
Lifting Operations
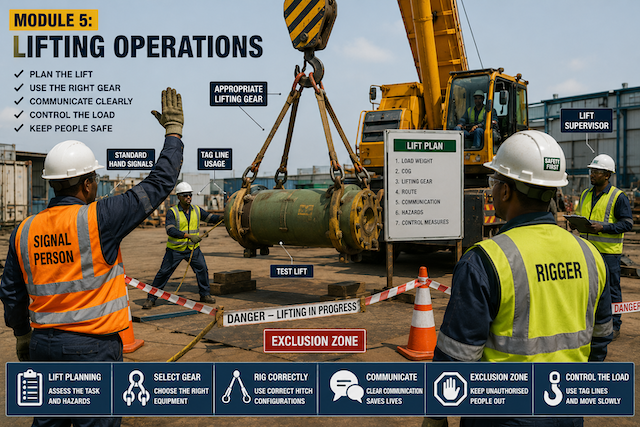
Introduction to Lifting Operations
A lifting operation is any activity where a load is raised, lowered, moved, or positioned using lifting equipment such as a crane, hoist, forklift attachment, chain block, gantry, or other lifting device.
A safe lifting operation is not just about attaching a sling and lifting the load. It involves planning, communication, correct equipment selection, inspection, supervision, and control of the work area.
The UK Health and Safety Executive explains that lifting operations must be properly planned, resourced, and organised by competent people because failed lifts can put people at serious risk.
Lift Planning
Lift planning means deciding how a load will be lifted safely before the operation begins.
A lift plan does not have to be complicated for every small routine lift, but every lift must be thought through. The higher the risk, the more detailed the plan should be.
HSE guidance states that a lifting plan should address the risks identified during risk assessment, the resources required, procedures, and responsibilities so the lifting operation is carried out safely.
A Good Lift Plan Should Answer
- What is being lifted?
- What is the weight of the load?
- Where is the centre of gravity?
- What lifting points will be used?
- What lifting equipment is required?
- What rigging accessories are needed?
- What is the route of the load?
- Where will the load be landed?
- Who is supervising the lift?
- Who is the rigger?
- Who is the crane operator?
- Who is the signal person?
- What communication method will be used?
- What hazards are present?
- What exclusion zone is required?
- What emergency procedure applies?
Key Information Needed Before a Lift
Before lifting starts, the lifting team must confirm important information.
| Information Required | Why It Matters |
|---|---|
| Load weight | Prevents overloading equipment |
| Load dimensions | Helps plan clearance and route |
| Centre of gravity | Helps prevent tilting and instability |
| Lifting points | Determines safe attachment points |
| Ground condition | Affects crane or equipment stability |
| Weather condition | Wind or rain can affect control |
| Overhead hazards | Prevents contact with power lines or structures |
| Landing area | Ensures the load can be safely placed |
| Personnel involved | Ensures roles are clear |
| Communication method | Prevents confusion during movement |
| Emergency plan | Prepares the team for unexpected events |
Practical Rule
If the load weight, lifting method, or communication plan is unclear, the lift should not proceed.
Basic Stages of a Lifting Operation
A safe lifting operation usually follows these stages:
1. Plan
Review the task, load, environment, hazards, equipment, and personnel.
2. Inspect
Inspect the lifting equipment and accessories before use.
3. Prepare
Set up the crane, hoist, lifting gear, exclusion zone, and communication system.
4. Rig
Attach the load using the correct slings, shackles, hooks, lifting points, and hitch configuration.
5. Test Lift
Raise the load slightly to check balance, stability, sling seating, and communication.
6. Lift and Move
Lift slowly and move the load along the planned route.
7. Land
Place the load safely on prepared supports or landing area.
8. De-rig
Remove lifting gear only when the load is stable and fully supported.
9. Review
Report any defects, near misses, or lessons learned.
Selection of Appropriate Lifting Gear
Selecting the right lifting gear is one of the most important decisions in any lifting operation.
CCOHS advises that lifting equipment, slings, and rigging hardware should be appropriate for the type and weight of the load, considering the hitch method, sling types, sling angles, WLL, and other factors that can affect the lift.
Factors to Consider When Selecting Lifting Gear
- Load weight
- Load shape
- Load size
- Centre of gravity
- Lifting points
- Sling angle
- Hitch type
- Working Load Limit
- Sharp edges
- Load temperature
- Surface finish
- Environmental conditions
- Chemical exposure
- Required load control
- Manufacturer instructions
Common Lifting Gear
| Equipment | Common Use |
|---|---|
| Wire rope sling | Heavy-duty lifting, rugged environments |
| Chain sling | Hot, sharp, heavy, abrasive loads |
| Synthetic webbing sling | Delicate or finished loads |
| Shackle | Connecting slings to lifting points |
| Hook | Connecting load or sling to lifting device |
| Eye bolt | Creating or using a lifting point |
| Lifting beam | Supporting loads with multiple lifting points |
| Spreader beam | Reducing sling angles on long or wide loads |
| Tag line | Controlling swing and rotation |
Important Rule
The lifting system is limited by its weakest component. A strong sling does not make the lift safe if the shackle, hook, or lifting point has a lower capacity.
Pre-Lift Equipment Check
Before lifting, check:
- WLL/SWL markings are visible.
- Inspection tags are valid.
- Slings are not cut, crushed, kinked, burnt, or chemically damaged.
- Shackles are not bent, cracked, or fitted with wrong pins.
- Hooks are not twisted and safety latches work properly.
- Eye bolts are properly seated and rated for lifting.
- Lifting beams or spreader beams are certified and not damaged.
- All parts are compatible.
- Sling angles are acceptable.
- The load is secure and stable.
If any item is defective, remove it from service and report it.
Rigging Methods and Hitch Configurations
A hitch is the way a sling is attached around or to a load. The hitch configuration affects load control, lifting capacity, and stability.
Common hitch configurations include:
- Vertical hitch
- Basket hitch
- Choker hitch
- Bridle hitch
- Multi-leg sling configuration
Vertical Hitch
A vertical hitch uses one sling leg directly between the hook and the load.
Best Used For
- Straight vertical lifting
- Loads with a certified single lifting point
- Simple controlled lifts
Safety Notes
- The load must not rotate freely.
- The lifting point must be rated.
- The sling must not be side-loaded.
- The load must remain balanced.
Basket Hitch
A basket hitch supports the load by passing the sling under the load, with both sling ends connected to the hook or lifting device.
Best Used For
- Balanced loads
- Cylindrical loads
- Loads that can be supported from underneath
- Loads requiring better support than a single vertical hitch
Safety Notes
- The load must not slide out of the sling.
- Sling legs must be balanced.
- Sharp edges must be protected.
- Sling angles must be considered.
- The load should be stable before lifting.
Choker Hitch
A choker hitch wraps the sling around the load and passes one end through the other to tighten around the load.
Best Used For
- Bundled materials
- Pipes
- Timbers
- Loads that need gripping action
Safety Notes
- Choker hitch reduces sling capacity.
- The choke point must be positioned correctly.
- The sling must not be forced or twisted.
- Do not choke fragile or easily damaged loads.
- Use edge protection where required.
Bridle Hitch and Multi-Leg Sling Configuration
A bridle hitch uses two or more sling legs connected to the load. Multi-leg slings can help lift loads with more than one lifting point.
Best Used For
- Loads with multiple lifting points
- Loads requiring balance
- Large or irregular loads
- Loads where one lifting point is not enough
Safety Notes
- The load may not be shared equally by all sling legs.
- Sling angles must be checked.
- The hook should be above the centre of gravity.
- Lifting points must be strong enough.
- Unequal sling lengths can overload one leg.
- Use a lifting beam or spreader beam if required.
Standard Hand Signals
Standard hand signals are used when the crane operator needs direction from the signal person. They are especially important where the operator cannot clearly see the load, landing area, or travel path.
OSHA requires signals to be used when the operator’s view is obstructed in the direction the equipment or load is travelling, when the operator’s view of the load’s landing area is obstructed, or when site-specific safety concerns require it. OSHA also states that non-standard hand signals must be agreed in advance by the signal person, operator, and lift director where applicable.
Common Crane Hand Signals
| Signal | Meaning |
|---|---|
| Hoist | Raise the load |
| Lower | Lower the load |
| Stop | Stop movement |
| Emergency stop | Stop immediately |
| Swing | Rotate the boom |
| Boom up | Raise the boom |
| Boom down | Lower the boom |
| Travel | Move crane or load as directed |
| Move slowly | Perform movement slowly |
| Dog everything | Stop and secure all movement |
Hand Signal Safety Rules
- Use only a trained and authorised signal person.
- Use one designated signal person at a time.
- The operator should obey emergency stop signals from anyone.
- Signals must be clear and visible.
- If the operator loses sight of the signal person, the lift should stop.
- Do not use confusing or improvised signals unless agreed before the lift.
- Use radios where hand signals are not visible.
Communication Between Rigger and Crane Operator
Good communication prevents confusion, sudden movement, and accidents.
Communication can be by:
- Standard hand signals
- Radio communication
- Verbal instruction
- Whistle signals, where approved
- Agreed site-specific signals
Communication Must Be
- Clear
- Simple
- Agreed before the lift
- Understood by all involved
- Continuous where necessary
- Stopped immediately if unclear
Radio Communication Best Practices
When using a radio:
- Test the radio before lifting.
- Use clear words.
- Avoid long explanations during active lifting.
- Identify the crane or operator if more than one crane is on site.
- Use agreed commands.
- Repeat critical instructions.
- Stop the lift if the radio fails.
Example Radio Commands
- “Crane 1, hoist slowly.”
- “Stop.”
- “Lower slowly.”
- “Hold position.”
- “Swing left slowly.”
- “Load clear.”
- “Landing area ready.”
- “Emergency stop.”
Important Rule
If communication is lost, unclear, or conflicting, stop the lift immediately.
Tag Line Usage
A tag line is a rope attached to a load to help control swing, rotation, and positioning during a lifting operation.
Tag lines are useful when a load may rotate, swing in the wind, or need guidance into position. A published safe-use guideline defines a tagline as a rope of suitable strength, construction, and length attached to a load to allow a rigger to control swinging or rotation during lifting or positioning.
When to Use a Tag Line
Use a tag line when:
- The load may rotate.
- The load is long or wide.
- Wind may affect the load.
- The load must be positioned accurately.
- Workers need to guide the load from a safe distance.
- The load has no safe handhold.
- The lift plan requires it.
Tag Line Safety Rules
- Use a rope of suitable length and condition.
- Keep hands and body away from pinch points.
- Do not wrap the tag line around your hand, wrist, arm, or body.
- Stand clear of the load path.
- Do not stand under the load.
- Do not pull against the crane.
- Do not use a damaged or tangled tag line.
- Do not use tag lines near rotating machinery or moving vehicles without control.
- Release the tag line if holding it becomes unsafe.
- Use more than one tag line for large or difficult loads if required.
What Tag Lines Should Not Be Used For
Tag lines should not be used to:
- Pull a load beyond the crane’s control.
- Drag a load on the ground.
- Stop a falling load.
- Replace proper rigging.
- Compensate for poor lift planning.
- Allow workers to stand in unsafe positions.
Exclusion Zones
An exclusion zone is a controlled area around a lifting operation where unauthorised people are not allowed to enter.
The purpose of an exclusion zone is to protect people from:
- Suspended loads
- Dropped objects
- Swinging loads
- Crane movement
- Pinch points
- Crushing points
- Rigging failure
- Falling equipment
HSE guidance states that where loads are suspended for significant periods, the area below should be treated as a danger zone with restricted access. OSHA also requires employers to use hoisting routes that minimise employee exposure to hoisted loads where available.
How to Set Up an Exclusion Zone
Use:
- Barricade tape
- Cones
- Barriers
- Signs
- Spotters
- Security personnel
- Verbal warning
- Site permit controls
Exclusion Zone Rules
- No one should stand under a suspended load.
- Only authorised persons should enter.
- Keep bystanders away.
- Keep the load path clear.
- Keep the landing area clear.
- Do not walk between the load and a fixed object.
- Do not stand in the line of fire.
- Stop the lift if someone enters the danger zone.
Line of Fire
The “line of fire” is any place where a person could be struck, trapped, crushed, or hit if the load moves unexpectedly.
Examples include:
- Under the load
- Between the load and a wall
- Between the load and a vehicle
- Near a swinging load
- Beside a tensioned sling or tag line
- Under the crane boom or hook path
Safe Lifting Sequence
A safe lifting operation should follow this sequence:
- Conduct toolbox talk.
- Review lift plan.
- Confirm roles and responsibilities.
- Inspect lifting equipment.
- Confirm load weight and centre of gravity.
- Select suitable lifting gear.
- Establish exclusion zone.
- Attach rigging correctly.
- Confirm communication method.
- Perform test lift.
- Lift slowly and smoothly.
- Control load with tag lines if required.
- Move along planned route.
- Land load safely.
- De-rig only when load is stable.
- Report defects or unsafe conditions.
Real-Life Scenario
A team is lifting a long steel pipe using a mobile crane. The pipe is heavy, smooth, and may rotate during movement. The operator cannot clearly see the landing area.
The correct lifting operation should include:
- A lift plan.
- Confirmed pipe weight.
- Suitable slings and shackles.
- Correct hitch configuration.
- Edge or surface protection where required.
- A designated signal person.
- Radio or clear hand-signal communication.
- Two tag lines to control rotation.
- A marked exclusion zone.
- A test lift before full movement.
- Slow movement to the landing point.
- Workers staying clear of the suspended load.
This is safer than rushing the lift with unclear signals and no tag line.
What a Rigger Should Never Do During Lifting Operations
A rigger should never:
- Start a lift without understanding the plan.
- Use lifting gear without inspection.
- Rig a load with unknown weight.
- Ignore the centre of gravity.
- Use damaged or unmarked lifting accessories.
- Stand under a suspended load.
- Allow people into the exclusion zone.
- Wrap a tag line around the hand or body.
- Give unclear signals to the crane operator.
- Allow multiple people to signal at the same time.
- Continue if communication is lost.
- Pull or push a suspended load with the body.
- Place hands near pinch points during tensioning.
- Move the load over people where avoidable.
- Leave a suspended load unattended.
- Continue lifting in unsafe weather or poor visibility.
Emergency Considerations During Lifting
Before the lift begins, the team should know what to do if something goes wrong.
Possible emergencies include:
- Load shift
- Sling failure
- Crane malfunction
- Dropped load
- Person entering exclusion zone
- Loss of communication
- Sudden wind
- Contact with structure
- Contact with power line
- Injury to worker
Emergency Response Actions
If something unsafe happens:
- Stop the lift immediately.
- Keep people away from the load.
- Lower the load if safe.
- Secure the area.
- Report to the supervisor.
- Call emergency support if needed.
- Do not restart until the situation has been assessed.
Quick Recap
A safe lifting operation requires planning, correct lifting gear, proper rigging methods, clear communication, tag line control, and effective exclusion zones. The lifting team must inspect equipment, confirm the load weight, agree on signals, perform a test lift, move the load slowly, and keep people away from suspended loads. If anything becomes unsafe, stop the lift immediately.