
Welding Positions
Introduction to Welding Positions
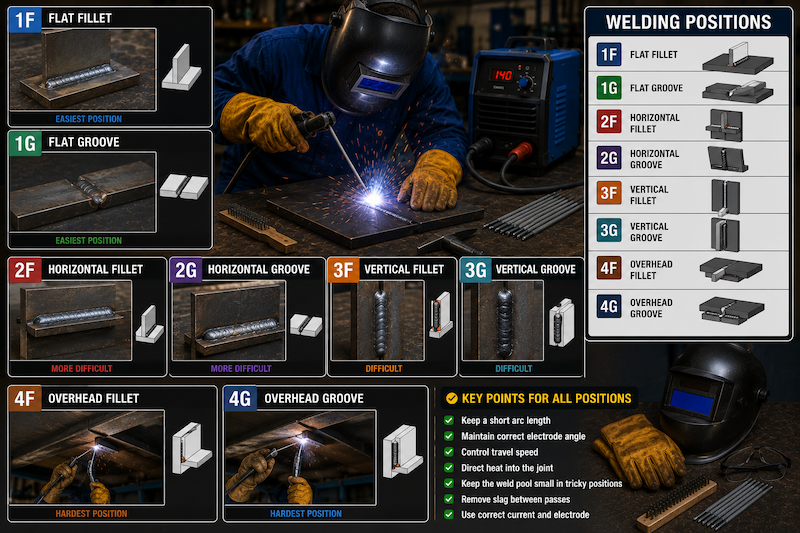
Welding positions describe the direction and placement of the weld joint while welding. In real fabrication and industrial work, a welder will not always weld on a flat table. Some jobs require welding on vertical surfaces, overhead structures, pipe supports, frames, tanks, gates, brackets, or already installed components.
A good welder must learn how to control the weld pool in different positions. This is important because gravity affects molten metal. Welding in the flat position is usually easier because the weld pool rests on the metal. Welding vertically or overhead is more difficult because the molten metal can run, sag, or drop if the welder does not control the arc, current, angle, and travel speed properly.
This module covers the basic welding positions used in arc welding:
- Flat position: 1F and 1G.
- Horizontal position: 2F and 2G.
- Vertical position: 3F and 3G.
- Overhead position: 4F and 4G.
Why Welding Positions Matter
Understanding welding positions helps trainees to:
- Weld in different job situations.
- Control the weld pool better.
- Select correct current and electrode technique.
- Avoid weld defects caused by gravity.
- Prepare for real workshop and site work.
- Improve confidence in difficult positions.
- Understand basic welding codes and position symbols.
- Build skill for fabrication, structural work, pipe supports, and repairs.
A welder who can only weld flat on a table is limited. A welder who can weld in several positions becomes more useful in the workplace.
Fillet Welds and Groove Welds
The welding-position codes in this module use two common letters:
| Letter | Meaning |
|---|---|
| F | Fillet weld |
| G | Groove weld |
A fillet weld is commonly used in lap joints, tee joints, and corner joints. It usually has a triangular shape and joins two surfaces at an angle.
A groove weld is commonly used in butt joints where two pieces are joined edge to edge. The edges may be square or prepared with a groove, such as a V-groove.
Basic Welding Position Codes
Common plate welding positions include:
| Code | Meaning |
|---|---|
| 1F | Flat fillet weld |
| 1G | Flat groove weld |
| 2F | Horizontal fillet weld |
| 2G | Horizontal groove weld |
| 3F | Vertical fillet weld |
| 3G | Vertical groove weld |
| 4F | Overhead fillet weld |
| 4G | Overhead groove weld |
The number shows the position, while the letter shows the weld type.
How Gravity Affects Welding
Gravity affects the molten weld pool. In flat welding, gravity helps keep the molten metal in the joint. In vertical and overhead welding, gravity can pull the molten metal downward before it freezes.
Because of gravity, difficult positions require better control of:
- Current.
- Electrode angle.
- Arc length.
- Travel speed.
- Weaving pattern.
- Weld pool size.
- Electrode selection.
- Body position.
- Heat input.
The harder the position, the more disciplined the welder must be.
General Rules for All Welding Positions
For every welding position:
- Wear full PPE.
- Clean the joint properly.
- Fit and tack the joint correctly.
- Attach the earth clamp to clean metal.
- Select a suitable electrode.
- Set correct current.
- Maintain a short arc.
- Control travel speed.
- Keep the electrode angle steady.
- Watch the weld pool.
- Remove slag after welding.
- Inspect the weld.
- Correct defects under trainer guidance.
Good welding habits remain the same in every position.
Position 1F: Flat Fillet Weld
The 1F position is a flat fillet weld. It is usually the easiest fillet position for beginners. The joint is positioned so the weld is deposited from above, allowing the molten metal to settle into the joint.
Common uses include:
- Tee joints on a table.
- Lap joints on a table.
- Brackets.
- Supports.
- Frames.
- Training practice.
- Light fabrication.
Flat fillet welding helps trainees learn basic weld pool control before moving to more difficult positions.
How to Weld in 1F Position
Steps:
- Clean both surfaces of the joint.
- Fit the pieces correctly.
- Tack weld both ends.
- Check alignment.
- Position the joint flat on the welding table.
- Set the correct current.
- Hold the electrode at about 45 degrees between both plates.
- Use a slight travel angle.
- Strike the arc at the start point.
- Direct the arc into the root of the joint.
- Move steadily along the joint.
- Fill the crater at the end.
- Chip, brush, and inspect.
The weld should fuse into both plates evenly.
1F Electrode Angle
For a tee joint in the 1F position:
- Work angle: about 45 degrees between the two plates.
- Travel angle: about 10 to 15 degrees in the direction of travel.
- Arc length: short and controlled.
- Movement: straight stringer bead or slight weave if needed.
If the electrode angle points too much toward one plate, the weld may fuse mostly on one side and be weak on the other side.
Common 1F Defects
Common defects in 1F include:
| Defect | Common Cause |
|---|---|
| Uneven leg length | Wrong electrode work angle |
| Lack of root fusion | Arc not directed into joint root |
| Undercut | High current, long arc, fast travel |
| Overlap | Low current or slow travel |
| Slag inclusion | Poor cleaning or wrong angle |
| Excessive spatter | Long arc or high current |
The most important habit in 1F is to direct the arc into the root while keeping the weld balanced on both plates.
Position 1G: Flat Groove Weld
The 1G position is a flat groove weld. It is commonly used for butt joints placed flat on the welding table. The weld is deposited from above along the joint line.
Common uses include:
- Joining two flat plates.
- Practice butt joints.
- Sheet and plate fabrication.
- Tank and frame components.
- Repair of flat plate sections.
This position teaches trainees how to keep the weld centered on a joint.
How to Weld in 1G Position
Steps:
- Cut two plates to the required size.
- Clean the edges.
- Prepare the edge if required.
- Align both plates edge to edge.
- Set root gap if instructed.
- Clamp the plates.
- Tack weld both ends.
- Check alignment.
- Strike the arc at the start point.
- Keep the electrode centered on the joint.
- Maintain a short arc.
- Move steadily.
- Fill the crater at the end.
- Chip, brush, and inspect.
The weld should fuse into both edges of the joint.
1G Electrode Angle
For a flat groove weld:
- Work angle: about 90 degrees to the plate surface or centered over the joint.
- Travel angle: about 10 to 15 degrees.
- Arc length: short.
- Movement: stringer bead for narrow joint; controlled weave for wider joint if instructed.
The electrode should not lean too much to one side, or one plate may receive more heat than the other.
Common 1G Defects
Common defects include:
| Defect | Common Cause |
|---|---|
| Bead not centered | Poor electrode positioning |
| Lack of fusion on one side | Wrong work angle |
| Burn-through | High current, slow travel, excessive gap |
| Poor penetration | Low current, fast travel, poor fit-up |
| Slag inclusion | Welding over slag or poor cleaning |
| Distortion | Too much heat or poor tack welding |
Good fit-up is very important in 1G welding.
Position 2F: Horizontal Fillet Weld
The 2F position is a horizontal fillet weld. In this position, the joint is placed so the weld is made along a horizontal line, usually on the side of a vertical plate meeting a horizontal plate.
The molten weld pool tends to sag downward, so the welder must control angle, current, and travel speed carefully.
Common uses include:
- Brackets fixed to vertical surfaces.
- Frames.
- Structural supports.
- Tee joints in a fixed position.
- Industrial fabrication.
- Repair work.
2F is more difficult than 1F because gravity pulls the weld pool downward.
How to Weld in 2F Position
Steps:
- Clean both surfaces.
- Fit the tee or lap joint properly.
- Tack the joint securely.
- Position the work in the horizontal fillet position.
- Use suitable current, usually slightly lower than flat if needed.
- Hold the electrode to direct more heat toward the upper plate edge and root.
- Keep a short arc.
- Move steadily along the horizontal joint.
- Avoid allowing the weld pool to sag.
- Fill the crater at the end.
- Chip, brush, and inspect.
The weld should be even and should not roll down onto the lower plate.
2F Electrode Angle
For 2F welding:
- Work angle may be slightly adjusted upward to fight sagging.
- Keep the arc directed into the root.
- Travel angle should remain steady.
- Arc length should be short.
- Avoid long arc because it increases spatter and poor control.
The welder may need to hold the electrode slightly more toward the upper plate than in 1F to prevent the weld from piling on the lower plate.
Common 2F Defects
Common defects include:
| Defect | Common Cause |
|---|---|
| Weld sags downward | Current too high, travel too slow |
| Undercut on upper plate | High current, wrong angle, fast travel |
| Overlap on lower plate | Slow travel, low heat, poor angle |
| Slag inclusion | Slag running ahead of weld pool |
| Uneven bead | Poor hand control |
| Lack of fusion at root | Arc not directed into root |
2F requires trainees to watch both the root and the lower edge of the weld pool.
Position 2G: Horizontal Groove Weld
The 2G position is a horizontal groove weld. The plates are usually vertical, and the weld is made horizontally across the joint.
This position is more difficult than 1G because gravity pulls molten metal downward while the joint line runs horizontally.
Common uses include:
- Plate butt joints in fixed vertical surfaces.
- Structural plates.
- Side-wall repairs.
- Tanks and vessels.
- Industrial fabrication practice.
How to Weld in 2G Position
Steps:
- Prepare the joint edges.
- Clean both sides of the joint.
- Align the plates vertically.
- Set the correct root gap where required.
- Tack the joint securely.
- Select suitable electrode and current.
- Strike the arc at the starting point.
- Keep the electrode centered on the joint.
- Control the weld pool to prevent sagging.
- Use stringer beads or controlled weave as instructed.
- Clean between passes if multi-pass welding is required.
- Inspect the weld after cleaning.
Good 2G welding requires strong control of bead placement and heat.
2G Technique Tips
Useful tips:
- Use a short arc.
- Reduce current slightly if the pool is too fluid.
- Keep movement steady.
- Do not let the weld pool become too large.
- Keep the bead centered.
- Clean thoroughly between passes.
- Use multiple smaller passes instead of one large uncontrolled pass.
- Watch for undercut along the top edge.
A large weld pool is difficult to control in 2G.
Common 2G Defects
| Defect | Common Cause |
|---|---|
| Sagging weld metal | High current or slow travel |
| Undercut at upper edge | Wrong angle, high current, long arc |
| Poor lower-side fusion | Electrode not centered |
| Slag inclusion | Poor cleaning or large weld pool |
| Uneven bead | Inconsistent speed |
| Lack of penetration | Low current or poor joint preparation |
2G develops the trainee’s ability to control gravity effects.
Position 3F: Vertical Fillet Weld
The 3F position is a vertical fillet weld. The joint is vertical, and the weld is made either upward or downward.
There are two common methods:
| Method | Description |
|---|---|
| Vertical-up | Welding from bottom to top |
| Vertical-down | Welding from top to bottom |
For training and stronger weld practice, vertical-up is commonly used because it can give better penetration when properly done. Vertical-down may be used for thinner materials or specific electrodes and procedures.
Why Vertical Welding Is Difficult
Vertical welding is difficult because molten metal wants to flow downward. The welder must keep the weld pool small and controlled.
Challenges include:
- Weld metal sagging.
- Slag running into the weld pool.
- Undercut.
- Poor penetration.
- Excessive buildup.
- Difficulty maintaining arc length.
- Hand fatigue.
- Poor visibility.
- Heat concentration.
Vertical welding requires patience and control.
How to Weld in 3F Vertical-Up Position
Steps:
- Clean the joint.
- Fit and tack the tee joint.
- Position the joint vertically.
- Set current slightly lower than flat welding if needed.
- Start at the bottom of the joint.
- Hold the electrode at the correct work angle.
- Use a short arc.
- Use a controlled upward movement.
- Pause slightly at the sides to allow fusion.
- Keep the weld pool small.
- Move upward steadily.
- Fill the end crater.
- Chip, brush, and inspect.
The key is to support the weld pool with controlled movement and proper heat.
3F Vertical-Up Techniques
Common techniques include:
- Small weave.
- Triangle pattern.
- Slight side-to-side movement.
- Pause at the sides.
- Move quickly through the centre.
- Keep arc short.
- Use controlled travel speed.
Do not make the weave too wide. Wide weaving can trap slag and overheat the joint.
3F Vertical-Down Awareness
Vertical-down welding is done from top to bottom. It may be used on thin materials with suitable electrodes and correct procedure.
However, vertical-down can produce poor penetration if done wrongly.
Trainees should only use vertical-down when instructed by the trainer and when the electrode and job are suitable.
Common 3F Defects
| Defect | Common Cause |
|---|---|
| Weld metal runs downward | Current too high, pool too large |
| Slag inclusion | Slag runs ahead of weld pool |
| Undercut | High current, long arc, fast movement |
| Lack of fusion | Moving too fast or poor side pauses |
| Excessive buildup | Moving too slowly |
| Uneven bead | Poor weaving control |
| Porosity | Long arc, dirty metal, damp electrode |
Vertical welding requires a short arc and good pool control.
Position 3G: Vertical Groove Weld
The 3G position is a vertical groove weld. The joint is vertical, and the weld is made vertically, usually upward for training and stronger weld practice.
3G is more demanding because the welder must control the molten metal inside a groove while working against gravity.
Common uses include:
- Vertical plate butt joints.
- Structural fabrication.
- Tank work.
- Repair of vertical plates.
- Welding qualification practice.
How to Weld in 3G Vertical-Up Position
Steps:
- Prepare joint edges correctly.
- Clean both plates.
- Set proper root gap if instructed.
- Tack the plates securely.
- Start at the bottom.
- Use correct electrode and current.
- Maintain a short arc.
- Control the weld pool with small movements.
- Ensure fusion at both sidewalls.
- Clean slag completely between passes.
- Add fill passes if required.
- Complete final cap pass.
- Chip, brush, and inspect.
3G often requires multi-pass welding and careful slag removal.
3G Technique Tips
Useful tips:
- Do not rush the root pass.
- Keep the weld pool small.
- Use lower current if the pool becomes too fluid.
- Pause at sidewalls for fusion.
- Do not let slag overtake the weld pool.
- Clean thoroughly between passes.
- Use stringer beads where required.
- Maintain comfortable body position.
3G helps develop advanced control and discipline.
Common 3G Defects
| Defect | Common Cause |
|---|---|
| Lack of sidewall fusion | Not pausing at sides |
| Slag inclusion | Poor cleaning or bad pool control |
| Excessive reinforcement | Moving too slowly |
| Undercut | High current, poor side control |
| Poor penetration | Low current or poor root technique |
| Uneven cap | Inconsistent weaving or travel speed |
3G requires practice and patience.
Position 4F: Overhead Fillet Weld
The 4F position is an overhead fillet weld. The joint is above the welder, and welding is done from underneath. This is one of the most difficult and uncomfortable positions.
Overhead welding requires excellent PPE, short arc length, controlled current, and small weld pool control.
Common uses include:
- Under-frame repairs.
- Structural steel.
- Equipment installed above the welder.
- Ceiling supports.
- Shipbuilding and maintenance.
- Industrial repairs.
Safety in Overhead Welding
Overhead welding is risky because sparks, slag, and molten metal can fall toward the welder.
Safety rules:
- Wear full PPE.
- Use proper welding helmet.
- Wear leather jacket or apron.
- Wear proper gloves.
- Protect neck and arms.
- Button sleeves and close openings.
- Wear safety boots.
- Remove flammable materials below.
- Protect other people nearby.
- Keep body positioned away from falling spatter where possible.
- Never weld overhead without trainer approval.
Overhead welding should be introduced only after trainees have built basic control.
How to Weld in 4F Position
Steps:
- Clean and fit the joint.
- Tack weld securely.
- Position yourself safely under the joint.
- Set current slightly lower if needed.
- Keep a short arc.
- Direct the arc into the joint root.
- Keep the weld pool small.
- Move steadily.
- Avoid excessive weaving.
- Stop smoothly and fill crater.
- Allow slag to cool.
- Chip carefully with eye protection.
- Inspect the weld.
Overhead welding requires small controlled welds, not a large fluid pool.
4F Technique Tips
Useful tips:
- Use a short arc.
- Use correct current; avoid excessive heat.
- Keep electrode angle steady.
- Use stringer beads where possible.
- Avoid wide weaving.
- Watch for molten metal sagging.
- Use small controlled passes.
- Keep slag behind the weld pool.
- Maintain a comfortable stance.
- Take breaks when needed.
The weld pool should be small enough to freeze quickly.
Common 4F Defects
| Defect | Common Cause |
|---|---|
| Weld metal dropping | Current too high, pool too large |
| Overlap | Low current or poor pool control |
| Lack of fusion | Travel too fast or poor angle |
| Undercut | High current or long arc |
| Slag inclusion | Poor cleaning or slag ahead of pool |
| Uneven bead | Poor body position or fatigue |
| Excessive spatter | Long arc or high current |
Overhead welding requires discipline and strong PPE compliance.
Position 4G: Overhead Groove Weld
The 4G position is an overhead groove weld. The joint is above the welder and usually involves welding a butt joint from underneath.
4G is more challenging than 4F because the welder must control molten metal in a groove overhead.
Common uses include:
- Structural plate welding.
- Shipbuilding.
- Repair under structures.
- Industrial installations.
- Welding qualification tests.
4G should only be practised after the trainee is comfortable with flat, horizontal, and vertical welding.
How to Weld in 4G Position
Steps:
- Prepare the groove properly.
- Clean both edges.
- Tack the joint securely.
- Wear full overhead welding PPE.
- Set suitable current.
- Use a short arc.
- Keep the weld pool small.
- Deposit the root or first pass carefully.
- Clean slag thoroughly.
- Add fill passes if required.
- Complete cap pass.
- Clean and inspect.
Each pass must be controlled. Rushing overhead groove welding leads to defects.
4G Technique Tips
Useful tips:
- Use smaller electrodes where appropriate.
- Reduce current slightly if the pool is too fluid.
- Maintain a very short arc.
- Use stringer beads.
- Avoid large weave patterns.
- Clean completely between passes.
- Position your body for stability.
- Protect yourself from falling slag.
- Inspect after every pass.
Good 4G welding depends on small, controlled weld pools.
Common 4G Defects
| Defect | Common Cause |
|---|---|
| Lack of fusion | Poor angle, fast travel, low heat |
| Slag inclusion | Poor cleaning or incorrect pass placement |
| Excessive reinforcement | Moving too slowly |
| Undercut | High current or long arc |
| Drooping weld metal | Excessive heat or wide pool |
| Porosity | Long arc, contamination, damp electrode |
4G requires high concentration and careful technique.
Choosing Current for Different Positions
Welding current may need adjustment depending on the position.
General guide:
| Position | Current Consideration |
|---|---|
| Flat | Normal recommended current range |
| Horizontal | Slight adjustment may be needed to reduce sagging |
| Vertical | Often slightly lower current to control pool |
| Overhead | Often slightly lower current and smaller pool control |
Do not reduce current too much, or lack of fusion and slag inclusion may occur. Current must remain high enough for proper fusion.
Electrode Selection for Positions
Not all electrodes are suitable for all positions. Electrode classification and manufacturer guidance should be checked.
For basic training:
- E6013 may be used for many beginner position exercises.
- E7018 may be used for stronger weld training where proper storage and technique are required.
- Some electrodes are easier in flat and horizontal positions.
- Some electrodes are not suitable for vertical or overhead use.
Always confirm that the electrode is suitable for the position before welding.
Body Position and Comfort
Good body position becomes more important as positions become difficult.
Before welding:
- Plan your movement.
- Place your feet firmly.
- Avoid overreaching.
- Support your welding arm where safe.
- Keep cables from pulling your hand.
- Position your head for visibility.
- Keep your body away from falling sparks where possible.
- Practise the hand movement before striking the arc.
- Take short breaks if fatigued.
Poor body position leads to shaky welds and unsafe movement.
Cleaning Between Passes in All Positions
For multi-pass welds in any position:
- Allow the pass to cool slightly.
- Wear goggles.
- Chip all slag.
- Brush thoroughly.
- Inspect the pass.
- Remove defects before continuing.
- Restart properly.
- Continue with the next pass.
Welding over slag is a major cause of weld defects.
Common Welding Position Mistakes
Avoid these mistakes:
- Using flat-position technique in every position.
- Using too much current in vertical or overhead welding.
- Holding a long arc.
- Allowing slag to run ahead of the weld pool.
- Making the weld pool too large.
- Weaving too widely.
- Poor body position.
- Welding without proper overhead protection.
- Failing to clean between passes.
- Poor fit-up before position welding.
- Ignoring gravity effect.
- Rushing difficult positions.
Each position requires adjustment and control.
What a Welding Trainee Should Never Do
A welding trainee should never:
- Weld in a new position without trainer approval.
- Attempt overhead welding without full PPE.
- Stand under falling slag without protection.
- Use damaged cables in any position.
- Weld above flammable materials.
- Use an electrode unsuitable for the position.
- Weld with a long arc in vertical or overhead positions.
- Weld over slag.
- Force wide weaving without control.
- Ignore poor fusion or sagging weld metal.
- Continue welding when molten metal is falling dangerously.
- Touch overhead slag or weld metal with bare hands.
Practical Exercise 1: 1F Flat Fillet Weld
Task:
Perform a fillet weld on a tee joint in the flat position.
Trainees should focus on:
- 45-degree work angle.
- Short arc.
- Root fusion.
- Even leg length.
- Steady travel speed.
- Slag removal.
- Visual inspection.
Assessment:
- Weld should be balanced on both plates.
- No major undercut.
- No visible slag inclusion.
- Bead should be consistent.
Practical Exercise 2: 1G Flat Groove Weld
Task:
Weld two plates edge to edge in the flat position.
Trainees should focus on:
- Edge cleaning.
- Proper alignment.
- Tack weld placement.
- Centering the bead.
- Good penetration.
- Controlled start and stop.
- Slag removal.
Assessment:
- Bead should be centered.
- Fusion should appear even.
- No major visible holes, cracks, or slag traps.
Practical Exercise 3: 2F Horizontal Fillet Weld
Task:
Perform a horizontal fillet weld on a tee joint.
Trainees should focus on:
- Controlling sagging.
- Correct electrode angle.
- Directing arc into root.
- Maintaining short arc.
- Avoiding undercut on upper plate.
- Keeping bead uniform.
Assessment:
- Weld should not roll downward.
- Upper plate should not be undercut.
- Root should show good fusion.
Practical Exercise 4: 3F Vertical Fillet Weld
Task:
Perform a vertical-up fillet weld.
Trainees should focus on:
- Starting from the bottom.
- Keeping weld pool small.
- Using controlled weave.
- Pausing at sides.
- Moving upward steadily.
- Avoiding sagging.
- Cleaning and inspecting.
Assessment:
- Bead should not run downward.
- Fusion should be visible on both plates.
- Weld should be uniform.
Practical Exercise 5: 4F Overhead Fillet Weld
Task:
Perform a basic overhead fillet weld under strict trainer supervision.
Trainees should focus on:
- Full PPE.
- Short arc.
- Small weld pool.
- Correct current.
- Safe body position.
- Avoiding falling spatter.
- Cleaning and inspection.
Assessment:
- Weld should remain in the joint.
- No excessive drooping.
- No major lack of fusion.
- Work area should remain safe.
Practical Exercise 6: Position Comparison
Task:
Run similar fillet welds in 1F, 2F, 3F, and 4F positions and compare results.
Trainees should observe:
- How gravity affects the weld pool.
- How current may need adjustment.
- How electrode angle changes.
- How body position affects control.
- Which defects appear in each position.
- How slag behaves in different positions.
This exercise helps trainees understand that welding position changes technique.
Real-Life Scenario
A trainee can produce good fillet welds on a flat table. During a practical exercise, the trainer asks him to weld a tee joint in the vertical position. The trainee uses the same speed and current as flat welding, but the molten weld pool starts running downward.
The trainer explains that vertical welding needs a smaller, more controlled weld pool. The trainee reduces the current slightly, keeps a shorter arc, starts from the bottom, and uses a small controlled weave with a pause at each side. The next weld shows better shape and less sagging.
The key lesson is that different welding positions require different control. A good welder adjusts technique based on the position.
Practical Skill Checklist
| Skill | Competent |
|---|---|
| Identifies 1F, 1G, 2F, 2G, 3F, 3G, 4F, and 4G | |
| Explains difference between fillet and groove welds | |
| Performs 1F flat fillet weld | |
| Performs 1G flat groove weld | |
| Performs 2F horizontal fillet weld | |
| Demonstrates awareness of 2G horizontal groove weld | |
| Performs 3F vertical fillet weld under supervision | |
| Demonstrates awareness of 3G vertical groove weld | |
| Performs 4F overhead fillet weld under supervision | |
| Demonstrates awareness of 4G overhead groove weld | |
| Adjusts current for position where required | |
| Maintains short arc in difficult positions | |
| Controls weld pool in vertical position | |
| Uses correct PPE for overhead welding | |
| Cleans slag between passes | |
| Identifies common position-related defects |
Quick Recap
Welding positions describe how the joint is placed during welding. The main plate positions are flat, horizontal, vertical, and overhead. Fillet weld positions are marked with F, while groove weld positions are marked with G. Flat welding, such as 1F and 1G, is usually easiest for beginners. Horizontal welding, such as 2F and 2G, requires control to prevent sagging. Vertical welding, such as 3F and 3G, requires a small weld pool, short arc, controlled movement, and careful heat control. Overhead welding, such as 4F and 4G, is more difficult and requires full PPE, small controlled welds, and strong safety awareness. A good welder adjusts current, angle, arc length, travel speed, and body position according to the welding position.