
Metal Preparation
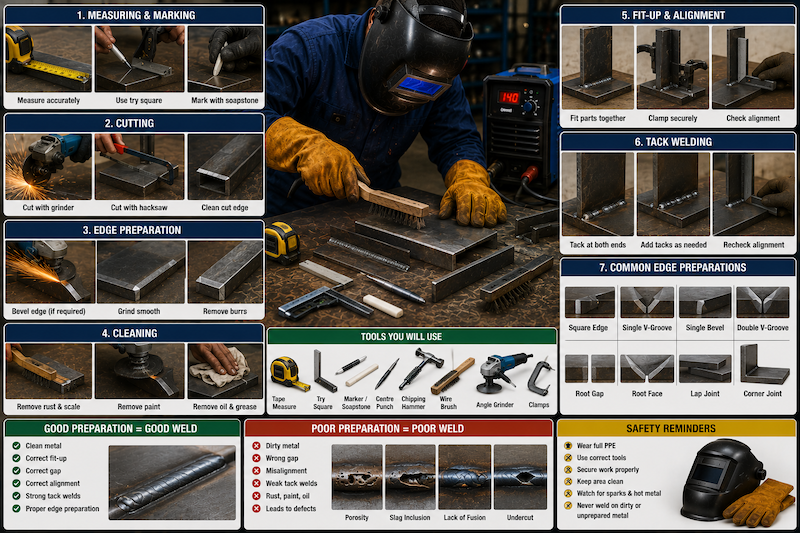
Introduction to Metal Preparation
Metal preparation is the process of getting metal ready before welding. It includes measuring, marking out, cutting, edge preparation, grinding, cleaning, fit-up, and alignment.
Good welding does not begin when the arc is struck. It begins before welding, during preparation. If metal is poorly measured, badly cut, dirty, rusty, oily, wrongly aligned, or poorly fitted, the weld quality will suffer.
A good welder must understand that preparation affects strength, appearance, accuracy, and durability. A neat weld on poorly prepared metal can still produce a poor job.
Why Metal Preparation Is Important
Metal preparation helps to:
- Improve weld quality.
- Improve joint strength.
- Reduce welding defects.
- Improve fit-up and alignment.
- Reduce gaps and distortion.
- Make welding easier.
- Improve final appearance.
- Reduce rework.
- Save time and materials.
- Improve safety in the workshop.
Many welding problems are caused by poor preparation, not only poor welding technique.
Common Metal Preparation Activities
Metal preparation may include:
- Reading the job instruction or drawing.
- Selecting the correct material.
- Measuring the material.
- Marking cutting lines.
- Checking squareness.
- Cutting metal to size.
- Removing sharp edges.
- Beveling edges where required.
- Grinding rust, paint, oil, or scale.
- Cleaning joint surfaces.
- Setting correct root gap.
- Aligning parts.
- Clamping parts.
- Tack welding before final welding.
Preparation should be done carefully and checked before welding begins.
Basic Metal Preparation Workflow
Use this simple workflow:
- Understand the job requirement.
- Select the correct material.
- Inspect the material.
- Measure accurately.
- Mark out clearly.
- Cut safely.
- Prepare the edges.
- Grind and clean the joint area.
- Fit the parts together.
- Align and clamp.
- Tack weld.
- Recheck measurements and squareness.
- Weld only after proper confirmation.
A professional welder measures, prepares, checks, and then welds.
Understanding the Job Requirement
Before preparing metal, understand what you are making or repairing.
Ask:
- What is the required length, width, and height?
- What material is required?
- What thickness is required?
- What type of joint is needed?
- Is the joint a butt, lap, tee, corner, or edge joint?
- Does the edge need beveling?
- Is a root gap required?
- Does the work need to be square?
- Is the weld temporary or permanent?
- Is the job structural or non-structural?
- What finish is expected?
Do not cut or weld until the job requirement is clear.
Selecting the Correct Metal
Different jobs require different materials. For beginner welding practice, mild steel is commonly used because it is available, affordable, and suitable for arc welding.
Common workshop metals include:
| Metal Type | Common Use |
|---|---|
| Mild steel plate | Practice welds, brackets, frames |
| Flat bar | Gates, supports, frames |
| Angle iron | Frames, supports, stands |
| Square pipe / hollow section | Gates, rails, furniture, frames |
| Round pipe | Handrails, supports, pipe fabrication |
| Channel | Structural and support work |
| Stainless steel | Food, chemical, decorative, corrosion-resistant work |
| Cast iron | Repairs, machine parts, engine components |
The welding electrode and preparation method must match the type of metal.
Inspecting Metal Before Preparation
Before measuring or cutting, inspect the metal.
Check for:
- Rust.
- Oil or grease.
- Paint.
- Cracks.
- Bends.
- Dents.
- Lamination.
- Wrong thickness.
- Wrong length.
- Sharp edges.
- Moisture.
- Dirt.
- Coatings such as galvanising.
Do not assume all metal is ready for welding.
Measuring and Marking Out
Measuring and marking out means using measuring tools to mark the correct size, shape, cut line, hole location, or weld position on the metal.
Good measuring and marking help the welder cut accurately and assemble parts properly.
Common tools include:
- Tape measure.
- Steel rule.
- Try square.
- Combination square.
- Spirit level.
- Divider.
- Scriber.
- Soapstone.
- Chalk.
- Marker.
- Centre punch.
- Straight edge.
- Protractor.
A wrong measurement can waste material and cause poor fit-up.
Measuring Accurately
Good measuring practice includes:
- Use the correct tool.
- Check the measuring unit.
- Hold the tape or ruler straight.
- Measure from the correct reference point.
- Read the measurement at eye level.
- Avoid bending the tape.
- Mark clearly.
- Measure twice before cutting.
- Confirm with the drawing or instruction.
- Ask the trainer if unsure.
The common workshop rule is: measure twice, cut once.
Common Measuring Tools
| Tool | Use |
|---|---|
| Tape measure | Measuring longer lengths |
| Steel rule | Short, accurate measurements |
| Try square | Checking and marking 90-degree angles |
| Combination square | Marking 90-degree and 45-degree lines |
| Spirit level | Checking level and vertical alignment |
| Scriber | Making fine marks on metal |
| Soapstone | Making visible marks for welding and cutting |
| Centre punch | Marking drilling points |
| Divider | Marking circles or equal spacing |
| Protractor | Measuring angles |
Each tool should be used for its correct purpose.
Tape Measure Use
A tape measure is useful for measuring long lengths of plate, bar, pipe, or frame members.
Good practice:
- Hook the tape properly at the starting edge.
- Pull the tape straight.
- Keep it flat on the metal.
- Read the mark clearly.
- Mark the measurement with soapstone or scriber.
- Check again before cutting.
Do not allow the tape to bend or sag during measurement.
Steel Rule Use
A steel rule is useful for short and accurate measurements.
Use it for:
- Small plate measurements.
- Edge marking.
- Checking gap.
- Measuring bead width.
- Short layout marks.
- Confirming small dimensions.
Do not use a steel rule as a hammer, scraper, or lever.
Try Square Use
A try square helps mark and check 90-degree angles.
Use it to:
- Mark straight cross-cut lines.
- Check corners of frames.
- Check tee joint alignment.
- Check plate squareness.
- Align bars before tack welding.
If a frame is not square before welding, welding may lock it permanently in the wrong shape.
Marking Tools
Marking tools help the welder see where to cut, grind, bend, drill, or weld.
Common marking tools include:
| Tool | Best Use |
|---|---|
| Soapstone | Heat-resistant visible marking |
| Chalk | Temporary marking |
| Marker | General marking |
| Scriber | Fine permanent line |
| Centre punch | Starting point for drilling |
Soapstone is common in welding workshops because the mark is visible and can survive heat better than ordinary ink.
Marking Out Procedure
Basic marking steps:
- Clean the surface lightly.
- Identify the reference edge.
- Measure the required length or position.
- Mark the point.
- Use a square or straight edge to draw the line.
- Check the measurement again.
- Mark waste side if needed.
- Punch drilling points where required.
- Confirm with trainer before cutting.
Clear marking reduces cutting mistakes.
Allowance for Cutting
When cutting metal, the cutting tool removes some material. This is called kerf. The kerf depends on the cutting method.
Cutting methods that remove material include:
- Hacksaw.
- Cut-off saw.
- Angle grinder cutting disc.
- Plasma cutter.
- Oxy-fuel cutting.
- Shearing.
When accuracy is important, mark and cut carefully so the final size is correct after the cut.
Cutting and Edge Preparation
Cutting is the process of separating metal into the required length or shape. Edge preparation is the process of shaping or cleaning the cut edges before welding.
Cutting may be done using:
- Hacksaw.
- Angle grinder with cutting disc.
- Cut-off saw.
- Shearing machine.
- Oxy-fuel cutting.
- Plasma cutting.
- Bandsaw.
- Mechanical saw.
The cutting method depends on metal thickness, available tools, required accuracy, and job type.
Cutting Safety
Before cutting:
- Wear goggles or face shield.
- Wear gloves.
- Secure the metal firmly.
- Use the correct cutting tool.
- Keep sparks away from flammable materials.
- Keep hands away from cutting path.
- Do not force the tool.
- Stand in a stable position.
- Keep bystanders away.
- Allow hot cut edges to cool.
- Remove sharp burrs after cutting.
Cutting is not a small task. It can cause serious injuries if done carelessly.
Cutting With an Angle Grinder
An angle grinder can be used to cut metal with a cutting disc.
Safety rules:
- Use the correct cutting disc.
- Do not use a grinding disc for cutting.
- Do not use a cracked disc.
- Keep the guard fitted.
- Hold the grinder with both hands.
- Wear goggles or face shield.
- Keep sparks away from people.
- Do not twist the disc inside the cut.
- Let the disc reach full speed before cutting.
- Allow the disc to stop before putting the grinder down.
A cutting disc is thin and can break if misused.
Cutting With a Hacksaw
A hacksaw is useful for small metal pieces and manual cutting.
Good practice:
- Clamp the metal firmly.
- Use the correct blade.
- Hold the saw straight.
- Use steady forward strokes.
- Do not force the blade.
- Keep fingers away from the cut line.
- Replace dull or broken blades.
- Deburr the cut after sawing.
A hacksaw is slower than a grinder but can give good control on small jobs.
Cutting With Oxy-Fuel or Plasma
Oxy-fuel and plasma cutting may be used for thicker metal or faster cutting. These methods require special training and safety precautions.
Important safety points:
- Use only if trained and authorised.
- Wear correct PPE.
- Keep flammable materials away.
- Check gas hoses and connections.
- Use flashback arrestors where required.
- Control sparks and hot slag.
- Ensure ventilation.
- Keep fire extinguisher nearby.
- Handle cylinders safely.
- Do not cut sealed containers.
Trainees should only use gas or plasma cutting under proper supervision.
Edge Preparation
Edge preparation means preparing the edges of the metal before welding. Proper edge preparation improves penetration, fusion, and weld strength.
Edge preparation may include:
- Removing burrs.
- Grinding sharp edges.
- Cleaning rust and scale.
- Beveling thick plates.
- Creating a root gap.
- Aligning edges.
- Removing paint or coatings.
- Squaring cut edges.
- Removing cracks or damaged metal.
Poor edge preparation can cause weak welds even if the welding technique is good.
Burr Removal
A burr is a sharp rough edge left after cutting.
Burrs should be removed because they can:
- Cut hands.
- Prevent proper fit-up.
- Create gaps.
- Affect alignment.
- Trap slag or dirt.
- Cause poor weld appearance.
Use a file, grinder, or deburring tool to remove burrs safely.
Beveling Edges
Beveling means grinding or cutting an angled edge on metal before welding. It is commonly used on thicker plates to allow deeper weld penetration.
Beveling may be required for:
- Thick butt joints.
- Groove welds.
- Full penetration welds.
- Multi-pass welding.
- Structural components.
- Pipe welding.
A bevel creates space for the weld metal to fill and fuse properly into the joint.
Common Edge Preparations for Butt Joints
| Edge Preparation | Use |
|---|---|
| Square edge | Thin to medium metal |
| Single V-groove | Thicker metal welded from one side |
| Double V-groove | Thick metal welded from both sides |
| Single bevel | One plate edge is bevelled |
| Root face | Small flat area at the root to prevent burn-through |
| Root gap | Space between plates to allow root penetration |
Beginners usually start with square edges, then progress to bevelled joints.
Root Gap
Root gap is the small space between two parts in a butt joint. It helps the weld penetrate through the joint.
If the root gap is too small:
- Penetration may be poor.
- Weld may sit on the surface.
- Root fusion may be weak.
If the root gap is too large:
- Burn-through may occur.
- Weld pool may be hard to control.
- Excessive filler may be needed.
- Distortion may increase.
The correct root gap depends on material thickness, electrode size, joint type, and job specification.
Root Face
Root face is the small flat land left at the bottom of a bevel. It helps control penetration and prevents the edge from burning away too easily.
If the root face is too large:
- Penetration may be poor.
If the root face is too small:
- Burn-through may occur.
Root face and root gap must work together for good groove welding.
Grinding and Cleaning
Grinding and cleaning remove contamination and prepare surfaces for welding. Welding over dirty metal can cause defects.
Remove:
- Rust.
- Paint.
- Oil.
- Grease.
- Dirt.
- Moisture.
- Mill scale where required.
- Galvanised coating where safe and authorised.
- Old weld defects.
- Sharp burrs.
- Uneven cut edges.
Clean metal improves arc stability, fusion, and weld appearance.
Why Cleaning Is Important
Cleaning helps prevent:
- Porosity.
- Slag inclusion.
- Lack of fusion.
- Poor penetration.
- Excessive spatter.
- Cracking.
- Poor bead appearance.
- Fume hazards from burning coatings.
- Contamination between metals.
A dirty joint is one of the most common causes of poor welding.
Cleaning Tools
Common cleaning tools include:
| Tool | Use |
|---|---|
| Wire brush | Removes loose rust, slag, dirt |
| Angle grinder | Removes heavy rust, paint, scale, bevels edges |
| File | Smooths sharp edges |
| Scraper | Removes paint, dirt, or slag |
| Sandpaper / emery cloth | Light surface cleaning |
| Clean cloth | Wipes dust and oil |
| Solvent / degreaser | Removes oil or grease, if approved |
| Chipping hammer | Removes slag from previous welds |
Use the correct tool for the level of cleaning required.
Grinding Before Welding
Grinding before welding may be used to:
- Remove rust.
- Remove mill scale.
- Remove paint.
- Remove old weld material.
- Bevel edges.
- Smooth cuts.
- Create good fit-up.
- Clean tack weld areas.
- Prepare repair areas.
Do not over-grind and reduce the metal thickness unnecessarily.
Grinding Safety
When grinding:
- Wear goggles or face shield.
- Wear gloves.
- Wear hearing protection where needed.
- Keep the grinder guard fitted.
- Use the correct disc.
- Hold the grinder with both hands.
- Keep sparks away from people and flammable materials.
- Secure the workpiece.
- Do not use cracked discs.
- Allow the disc to stop before putting it down.
- Do not grind toward your body.
Grinding accidents are common when workers rush or remove guards.
Cleaning Oil and Grease
Oil and grease must be removed before welding because they can cause porosity, smoke, fire, and poor weld quality.
Cleaning steps:
- Wipe off excess oil or grease.
- Use approved degreaser if available.
- Allow the area to dry completely.
- Grind or brush if required.
- Keep cleaned surfaces free from contamination.
Never weld oily material without cleaning.
Cleaning Painted Metal
Paint should be removed from the weld area before welding.
Reasons:
- Paint can cause fumes.
- Paint can contaminate the weld.
- Paint can cause porosity.
- Paint can reduce fusion.
- Paint may catch fire.
Remove paint from the joint area and surrounding heat-affected area where necessary.
Cleaning Rusty Metal
Rust can interfere with the arc and weld quality.
Light rust may be removed with:
- Wire brush.
- Sandpaper.
- Grinder.
- Scraper.
Heavy rust may require:
- Grinding.
- Cutting out damaged areas.
- Replacing the metal.
- More detailed repair preparation.
Do not assume rust will disappear during welding. Clean it first.
Welding Galvanised Metal Warning
Galvanised metal is coated with zinc. Welding galvanised metal can produce hazardous fumes.
Trainees should not weld galvanised metal unless:
- They are trained.
- The coating is properly removed from the weld area.
- Ventilation is adequate.
- Respiratory protection is used if required.
- The trainer or supervisor authorises the work.
If a metal gives off heavy white fumes, stop and report immediately.
Fit-Up and Alignment
Fit-up means placing the metal parts together correctly before welding. Alignment means ensuring they are in the correct position, angle, level, and dimension.
Good fit-up and alignment are necessary for:
- Strong welds.
- Correct dimensions.
- Reduced distortion.
- Easier welding.
- Neat appearance.
- Less grinding and correction.
- Professional fabrication.
Poor fit-up cannot always be corrected by adding more weld.
Common Fit-Up Checks
Before welding, check:
- Are the parts the correct size?
- Are the edges clean?
- Are the gaps correct?
- Are the parts square?
- Are the parts level?
- Are the pieces aligned?
- Are the clamps secure?
- Are the tack welds strong enough?
- Is the joint accessible for welding?
- Is there enough space for electrode movement?
Fit-up should be checked before final welding begins.
Alignment Tools
Tools for fit-up and alignment include:
- Try square.
- Combination square.
- Spirit level.
- Straight edge.
- Tape measure.
- Clamps.
- Magnetic square.
- Bench vice.
- Welding table.
- Spacers.
- Wedges.
- Tack welds.
Good alignment tools help reduce guessing.
Clamping
Clamps hold parts in position during fitting and welding.
Common clamps include:
- G-clamp.
- C-clamp.
- Locking pliers.
- Bar clamp.
- Magnetic clamp.
- Bench vice.
Clamps help prevent movement during tack welding and final welding.
Tack Welding During Fit-Up
Tack welds are small welds used to hold parts in position before final welding.
Good tack welding helps:
- Maintain alignment.
- Hold root gap.
- Reduce movement.
- Prevent parts from shifting.
- Control distortion.
- Allow checking before final welding.
Tack welds should be strong enough to hold but not too large or poorly placed.
Checking Squareness
Squareness means checking that parts meet at 90 degrees where required.
Use:
- Try square.
- Combination square.
- Measuring diagonals.
- Frame alignment check.
For rectangular frames, measuring diagonals is useful. If both diagonal measurements are equal, the frame is likely square.
Measuring Diagonals
To check a rectangular frame:
- Measure from one corner to the opposite corner.
- Measure the other diagonal.
- Compare both measurements.
- If equal, the frame is square.
- If not equal, adjust before final welding.
Tack welds should allow small adjustment before final welding.
Controlling Gap
A gap is the space between parts before welding.
Some gaps are required, such as root gaps in butt joints. Other gaps happen because of poor cutting or fit-up.
Too much gap can cause:
- Burn-through.
- Excessive weld metal.
- Distortion.
- Poor appearance.
- Difficulty controlling the weld pool.
Too little gap can cause:
- Poor penetration.
- Lack of root fusion.
The correct gap depends on the joint and welding procedure.
Distortion Awareness During Preparation
Welding heat can cause metal to move, pull, bend, or twist. Good preparation helps reduce distortion.
Control methods include:
- Accurate fit-up.
- Proper tack welding.
- Clamping.
- Balanced welding sequence.
- Avoiding excessive weld size.
- Allowing cooling.
- Using correct current.
- Avoiding unnecessary heat.
A well-prepared job is easier to control during welding.
Preparing Different Joint Types
Different joints require different preparation.
| Joint Type | Preparation Focus |
|---|---|
| Butt joint | Straight edges, root gap, alignment |
| Lap joint | Clean overlap area, correct overlap, clamping |
| Tee joint | 90-degree alignment, clean root area, tacking |
| Corner joint | Square corner, gap control, proper tacks |
| Edge joint | Clean edges, correct spacing, support |
The joint type determines how the metal should be fitted and cleaned.
Preparing a Butt Joint
Steps:
- Cut two plates to size.
- Grind or file the edges straight.
- Remove burrs.
- Clean both edges.
- Align the plates edge to edge.
- Set root gap if required.
- Clamp the plates.
- Tack weld at both ends.
- Check alignment.
- Weld only after confirmation.
Butt joints require accurate edge alignment.
Preparing a Lap Joint
Steps:
- Clean both overlapping surfaces.
- Mark the overlap distance.
- Place one piece over the other.
- Clamp securely.
- Tack at both ends.
- Check alignment.
- Weld along the edge.
Dirt or paint between overlapping surfaces can affect weld quality and may create fumes.
Preparing a Tee Joint
Steps:
- Clean the base plate and vertical plate.
- Mark the position of the vertical plate.
- Place the vertical plate at 90 degrees.
- Check with a try square.
- Clamp or hold securely.
- Tack weld both ends.
- Recheck squareness.
- Weld the fillet joint.
Good tee joint preparation helps ensure even fillet welds.
Preparing a Corner Joint
Steps:
- Cut both pieces accurately.
- Remove burrs.
- Clean the edges.
- Align the pieces at the required angle.
- Clamp securely.
- Tack weld at both ends.
- Check squareness.
- Weld carefully to reduce distortion.
Corner joints can move easily during welding, so tack placement is important.
Preparing Repair Welds
Repair welding often requires extra preparation because the metal may be damaged, worn, cracked, rusty, or contaminated.
Repair preparation may include:
- Cleaning the area.
- Removing old welds.
- Grinding out cracks.
- Removing oil, paint, or rust.
- Cutting out damaged metal.
- Preparing a groove.
- Checking for hidden cracks.
- Selecting the right electrode.
- Preheating where required.
Do not weld directly over cracks without removing the damaged area.
Surface Contamination and Weld Defects
Poor cleaning can cause weld defects.
| Contamination | Possible Weld Defect |
|---|---|
| Oil or grease | Porosity, smoke, fire risk |
| Paint | Fumes, porosity, poor fusion |
| Rust | Porosity, slag inclusion |
| Moisture | Porosity, cracking risk |
| Dirt | Poor fusion, slag inclusion |
| Galvanising | Toxic fumes, porosity |
| Old slag | Slag inclusion |
| Heavy scale | Poor fusion |
Clean metal is easier and safer to weld.
Preparation Before Multi-Pass Welding
Before multi-pass welding:
- Bevel edges if required.
- Clean the groove.
- Set correct gap.
- Tack securely.
- Check alignment.
- Select suitable electrode.
- Prepare for slag removal between passes.
- Keep chipping hammer and wire brush ready.
- Inspect each pass before continuing.
Do not rush multi-pass welding preparation.
Workplace Housekeeping During Preparation
Metal preparation creates waste, sparks, dust, sharp pieces, and offcuts.
Good housekeeping includes:
- Keep walkways clear.
- Remove offcuts from the floor.
- Store sharp scrap safely.
- Keep tools organised.
- Coil cables properly.
- Keep grinders and discs in safe locations.
- Dispose of used discs correctly.
- Sweep grinding dust where required.
- Keep flammable waste away from sparks.
- Do not leave measuring tools under heavy metal.
Good housekeeping prevents accidents and makes work easier.
Quality Checks Before Welding
Before final welding, check:
- Correct material selected.
- Correct dimensions.
- Correct cut length.
- Edges prepared.
- Surfaces cleaned.
- Joint gap correct.
- Alignment correct.
- Squareness correct.
- Clamps secure.
- Tack welds sound.
- Earth clamp location suitable.
- Welding area safe.
If preparation is wrong, stop and correct it before welding.
Common Metal Preparation Mistakes
Avoid these mistakes:
- Cutting before confirming measurement.
- Measuring from the wrong reference point.
- Marking unclear lines.
- Ignoring cutting allowance.
- Leaving burrs on cut edges.
- Welding over paint, oil, or rust.
- Poor edge preparation.
- Wrong root gap.
- Poor alignment.
- Weak or misplaced tack welds.
- Not checking squareness.
- Forcing parts together with welding.
- Using dirty clamps or unstable supports.
- Over-grinding and reducing metal thickness.
- Ignoring sharp edges.
What a Welding Trainee Should Never Do
A welding trainee should never:
- Cut metal without permission or instruction.
- Use a grinder without eye and face protection.
- Remove grinder guards.
- Cut unsupported metal.
- Weld without cleaning the joint area.
- Weld over oil, paint, or heavy rust.
- Weld galvanised metal without authorisation and controls.
- Touch freshly cut or ground metal with bare hands.
- Leave sharp offcuts on the floor.
- Guess measurements.
- Force poor fit-up with excessive weld metal.
- Ignore poor alignment.
- Weld over cracks without proper repair preparation.
- Hide cutting or measuring mistakes.
Practical Exercise 1: Measuring and Marking
Task:
Measure and mark mild steel flat bar or plate for cutting.
Trainees should practise:
- Using tape measure.
- Using steel rule.
- Using try square.
- Marking straight lines.
- Checking dimensions.
- Identifying waste side.
- Rechecking before cutting.
Assessment:
- Measurements should be accurate.
- Lines should be clear.
- Corners should be square.
- Trainee should measure twice before cutting.
Practical Exercise 2: Cutting and Deburring
Task:
Cut metal to a marked line and remove burrs.
Trainees should practise:
- Securing the workpiece.
- Using correct cutting method.
- Wearing PPE.
- Cutting accurately.
- Removing burrs.
- Checking final length.
- Cleaning the cut edge.
Assessment:
- Cut should follow the line.
- Edge should be safe to handle.
- Final size should be within acceptable tolerance.
- Work area should remain safe.
Practical Exercise 3: Grinding and Cleaning
Task:
Prepare a rusty or painted mild steel plate for welding.
Trainees should practise:
- Identifying contamination.
- Using wire brush.
- Using grinder safely.
- Removing rust or paint from weld area.
- Cleaning both sides of the joint.
- Inspecting surface readiness.
Assessment:
- Weld area should be clean.
- Grinder should be used safely.
- No unnecessary over-grinding.
- PPE must be worn correctly.
Practical Exercise 4: Butt Joint Fit-Up
Task:
Prepare and fit two plates for a butt joint.
Trainees should practise:
- Cleaning edges.
- Aligning plates.
- Setting root gap if required.
- Clamping.
- Tack welding.
- Checking alignment.
Assessment:
- Edges should be aligned.
- Gap should be consistent.
- Tack welds should hold properly.
- Joint should be ready for welding.
Practical Exercise 5: Tee Joint Alignment
Task:
Prepare a tee joint for fillet welding.
Trainees should practise:
- Marking plate position.
- Cleaning joint area.
- Using try square.
- Holding 90-degree alignment.
- Applying tack welds.
- Rechecking squareness.
Assessment:
- Vertical plate should be square.
- Tacks should be neat and strong enough.
- Joint should not shift after tacking.
Practical Exercise 6: Frame Squareness Check
Task:
Fit a simple rectangular frame and check squareness.
Trainees should practise:
- Measuring four sides.
- Tack welding corners.
- Measuring diagonals.
- Adjusting before final welding.
- Confirming squareness.
Assessment:
- Opposite sides should match.
- Diagonal measurements should be close.
- Frame should be properly aligned before final welding.
Real-Life Scenario
A trainee is asked to weld a small rectangular frame. He quickly cuts four pieces of metal and begins tacking them together. After tacking, the trainer checks the frame and discovers that it is not square. One piece was cut slightly longer, and the trainee did not measure the diagonals before tacking.
The trainer asks the trainee to stop and correct the fit-up. The trainee remeasures the pieces, grinds one piece to the correct length, aligns the frame again, clamps it properly, and measures both diagonals. This time, the frame is square before final welding.
The key lesson is that welding cannot correct poor measuring and alignment. Good preparation prevents poor fabrication.
Practical Skill Checklist
| Skill | Competent |
|---|---|
| Reads basic job instruction | |
| Selects correct material | |
| Inspects metal condition | |
| Uses tape measure correctly | |
| Uses steel rule correctly | |
| Uses try square correctly | |
| Marks cutting lines clearly | |
| Checks measurement before cutting | |
| Cuts metal safely | |
| Removes burrs after cutting | |
| Grinds edges safely | |
| Cleans rust, paint, oil, and dirt | |
| Prepares butt joint edges | |
| Sets basic root gap where required | |
| Fits and aligns lap joint | |
| Fits and aligns tee joint | |
| Checks squareness | |
| Clamps parts securely | |
| Tack welds parts in position | |
| Rechecks alignment after tacking | |
| Keeps work area clean |
Quick Recap
Metal preparation is the foundation of good welding. It includes measuring, marking out, cutting, edge preparation, grinding, cleaning, fit-up, and alignment. Good preparation improves weld strength, appearance, accuracy, and safety. Trainees must measure carefully, mark clearly, cut safely, remove burrs, clean rust and contamination, prepare edges correctly, align parts properly, clamp securely, tack weld carefully, and recheck before final welding. Poor preparation can cause gaps, distortion, weak welds, defects, wasted material, and rework. A professional welder does not rush preparation because good welding starts before the arc is struck.