
Cladding Installation
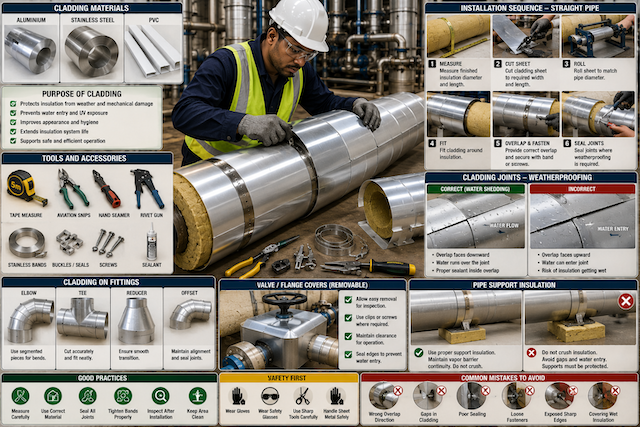
Introduction to Cladding Installation
Cladding installation is the process of fitting a protective covering over insulation. In pipe insulation work, cladding protects the insulation from weather, mechanical damage, water entry, UV exposure, chemical contamination, and general wear.
Cladding is also called jacketing or protective covering. It is commonly installed over insulated pipes, bends, tees, reducers, valves, flanges, tanks, vessels, ducts, and equipment.
A good cladding system should be neat, secure, weather-resistant, easy to inspect, and suitable for the working environment. The CINI manual provides guidance for the selection, assembly, and finishing of insulation systems for hot, cold, cryogenic, and acoustic applications.
Purpose of Cladding
Cladding is not only for appearance. It protects the insulation system and helps extend its service life.
| Purpose | Explanation |
|---|---|
| Weather protection | Prevents rainwater and moisture from entering the insulation |
| Mechanical protection | Protects insulation from impact, tearing, and site damage |
| UV protection | Protects insulation materials that can degrade under sunlight |
| Hygiene and cleanliness | Keeps insulation covered and easier to clean |
| Fire and heat protection | Supports system performance where specified |
| Appearance | Gives the installation a neat professional finish |
| Maintenance support | Helps identify, remove, and replace sections when needed |
Poorly installed cladding can allow water into the insulation. HSE notes that water ingress into insulation is often caused by poor cladding design or installation, failed joint sealant, mechanical damage, or cladding that was removed and not properly replaced.
Common Cladding Materials
The main cladding materials used in pipe insulation and tinsmith work include aluminium, stainless steel, and PVC. The correct material depends on the environment, temperature, mechanical risk, corrosion risk, appearance requirement, and project specification.
| Cladding Material | Common Use |
|---|---|
| Aluminium cladding | General pipe insulation, outdoor systems, industrial and building services |
| Stainless steel cladding | Harsh environments, marine areas, chemical plants, food processing, high-corrosion zones |
| PVC cladding | Indoor systems, chilled water lines, light-duty protection, clean environments |
| Galvanized steel cladding | Stronger protection where impact resistance is needed |
| Pre-coated metal cladding | Decorative or corrosion-resistant applications |
Aluminium Cladding
Aluminium cladding is widely used because it is lightweight, easy to cut, easy to roll, and suitable for many pipe insulation systems.
It is commonly used for:
- Straight pipe sections
- Elbows and bends
- Tees
- Reducers
- Valve boxes
- Flange covers
- Tanks and vessels
- Outdoor insulation protection
Aluminium is easier to fabricate than stainless steel, but it can dent more easily. It should be handled carefully to avoid scratches, dents, and sharp edges.
Aluminium Cladding Installation
Good aluminium cladding installation should include:
- Correct measurement of finished insulation diameter.
- Proper overlap allowance.
- Smooth rolling to match pipe shape.
- Neat alignment of longitudinal and circumferential joints.
- Correct direction of overlap to shed water.
- Secure fixing with bands, screws, rivets, or clips.
- Proper sealing where weatherproofing is required.
- Smooth finishing with no sharp exposed edges.
Aluminium cladding should not be forced into place. If the piece does not fit, the measurement, insulation thickness, rolling, and overlap should be checked.
Stainless Steel Cladding
Stainless steel cladding is used where stronger corrosion resistance and durability are required. It is common in aggressive environments such as offshore facilities, marine areas, chemical plants, food processing plants, and areas exposed to chemicals or salt air.
Stainless steel is stronger than aluminium, but it is harder to cut, bend, and form. It may require sharper tools, more careful handling, and stronger fixing methods.
Stainless Steel Cladding Installation
Good stainless steel cladding installation should include:
- Correct selection of stainless steel grade where specified.
- Accurate measurement before cutting.
- Use of suitable cutting and forming tools.
- Proper edge deburring after cutting.
- Correct fasteners compatible with stainless steel.
- Secure fixing to resist vibration and weather.
- Careful sealing around joints, fittings, and penetrations.
- Good finishing to avoid sharp edges.
Stainless steel should not be mixed carelessly with incompatible metals where galvanic corrosion may occur. Material compatibility should follow the project specification.
PVC Cladding
PVC cladding is a plastic protective covering used mostly in indoor, light-duty, clean, or low-impact environments. It is common in building services, chilled water systems, hospitals, offices, laboratories, food areas, and commercial facilities.
PVC cladding is lightweight, neat, and easy to clean. However, it may not be suitable for high-temperature systems, harsh outdoor exposure, heavy mechanical impact, or fire-sensitive locations unless specifically approved.
PVC Cladding Installation
Good PVC cladding installation should include:
- Clean and dry insulation surface.
- Correct measurement and cutting.
- Neat overlap and alignment.
- Proper adhesive or fixing method where specified.
- Smooth finishing around bends and fittings.
- Sealed joints where vapour or hygiene control is required.
- Protection from heat sources.
- Avoidance of cracking, splitting, or over-stretching.
PVC cladding should be installed according to manufacturer instructions and project requirements.
Preparing for Cladding Installation
Before installing cladding, the insulation system must be checked.
Confirm the following:
| Check | Reason |
|---|---|
| Insulation is dry | Wet insulation can reduce performance and increase CUI risk |
| Insulation is correctly fitted | Cladding should not hide poor insulation work |
| Pipe surface concerns are reported | Corrosion or damage should not be covered without approval |
| Vapour barrier is intact | Important for cold and chilled systems |
| Correct cladding material is available | Prevents wrong material installation |
| Measurements are accurate | Prevents poor fit and material waste |
| Tools are ready | Improves safety and workmanship |
| Weatherproofing requirement is clear | Prevents water entry |
| Access for valves and flanges is maintained | Supports future maintenance |
Never use cladding to hide damaged insulation, wet insulation, corrosion, poor gaps, or unfinished work.
Measuring for Cladding
Cladding measurement is based on the finished size of the insulated pipe, not only the bare pipe.
Important measurements include:
- Finished outside diameter
- Circumference
- Pipe section length
- Insulation thickness
- Overlap allowance
- Bend angle
- Reducer length
- Tee branch size
- Valve and flange dimensions
- Support location
- Maintenance access space
For straight pipe cladding, the sheet width is based on the circumference of the insulated pipe plus overlap allowance.
Example:
Finished outside diameter: 200 mm
Circumference: 200 × 3.142 = 628.4 mm
Overlap allowance: 40 mm
Required sheet width: 668.4 mm
Cladding Overlap
Overlap is the extra part of one cladding edge that covers another. It helps secure the cladding and reduce water entry.
Common overlap areas include:
- Longitudinal seams
- Circumferential joints
- Elbow segments
- Tee branches
- Reducers
- Valve boxes
- End caps
Overlap direction is very important outdoors. Joints should be arranged so that water runs over the joint rather than into it.
Weatherproofing
Weatherproofing means installing cladding in a way that prevents rainwater, wash water, and moisture from entering the insulation system.
Weatherproofing is especially important for:
- Outdoor pipework
- Rooftop systems
- Process plants
- Marine environments
- Cooling systems
- Chilled water systems
- Areas exposed to washdown
- Systems with high CUI risk
Water entry into insulation can reduce performance and increase corrosion risk. HSE identifies poor protective finish, sealant breakdown, mechanical damage, and poorly replaced cladding as common causes of water ingress into insulation.
Weatherproofing Good Practice
Good weatherproofing includes:
- Correct overlap direction.
- Proper sealing of joints.
- Tight but not damaging bands.
- Use of compatible sealants.
- End caps where required.
- Sealed penetrations.
- Proper fitting around supports and hangers.
- Removable covers that can be resealed after maintenance.
- Immediate repair of damaged cladding.
- Avoiding open upward-facing joints.
Outdoor cladding should be installed to shed water. If water can sit on or enter a joint, the detail should be corrected.
Joint Sealing
Joint sealing prevents water, vapour, air, dust, and contaminants from entering the insulation system. It is especially important on cold insulation and outdoor systems.
Joints that may require sealing include:
- Longitudinal seams
- Circumferential joints
- Elbow segment joints
- Tee and branch joints
- Reducer joints
- Valve box edges
- Flange cover edges
- End caps
- Penetrations around supports and hangers
Sealant must be compatible with the cladding material, insulation material, temperature, weather condition, and service environment.
Sealant Application
Good sealant application includes:
- Clean the surface before application.
- Keep the surface dry where required.
- Use the correct sealant type.
- Apply evenly and continuously.
- Avoid gaps, breaks, or thin spots.
- Do not over-apply where it creates messy finishing.
- Allow curing time where required.
- Check the joint after curing.
- Replace failed or cracked sealant promptly.
Poor sealant application can fail quickly and allow water into the insulation system.
Fastening and Fixing
Cladding may be fixed using bands, screws, rivets, clips, straps, buckles, or other approved fixing methods.
Common fixing accessories include:
| Accessory | Common Use |
|---|---|
| Stainless steel bands | Securing metal cladding around pipes |
| Buckles / seals | Locking banding straps |
| Self-tapping screws | Fixing overlaps, boxes, and covers |
| Rivets | Permanent sheet metal joints |
| Spring clips | Removable covers |
| Washers | Supporting screws and reducing damage |
| Cladding clips | Holding cladding sections in place |
Fixings must hold the cladding securely without crushing the insulation or creating water-entry points.
Aluminium Cladding on Straight Pipes
Basic installation steps include:
- Measure the insulated pipe length.
- Measure finished outside diameter.
- Calculate circumference.
- Add overlap allowance.
- Cut aluminium sheet to size.
- Roll sheet to the required curve.
- Fit around the insulation.
- Align the longitudinal seam.
- Fasten with bands, screws, or rivets as specified.
- Seal joints where required.
- Check final appearance and sharp edges.
The cladding should sit neatly around the pipe without excessive gaps, dents, or twisting.
Cladding Elbows and Bends
Elbows and bends are usually covered with segmented cladding pieces. Each segment must overlap neatly and follow the curve of the bend.
Good elbow cladding should:
- Match the bend shape.
- Have even segment spacing.
- Use correct overlap direction.
- Avoid open gaps.
- Avoid sharp raised edges.
- Be securely fastened.
- Be sealed where exposed to weather.
- Look neat and consistent.
Poor elbow cladding often allows water entry and gives poor appearance.
Cladding Tees
A tee requires accurate fitting around the branch connection. The main pipe cladding and branch pipe cladding must meet neatly.
Good tee cladding should:
- Fit closely around the branch.
- Avoid large cut-out gaps.
- Maintain correct overlap.
- Allow water to shed away from the joint.
- Be sealed where required.
- Avoid crushing insulation around the branch.
- Allow maintenance access where needed.
Tee cladding should not be guessed. Poor cut-outs are difficult to hide and may create water-entry points.
Cladding Reducers
Reducer cladding protects insulation where the pipe changes size.
Good reducer cladding should:
- Match the large and small finished diameters.
- Fit the taper smoothly.
- Avoid wrinkles.
- Maintain seam allowance.
- Be fastened securely.
- Be sealed outdoors.
- Align neatly with adjoining straight cladding.
Reducers require accurate layout because both ends are different sizes.
Valve and Flange Covers
Valves and flanges often require removable covers because they may need inspection, operation, or maintenance.
Good valve and flange covers should:
- Protect the insulation.
- Allow removal and replacement.
- Avoid blocking valve operation.
- Provide clearance for bolts, stems, and handwheels.
- Be sealed against weather where required.
- Be labelled or marked where useful.
- Be strong enough for repeated handling.
- Be reinstalled properly after maintenance.
HSE notes that cladding removed and not properly replaced, especially around valve boxes, can contribute to water ingress into insulation.
Finishing Techniques
Finishing is the final stage that gives cladding its professional appearance and helps ensure long-term performance.
Good finishing includes:
- Smooth cut edges.
- No exposed sharp points.
- Neat seams.
- Consistent overlaps.
- Proper rivet or screw spacing.
- Clean surface.
- No unnecessary dents.
- Correct sealant application.
- Tight bands.
- Proper end caps.
- Good alignment between sections.
- No loose or rattling cladding.
A good finish shows good workmanship. It also reduces injury risk and improves durability.
Inspection After Installation
After cladding is installed, inspect the work before handover.
Check:
| Inspection Item | What to Confirm |
|---|---|
| Fit | Cladding fits neatly without gaps or twisting |
| Overlap | Joints overlap in the correct direction |
| Fastening | Bands, screws, rivets, and clips are secure |
| Sealing | Weather-exposed joints are properly sealed |
| Edges | No dangerous sharp edges are exposed |
| Insulation | Cladding has not crushed or damaged insulation |
| Access | Valves, flanges, and inspection points remain accessible |
| Appearance | Work is clean, aligned, and professional |
| Water shedding | Outdoor cladding can drain water away |
| Damage | No dents, cracks, or loose sections |
Any defect should be corrected before the job is considered complete.
Real-Life Scenario
A team installs cladding on outdoor hot-water pipework. The straight sections look neat, but the elbow overlaps face upward. After rainfall, water enters through the elbow joints and wets the insulation.
The problem is not the insulation material; it is poor cladding detail.
The correct approach is to remove the affected cladding, inspect the insulation, replace wet insulation where required, reinstall the elbow segments with correct water-shedding overlap, seal the joints properly, and inspect the system after completion.
Common Cladding Installation Mistakes
Avoid these mistakes:
- Installing cladding over wet insulation.
- Using the wrong cladding material.
- Measuring bare pipe instead of finished insulation diameter.
- Forgetting overlap allowance.
- Installing overlaps in the wrong direction outdoors.
- Leaving upward-facing joints unsealed.
- Crushing insulation with bands or fasteners.
- Leaving gaps around elbows, tees, valves, and supports.
- Using incompatible fasteners.
- Leaving sharp edges exposed.
- Poor sealant application.
- Failing to replace cladding properly after maintenance.
- Ignoring dents, open joints, or loose covers.
- Covering corrosion or pipe damage without reporting it.
What a Tinsmith or Pipe Insulator Should Never Do
A tinsmith or pipe insulator should never:
- Use cladding to hide poor insulation work.
- Cover wet insulation without reporting it.
- Ignore rust stains or signs of water entry.
- Leave cladding loose or poorly sealed.
- Install outdoor joints that allow water to enter.
- Use damaged sheets for visible finishing.
- Leave sharp sheet metal edges exposed.
- Block access to valves, flanges, or inspection points.
- Mix metals carelessly where corrosion may occur.
- Remove cladding and fail to reinstall it properly.
- Hand over cladding work without inspection.
Quick Recap
Cladding protects pipe insulation from weather, damage, moisture, UV exposure, and contamination. Aluminium cladding is lightweight and common, stainless steel cladding is strong and corrosion-resistant, while PVC cladding is suitable for clean indoor and light-duty applications. Good cladding installation requires accurate measurement, correct overlap, proper fastening, weatherproofing, joint sealing, and neat finishing. Poor cladding can allow water into insulation and increase the risk of corrosion under insulation. A professional cladding job should be secure, sealed, accessible, safe, and visually neat.