
Crane Awareness
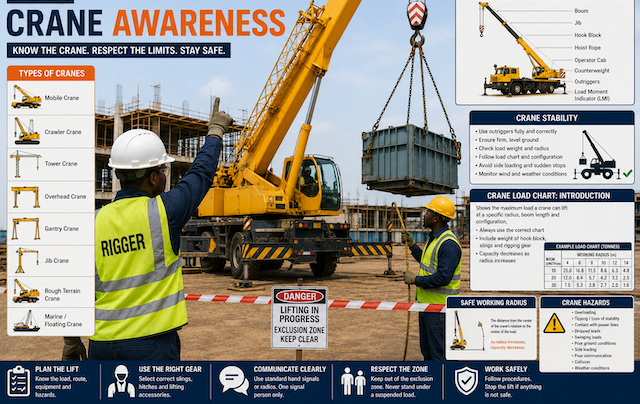
Introduction to Crane Awareness
Crane awareness means understanding how cranes work, what their major parts do, what can make them unsafe, and how riggers and lifting teams should work safely around them.
A rigger is not always the crane operator, but every rigger must understand the basic behaviour of cranes. This helps the rigger communicate better with the operator, identify unsafe conditions, respect crane limitations, and avoid actions that could cause tipping, overload, dropped loads, or collision.
A crane is a powerful lifting machine, but it has limits. Those limits depend on the crane type, boom length, working radius, ground condition, load weight, crane configuration, weather, and the lifting method. Lifting operations must be properly planned, supervised, and carried out safely by competent people. Cranes and lifting accessories must also be strong enough, tested, examined, and inspected as required.
Types of Cranes
Different cranes are designed for different lifting environments. The type of crane selected depends on the weight of the load, lifting height, working radius, ground condition, site access, and the nature of the task.
Mobile Crane
A mobile crane is mounted on a wheeled carrier or truck. It can move from one location to another and is commonly used in construction, oil and gas, industrial maintenance, and general lifting operations.
Mobile cranes are useful because they are flexible and can be set up in different areas. However, they require proper ground preparation, outrigger setup, load chart use, and safe operating radius control.
Crawler Crane
A crawler crane moves on tracks instead of wheels. It is often used for heavy lifting, long-term projects, and sites with softer ground conditions.
Crawler cranes can provide good stability because of their wide tracked base, but they still require proper ground assessment and must not exceed their rated capacity.
Tower Crane
A tower crane is a fixed crane commonly used on high-rise construction projects. It has a tall mast, long jib, counter-jib, counterweights, and trolley system.
Tower cranes are useful for lifting materials to height and reaching across large construction sites. Key risks include high winds, overloading, collision with structures, and poor communication.
Overhead Crane
An overhead crane, also called a bridge crane, is commonly used inside factories, workshops, warehouses, and industrial plants. It moves along rails and is used to lift and move loads within a defined area.
Overhead cranes are useful for repetitive lifting operations, but hazards include poor load control, side pulling, hook damage, collision, and people standing under suspended loads.
Gantry Crane
A gantry crane has a bridge supported by legs. It may run on rails or wheels and is often used in yards, workshops, ports, and fabrication areas.
Gantry cranes are suitable for lifting large or heavy items within a controlled area. They must be operated on suitable ground or rails and kept clear of obstructions.
Jib Crane
A jib crane has a horizontal arm that supports a hoist. It may be wall-mounted, column-mounted, or portable.
Jib cranes are useful for local lifting tasks, workshops, loading areas, and maintenance work. The operator must respect the crane’s rated capacity and working radius.
Rough Terrain Crane
A rough terrain crane is designed for off-road sites. It has large tyres and is commonly used in construction and industrial work where the ground is uneven.
Even though it is designed for rough terrain, it still needs correct setup, stable ground, proper outrigger use, and safe operating limits.
Floating or Marine Crane
A floating crane is mounted on a vessel, barge, or offshore platform. It is used in marine construction, ports, offshore work, and ship operations.
Marine lifting can be affected by vessel movement, waves, wind, tide, and limited working space. Extra planning and specialist supervision are usually required.
Basic Crane Components
A crane has many parts, but every rigger should understand the basic components involved in lifting.
Boom
The boom is the main lifting arm of the crane. It supports the hoist rope and helps position the load.
Boom length affects how far and how high the crane can lift. As boom length and radius increase, the crane’s lifting capacity usually reduces.
Jib
A jib is an extension attached to the boom to provide additional reach or height. It is useful for specific lifts but changes the crane’s capacity and configuration.
A crane must only be used according to the correct load chart for the exact boom and jib setup.
Hook Block
The hook block contains the hook and sheaves used to lift the load. The sling or lifting accessory connects to the hook.
The hook block has weight, and this weight must be considered as part of the lifting calculation where required.
Hoist Rope
The hoist rope is the wire rope that raises and lowers the hook block and load.
The hoist rope must be inspected and must not be kinked, crushed, corroded, damaged, or overloaded.
Counterweight
Counterweights help balance the crane against the load. They provide stability by counteracting the lifting force.
The correct counterweight configuration must be used according to the crane manufacturer’s instructions and load chart.
Outriggers and Stabilizers
Outriggers or stabilizers extend from the crane to increase its support base. They help improve stability during lifting.
Outriggers must be fully or correctly deployed according to the load chart and manufacturer’s instructions. Outrigger pads or mats may be required to spread the load on the ground.
Slewing System
The slewing system allows the upper part of the crane to rotate.
Slewing must be controlled carefully because sudden rotation can create load swing and instability.
Operator Cab
The operator cab is where the crane operator controls the crane.
The operator must have a clear view where possible, follow the load chart, obey signals, and stop if the lift becomes unsafe.
Load Moment Indicator
A Load Moment Indicator, often called LMI, is a safety device that helps monitor crane loading conditions. It may warn the operator when the crane is approaching unsafe load conditions.
An LMI is a safety aid, not a replacement for proper lift planning, load chart use, and competent operation.
Boom Angle Indicator
The boom angle indicator shows the angle of the boom. Boom angle affects the radius and lifting capacity of the crane.
Rated Capacity Limiter
A rated capacity limiter is designed to help prevent overload by warning or limiting crane movement when the crane approaches unsafe capacity conditions.
Safety devices must never be bypassed or ignored.
Crane Stability
Crane stability means the crane remains balanced and does not tip, sink, collapse, or lose control during the lift.
A crane can become unstable when the load is too heavy, the radius is too far, the ground is weak, outriggers are not properly set, the crane is side-loaded, or the lift is affected by wind or sudden movement.
Factors That Affect Crane Stability
| Factor | How It Can Affect Stability |
|---|---|
| Load weight | Excessive weight can overload the crane |
| Working radius | Capacity reduces as radius increases |
| Boom length | Longer boom configurations may reduce lifting capacity |
| Ground condition | Weak ground can cause outriggers or tracks to sink |
| Outrigger setup | Poor setup can reduce crane stability |
| Counterweight configuration | Wrong counterweight setup can affect balance |
| Wind | Can push the load and boom, especially with large loads |
| Load swing | Creates additional forces and instability |
| Sudden movement | Shock loading can overload crane components |
| Side loading | Cranes are not designed for uncontrolled side pulling |
| Slope or uneven surface | Can reduce stability and increase tipping risk |
Outrigger Safety
For cranes using outriggers:
- Use proper outrigger mats or pads where required.
- Place outriggers on firm, level, stable ground.
- Do not set outriggers over drains, voids, soft soil, trenches, or unsupported surfaces.
- Confirm the outrigger setup matches the load chart configuration.
- Keep the crane level within manufacturer limits.
- Watch for ground settlement during lifting.
- Stop the lift if any outrigger begins to sink or shift.
Stability Warning Signs
Stop the lifting operation if you notice:
- Outrigger movement
- Ground cracking or sinking
- Crane leaning
- Load swinging excessively
- Unexpected boom movement
- Warning alarms
- Load chart limit being approached
- Wind increasing beyond safe limits
- Communication breakdown
- Load snagging or dragging
A safe lift depends on both crane capacity and ground stability. A crane may be technically capable of lifting the load, but still become unsafe if the ground or setup is poor.
Crane Load Charts: Introduction
A crane load chart shows the maximum load the crane can safely lift under specific conditions.
The load chart is one of the most important documents in crane lifting. It helps determine whether the crane can lift a load at a particular radius, boom length, boom angle, counterweight setup, outrigger configuration, and crane setup.
A crane load chart must be used for the exact crane model and configuration. Generic charts or assumptions must not be used for actual lift planning.
What a Load Chart Usually Shows
A crane load chart may include:
- Crane model
- Boom length
- Boom angle
- Working radius
- Rated lifting capacity
- Counterweight configuration
- Outrigger position
- Parts of line
- Jib configuration
- Deductions
- Operating notes
- Safety limits
Important Load Chart Terms
| Term | Meaning |
|---|---|
| Rated capacity | Maximum load the crane can lift under stated conditions |
| Radius | Horizontal distance from crane centre of rotation to the load centre |
| Boom length | Length of the boom used for the lift |
| Boom angle | Angle of the boom from the horizontal |
| Parts of line | Number of rope parts supporting the hook block |
| Deductions | Items that must be subtracted from rated capacity |
| Gross load | Total load on the crane, including load and lifting accessories |
| Net load | Actual object being lifted, excluding some lifting accessories |
| Configuration | The exact crane setup used for the lift |
Gross Load
When checking a crane load chart, the total load on the crane must include more than the item being lifted.
Gross load may include:
- The main load
- Hook block
- Slings
- Shackles
- Lifting beam
- Spreader beam
- Jib weight or attachments where applicable
- Any other below-the-hook lifting device
If these are ignored, the crane may be overloaded even when the main load appears to be within capacity.
How Load Charts Are Used
A basic load chart check follows this logic:
- Confirm the exact crane configuration.
- Confirm the total gross load.
- Confirm the working radius.
- Confirm boom length and boom angle.
- Find the rated capacity on the load chart.
- Apply deductions where required.
- Confirm the lift remains within the allowed capacity.
- Stop if the lift exceeds or approaches unsafe limits.
Load charts are not optional. They are essential for avoiding overload and crane instability.
Safe Working Radius
The working radius is the horizontal distance from the crane’s centre of rotation to the centre of the load.
This is one of the most important crane safety concepts.
As the working radius increases, the crane’s lifting capacity usually decreases. This means the crane can lift more when the load is close and less when the load is farther away.
Simple Example
A crane may be able to lift a heavy load at a short radius but may not be able to lift the same load at a longer radius.
For example, a crane might lift a load safely at 5 metres radius but become unsafe at 12 metres radius with the same load and boom configuration.
Why Radius Matters
Radius affects the load moment on the crane.
The farther the load is from the crane, the greater the overturning force becomes.
A load does not need to get heavier to become unsafe. It only needs to move farther away from the crane.
Radius Can Change During the Lift
The working radius can increase during:
- Boom lowering
- Boom extension
- Slewing
- Load movement
- Crane movement
- Poor control of the load
- Ground settlement
- Load swinging
This is why the lift must be planned for the maximum radius, not only the starting point.
Safe Radius Rules
- Know the working radius before lifting.
- Check the crane load chart at the correct radius.
- Plan for the maximum radius during the lift.
- Do not boom down or extend the boom without checking capacity.
- Do not drag or side-pull loads.
- Keep the load controlled to avoid swing.
- Stop the lift if the radius changes beyond the plan.
- Never guess crane capacity based on appearance.
Crane Hazards
Crane operations involve several serious hazards. A rigger must be able to recognise these hazards and help control them.
Overloading
Overloading happens when the crane is asked to lift more than it can safely handle in its current configuration.
Causes include:
- Unknown load weight
- Ignoring gross load
- Wrong load chart
- Increased radius
- Incorrect crane setup
- Dynamic loading
- Load stuck or snagged
- Incorrect deductions
Overloading can cause structural failure, tipping, rope failure, or dropped loads.
Tipping or Loss of Stability
A crane can tip if the load moment exceeds the crane’s stability limit or if the ground support fails.
Common causes include poor ground conditions, incorrect outrigger setup, excessive radius, overload, slope, wind, and sudden movement.
Contact With Power Lines
Power line contact is one of the most serious crane hazards. Electricity can travel through the crane, load, rigging gear, and the ground.
Workers must maintain safe clearance from overhead power lines and follow site-specific electrical safety procedures.
Dropped Loads
A dropped load may result from rigging failure, hook failure, overload, wrong hitch, damaged lifting gear, poor communication, or load instability.
No one should stand under a suspended load. OSHA crane standards include specific requirements for work area control and keeping clear of the load.
Swinging Loads
A swinging load can strike workers, structures, vehicles, or equipment.
Swinging may be caused by sudden crane movement, wind, poor load control, incorrect signalling, or moving the crane too quickly.
Side Loading
Side loading happens when a crane is used to pull a load sideways instead of lifting vertically.
Cranes are generally designed to lift vertically, not drag loads horizontally. Side loading can damage the boom, overload the crane, and destabilise the lift.
Poor Ground Conditions
Crane stability depends on the ground supporting the crane. Soft soil, underground voids, drainage covers, trenches, slopes, and poorly compacted ground can cause crane movement or outrigger failure.
Wind and Weather
Wind can affect the crane, boom, and load, especially large or flat loads. Rain can reduce visibility and ground strength. Lightning creates serious risk during crane operations.
Lifting should stop when weather conditions exceed safe limits or reduce control of the load.
Poor Communication
Miscommunication can cause sudden movement, incorrect lifting, collision, or load instability.
Signals should be clear, agreed, and given by an authorised signal person. OSHA requires signals when the operator’s view is obstructed, when the landing area is not visible, or when site-specific safety concerns require signalling.
Collision
The crane, boom, hook block, or load may collide with buildings, scaffolds, vehicles, plant, power lines, or other cranes.
A safe lifting route must be planned and kept clear.
Unauthorised Personnel in the Lifting Area
People entering the lifting area may be struck, crushed, or trapped.
A proper exclusion zone should be established before lifting begins.
Safe Behaviour Around Cranes
Workers around cranes should:
- Stay outside exclusion zones.
- Never stand under suspended loads.
- Follow instructions from the lift supervisor or signal person.
- Keep clear of counterweight swing areas.
- Avoid walking between the load and fixed objects.
- Keep hands away from pinch points.
- Never distract the crane operator.
- Watch for alarms, movement, and warning signals.
- Report unsafe ground, defective gear, or poor visibility.
- Stop work if conditions become unsafe.
Real-Life Scenario
A mobile crane is lifting a generator from a truck to a foundation pad. At the start of the lift, the load is close to the crane and appears stable. As the operator begins to boom down toward the foundation, the radius increases.
The lifting team must understand that the crane’s capacity reduces as the radius increases. The lift should have been planned using the maximum radius, not only the starting radius.
The safe response is to stop if the radius exceeds the planned limit, recheck the load chart, confirm the crane capacity, and continue only if the lift remains within safe limits.
Common Crane Awareness Mistakes
Avoid these unsafe practices:
- Assuming all cranes can lift the same load.
- Ignoring the crane load chart.
- Checking load weight but forgetting hook block and rigging weight.
- Planning only for starting radius instead of maximum radius.
- Setting outriggers on weak or uneven ground.
- Standing near counterweight swing areas.
- Walking under suspended loads.
- Using unclear hand signals.
- Continuing when the operator cannot see the signal person.
- Lifting during unsafe wind or weather.
- Dragging loads sideways with the crane.
- Allowing people into the exclusion zone.
- Ignoring warning alarms or safety devices.
- Treating the Load Moment Indicator as a substitute for lift planning.
What a Rigger Should Never Do
A rigger should never:
- Assume crane capacity without checking the load chart.
- Ignore the crane operator’s concerns.
- Stand under a suspended load.
- Allow workers to enter the danger zone.
- Signal a lift without authorisation.
- Give conflicting signals.
- Allow side pulling or dragging.
- Rig a load with unknown weight.
- Ignore radius changes.
- Continue a lift if the crane is unstable.
- Bypass or ignore crane safety alarms.
- Stand near outriggers during lifting.
- Work close to power lines without proper controls.
- Continue a lift after communication is lost.
- Rush a lift because of pressure.
Quick Recap
Crane awareness helps riggers work safely around lifting equipment. Different cranes have different uses, limits, components, and hazards. Crane stability depends on load weight, radius, ground condition, setup, counterweights, wind, and control of movement. Crane load charts show what the crane can safely lift under specific conditions, and the working radius has a major effect on capacity. Safe crane operations require planning, communication, exclusion zones, competent workers, and respect for the crane’s rated limits.