
Rigging Principles
Introduction to Rigging Principles
Rigging principles are the basic rules that guide safe lifting operations. A rigger must understand how a load behaves before it is lifted, how lifting accessories carry force, and how incorrect rigging can cause the load to tilt, swing, fall, or overload the equipment.
Safe rigging is not guesswork. It requires proper planning, correct equipment selection, understanding of load weight, control of sling angles, and awareness of the load’s centre of gravity.
The UK Health and Safety Executive explains that lifting operations can put people at great risk when they go wrong, so they must be properly planned, resourced, and organised by competent people.
Suggested Image:
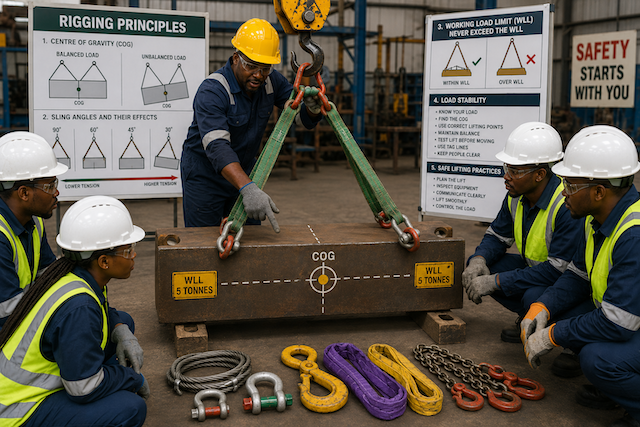
Insert image of African rigging trainees gathered around an instructor who is explaining load balance, sling angle, and centre of gravity using a demonstration load.
Load Characteristics
Before lifting any load, the rigger must understand the characteristics of the load. The shape, weight, balance, attachment points, surface condition, and environment all affect how the load should be rigged.
Important Load Characteristics to Check
| Load Characteristic | Why It Matters |
|---|---|
| Weight | Determines the capacity of the lifting gear required |
| Shape | Affects how the load is supported and controlled |
| Size | Affects lifting space, clearance, and sling arrangement |
| Centre of gravity | Determines balance and stability |
| Lifting points | Determines where slings or hooks can be attached |
| Surface condition | Sharp edges, oil, rust, or heat can damage slings |
| Strength of load | Weak or fragile loads may deform or break |
| Temperature | Hot loads can damage synthetic slings |
| Stability | Unstable loads may tilt, rotate, or shift |
| Contents | Liquids or loose materials can move during lifting |
Practical Example
A rectangular steel frame may look easy to lift, but if one side is heavier because of attached machinery, the centre of gravity will not be in the middle. If the rigger assumes the load is balanced, the frame may tilt suddenly when lifted.
Centre of Gravity: COG
The centre of gravity, often called COG, is the point where the entire weight of the load is considered to act. It is the balance point of the load.
A load will always try to hang with its centre of gravity directly below the crane hook or lifting point.
If the hook is not above the centre of gravity, the load may:
- Tilt
- Swing
- Rotate
- Slide out of the rigging
- Overload one sling leg
- Become unstable
CCOHS advises that before choosing slings, the weight of the load, centre of gravity, slinging configuration, WLL, attachments, and physical characteristics of the load should be determined.
How to Identify the Centre of Gravity
The COG may be identified by:
- Manufacturer information
- Engineering drawing
- Marking on the load
- Symmetry of the object
- Known weight distribution
- Calculation
- Trial lift by a competent team
- Supervisor or engineer confirmation
General COG Rules
- For a uniform square or rectangular load, the COG is usually near the centre.
- For an irregular load, the COG may be closer to the heavier side.
- For loads containing liquid, the COG may shift during movement.
- For machinery, the COG may be near the motor, gearbox, or heavy component.
- For long loads, the COG may not be exactly halfway along the length.
Practical Rule
The crane hook should be positioned directly above the load’s centre of gravity before lifting.
If the load tilts during a test lift, stop, lower it, and adjust the rigging.
Load Stability
Load stability means keeping the load balanced, controlled, and secure during lifting, moving, and landing.
A stable load should:
- Lift level or as planned.
- Remain controlled during movement.
- Not shift inside the rigging.
- Not spin or swing dangerously.
- Not overload one sling leg.
- Land safely without tipping.
Factors That Affect Load Stability
| Factor | Effect |
|---|---|
| Incorrect COG | Load tilts or rotates |
| Unequal sling lengths | Load lifts unevenly |
| Wrong lifting points | Load may shift or break loose |
| Poor sling angle | Sling tension increases |
| Loose contents | Load balance may change |
| Wind | Load may swing or spin |
| Sudden crane movement | Load may swing violently |
| No tag line | Poor control of suspended load |
| Weak lifting point | Attachment may fail |
How to Improve Load Stability
- Position the hook above the COG.
- Use correct lifting points.
- Use equal sling lengths where needed.
- Use a lifting beam or spreader beam where appropriate.
- Use tag lines to control rotation.
- Keep the lift slow and controlled.
- Avoid sudden starts and stops.
- Keep people outside the exclusion zone.
- Conduct a short test lift before full movement.
Test Lift
A test lift is a short lift, usually just a few centimetres above the ground, to confirm that the load is balanced and secure.
During a test lift, check:
- Is the load level?
- Are slings correctly seated?
- Are sling angles acceptable?
- Is any sling overloaded or slack?
- Is the load rotating or sliding?
- Are lifting points holding properly?
- Is the communication clear?
If anything looks wrong, lower the load immediately and correct the rigging.
Sling Angles and Their Effects
Sling angle is one of the most important rigging principles. The angle of a sling affects the tension in the sling.
As sling angle becomes smaller, sling tension increases.
This means that a sling may be overloaded even when the load itself is within the sling’s normal vertical capacity.
Important Rule
The flatter the sling angle, the greater the tension in each sling leg.
For example, two slings lifting a load may look strong enough, but if the angle is too low, the force in each sling can become much higher than expected.
OSHA’s safe sling-use guidance emphasises selecting and using slings according to their rated load and manufacturer information. CCOHS also advises checking manufacturer information for sling capacities at different angles.
Sling Angle Reference
| Sling Angle from Horizontal | Approximate Tension Effect |
|---|---|
| 90° | Lowest sling tension |
| 60° | Acceptable for many lifts |
| 45° | Higher sling tension |
| 30° | Much higher sling tension |
| Below 30° | Usually unsafe unless specifically engineered |
Simple Explanation
Imagine two people carrying a heavy bucket with ropes. If they stand close together and pull upward, the force is easier to manage. If they stand far apart and pull sideways, each person feels more strain. The same thing happens with sling angles.
Practical Safety Tips
- Avoid very low sling angles.
- Follow the sling manufacturer’s load chart.
- Use a spreader beam when needed to improve sling angles.
- Do not assume each sling carries equal weight.
- Remember that unequal loads can overload one sling leg.
- Consider the effect of choker hitch and basket hitch configurations.
- Stop the lift if sling angles look unsafe.
Working Load Limit: WLL
Working Load Limit, or WLL, is the maximum load that a lifting accessory is designed and rated to lift under specific conditions.
It is usually marked on lifting equipment such as:
- Slings
- Shackles
- Hooks
- Eye bolts
- Lifting beams
- Chain blocks
- Hoists
- Crane accessories
OSHA defines rated capacity or Working Load Limit as the maximum working load permitted under the sling standard.
Where to Find WLL
WLL may be found on:
- Sling tag
- Shackle body
- Hook marking
- Eye bolt marking
- Lifting beam plate
- Chain sling tag
- Manufacturer certificate
- Load chart
WLL Safety Rules
- Never exceed the WLL.
- Do not use lifting gear without visible WLL marking.
- Check WLL for the specific configuration.
- Remember that sling angle can reduce capacity.
- Do not mix components without checking the lowest WLL.
- The lifting system is limited by the weakest component.
Practical Example
If a load weighs 3 tonnes and the sling is rated for 5 tonnes, but the shackle is rated for only 2 tonnes, the system is not safe. The weakest component determines the limit.
Safe Working Load: SWL
Safe Working Load, or SWL, is the maximum load that equipment can safely lift under specified working conditions.
In many workplaces, WLL and SWL are sometimes used interchangeably, but they are not always exactly the same in practical use.
Simple Difference
| Term | Meaning |
|---|---|
| WLL | Manufacturer-rated maximum working load for the equipment |
| SWL | Safe load allowed for a specific lifting operation after considering conditions |
Practical Meaning
The WLL may be printed on the equipment, but the actual safe load for a job may be lower because of:
- Sling angle
- Hitch type
- Load shape
- Sharp edges
- Temperature
- Wear or condition
- Dynamic forces
- Environmental conditions
- Site procedures
Important Rule
Do not assume the printed WLL is automatically safe for every situation. The lifting method and site conditions must be considered.
Load Weight Estimation
Before any lift, the rigger must know or correctly estimate the load weight.
Never lift a load based on guessing.
Reliable Ways to Know Load Weight
Use:
- Manufacturer plate
- Equipment manual
- Delivery document
- Packing list
- Engineering drawing
- Weighbridge ticket
- Load cell
- Previous certified records
- Calculation by competent person
- Supervisor or engineer confirmation
Estimating Load Weight by Calculation
For simple solid objects, weight can be estimated using:
Weight = Volume × Material Density
Common Approximate Material Densities
| Material | Approximate Density |
|---|---|
| Steel | 7,850 kg/m³ |
| Concrete | 2,400 kg/m³ |
| Aluminium | 2,700 kg/m³ |
| Water | 1,000 kg/m³ |
| Timber | 500–900 kg/m³ depending on type and moisture |
| Sand | 1,600 kg/m³ approximately |
Example: Steel Plate
A steel plate measures:
- Length: 2 m
- Width: 1 m
- Thickness: 0.02 m
Volume:
2 × 1 × 0.02 = 0.04 m³
Weight:
0.04 × 7,850 = 314 kg approximately
The rigger should still allow for fittings, coatings, attachments, lifting gear, and any uncertainty.
Important Weight Estimation Rules
- Include all attached parts.
- Include contents inside containers or tanks.
- Consider trapped water, mud, oil, or debris.
- Consider packaging or pallets.
- Add allowance where required by site procedure.
- Ask for engineering support when unsure.
- Do not lift if the weight cannot be confirmed.
Dynamic Loading
Dynamic loading happens when extra forces are created during lifting because of motion.
Even if the load weighs 2 tonnes, the force on the rigging may become higher if the load is jerked, dropped suddenly, stopped sharply, or lifted too fast.
Causes of Dynamic Loading
- Sudden lifting
- Sudden stopping
- Shock loading
- Load swinging
- Crane movement
- Wind
- Uneven ground
- Snatch lifting
- Load snagging on another object
Safety Rule
Lift slowly and smoothly. Avoid shock loading.
A lifting accessory may fail if subjected to sudden forces beyond its rated capacity.
Load Control During Lifting
A suspended load must remain under control at all times.
Good Load Control Practices
- Use tag lines where appropriate.
- Keep hands away from pinch points.
- Do not push or pull the load with your body.
- Avoid standing between the load and a fixed object.
- Keep the path clear.
- Use one designated signal person.
- Move slowly.
- Stop if the load begins to swing or rotate.
- Never leave a suspended load unattended.
Exclusion Zone
An exclusion zone is a restricted area around the lifting operation.
Only authorised workers should enter the zone. No one should stand under or near the suspended load unless required and controlled by the lift plan.
Real-Life Scenario
A team needs to lift a large machine base. The base appears rectangular, but one side contains a heavy motor. The rigger places the hook above the centre of the frame instead of the centre of gravity.
When the load is lifted slightly, one side drops and the load tilts.
The correct action is to:
- Stop immediately.
- Lower the load carefully.
- Reassess the centre of gravity.
- Adjust the sling positions or lifting points.
- Confirm sling angles and capacity.
- Perform another test lift.
- Continue only when the load lifts safely and remains stable.
This shows why the centre of gravity must be understood before the lift begins.
Common Rigging Principle Mistakes
Avoid these mistakes:
- Guessing the load weight.
- Ignoring the centre of gravity.
- Assuming a load is balanced because it looks symmetrical.
- Using slings at very low angles.
- Ignoring sling angle capacity reduction.
- Using equipment with unclear WLL.
- Forgetting that the weakest component controls the lift.
- Lifting without a test lift.
- Lifting with loose or shifting contents.
- Using damaged lifting points.
- Standing near or under suspended loads.
- Starting or stopping the crane suddenly.
- Continuing a lift when the load tilts unexpectedly.
- Ignoring wind or poor ground conditions.
Quick Recap
Rigging principles help prevent failed lifts. Before lifting, a rigger must understand the load’s weight, shape, centre of gravity, stability, lifting points, sling angles, WLL, and SWL. Low sling angles increase sling tension, unstable loads can tilt or rotate, and unknown weights must be verified before lifting. Safe rigging depends on planning, calculation, inspection, communication, and controlled lifting.