
Tools and Equipment
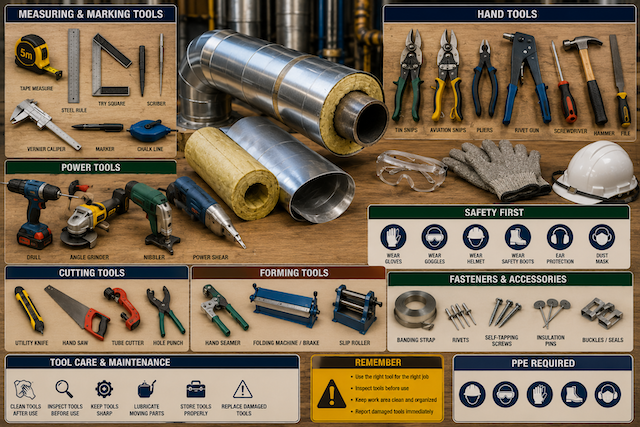
Introduction to Tools and Equipment
Tools and equipment are essential for pipe insulation and tinsmith work. They are used for measuring, marking, cutting, forming, joining, fastening, installing, and maintaining insulation and cladding systems.
A skilled worker must know the correct tool for each task, how to use it safely, and how to maintain it properly. Using the wrong tool can damage materials, produce poor workmanship, waste time, or cause injury.
Hand and power tools can cause serious injuries when used or maintained incorrectly, so workers must pay careful attention to safe tool handling, inspection, storage, and maintenance. OSHA notes that hand and power tools are useful but can be hazardous if used or maintained improperly.
Main Categories of Tools
Pipe insulation and tinsmith work uses different categories of tools.
| Tool Category | Main Purpose |
|---|---|
| Hand tools | Cutting, gripping, bending, fastening, shaping, and fitting |
| Power tools | Faster cutting, drilling, grinding, fastening, and forming |
| Measuring and marking tools | Taking dimensions, marking cut lines, and laying out patterns |
| Cutting tools | Cutting insulation, sheet metal, bands, rods, and accessories |
| Forming tools | Bending, rolling, folding, grooving, and shaping sheet metal |
| Joining tools | Riveting, screwing, soldering, seaming, and fastening |
| Maintenance tools | Cleaning, sharpening, lubricating, and adjusting tools |
A professional worker should keep tools clean, organised, and ready for use.
Hand Tools
Hand tools are manually operated tools used for basic fabrication, installation, fitting, and finishing. They are important because many pipe insulation and cladding tasks require accuracy and control.
Common hand tools include:
| Hand Tool | Common Use |
|---|---|
| Tape measure | Measuring pipe length, sheet size, and cladding dimensions |
| Steel rule | Short accurate measurements and straight marking |
| Try square | Checking and marking right angles |
| Scriber | Marking lines on sheet metal |
| Marker / pencil | Marking insulation and layout lines |
| Tin snips | Cutting thin sheet metal |
| Aviation snips | Cutting straight, left, or right curves in sheet metal |
| Hand seamer | Bending and flattening sheet metal edges |
| Pliers | Holding, gripping, twisting, and bending |
| Rivet gun | Fixing rivets in sheet metal joints |
| Screwdriver | Tightening screws and fasteners |
| Spanner | Tightening nuts, bolts, and fittings |
| Hammer / mallet | Light forming, fitting, and adjustment |
| File | Smoothing sharp edges and burrs |
| Utility knife | Cutting insulation and soft materials |
Tinsmith tools commonly include snips, seamers, folding tools, punches, rivet guns, files, measuring tools, soldering tools, and sheet metal forming tools.
Safe Use of Hand Tools
Hand tools should be selected according to the task and material.
Good hand tool practice includes:
- Use the correct tool for the job.
- Inspect tools before use.
- Keep cutting edges sharp and controlled.
- Wear gloves when handling sheet metal.
- Wear eye protection when cutting, drilling, filing, or punching.
- Keep hands away from cutting lines.
- Secure materials before cutting or forming.
- Do not use broken, loose, cracked, or worn tools.
- Do not use screwdrivers as chisels.
- Do not use pliers as hammers.
- Do not force a tool beyond its capacity.
- Store tools safely after use.
OSHA requires hand and power tools to be kept in safe condition, whether supplied by the employer or by workers themselves.
Tin Snips and Shears
Tin snips and shears are used to cut thin sheet metal such as aluminium, galvanized steel, and stainless steel.
Different snips are used for different cuts:
| Snip Type | Common Use |
|---|---|
| Straight snips | Straight cuts and gentle curves |
| Left-cut snips | Curves and cuts to the left |
| Right-cut snips | Curves and cuts to the right |
| Aviation snips | Controlled cutting of sheet metal |
| Tinner’s shears | Longer cuts on thin sheet metal |
Good cutting practice includes marking clearly, supporting the sheet, cutting steadily, and avoiding rough tearing of the metal. Some modern sheet metal snips are designed for straight cuts, curves, thick materials, or thin sheets, and some lever-action snips reduce the force required during cutting.
Files and Deburring Tools
Files and deburring tools are used to remove sharp edges, burrs, and rough areas after cutting sheet metal.
This is important because sharp edges can cut hands, damage insulation, tear vapour barriers, or create poor finishing.
After cutting metal:
- Check the cut edge.
- Remove burrs.
- Smooth sharp corners.
- Avoid leaving jagged edges.
- Wear gloves during handling.
- Dispose of sharp offcuts safely.
A clean edge improves both safety and appearance.
Rivet Guns and Fastening Tools
Rivet guns are used to join sheet metal parts permanently. Rivets are common in cladding, fabricated covers, boxes, elbows, and sheet metal accessories.
Good riveting practice includes:
- Use the correct rivet size and material.
- Drill the correct hole size.
- Align the sheets properly.
- Insert the rivet fully.
- Pull the rivet squarely.
- Avoid over-spacing or under-spacing rivets.
- Check that the joint is secure.
- Remove sharp mandrel waste safely.
Fastening must be strong enough to hold the cladding, but it should not crush or damage the insulation underneath.
Power Tools
Power tools make work faster and easier, especially when cutting, drilling, grinding, fastening, or forming materials. However, power tools can cause serious injuries if used carelessly.
Common power tools include:
| Power Tool | Common Use |
|---|---|
| Electric drill | Drilling holes in sheet metal, brackets, and supports |
| Cordless drill/driver | Drilling and fastening screws |
| Angle grinder | Cutting or grinding metal where appropriate |
| Power shear | Cutting sheet metal faster and cleaner |
| Nibbler | Cutting curves and profiles in sheet metal |
| Jigsaw | Cutting light sheet or board materials where suitable |
| Heat gun | Applying heat-shrink or softening some materials |
| Soldering iron | Joining or sealing light metal work where applicable |
| Portable work light | Improving visibility in work areas |
Power tools should only be used by trained or supervised persons.
Safe Use of Power Tools
Before using power tools:
- Inspect the plug, cable, battery, switch, guard, and body.
- Confirm the tool is suitable for the job.
- Use the correct blade, bit, disc, or attachment.
- Wear eye protection.
- Wear hearing protection where noise is high.
- Keep loose clothing away from rotating parts.
- Secure the workpiece before cutting or drilling.
- Keep both hands controlled.
- Disconnect power before changing accessories.
- Do not remove guards.
- Do not use damaged tools.
- Do not use electric tools in wet conditions unless properly rated and protected.
OSHA construction standards require hand and power tools to be maintained in safe condition, and tools designed with guards must have guards in place during use.
Measuring and Marking Tools
Accurate measurement is one of the most important skills in pipe insulation and tinsmith work. Poor measurement leads to wasted materials, poor cladding fit, open joints, gaps, and poor finishing.
Common measuring and marking tools include:
| Tool | Use |
|---|---|
| Tape measure | General measurement of pipes, sheets, and work areas |
| Steel rule | Short and accurate measurement |
| Vernier caliper | Measuring thickness, diameter, and small dimensions |
| Divider / compass | Marking circles and arcs |
| Try square | Checking and marking 90-degree angles |
| Combination square | Measuring and marking angles |
| Protractor | Measuring angles |
| Chalk line | Marking long straight lines |
| Scriber | Marking sheet metal |
| Marker pen | Marking insulation and cladding |
| Spirit level | Checking level and alignment |
Good tinsmith work begins with accurate marking out. Once metal is cut incorrectly, it may not be reusable.
Measuring Rules
Good measuring practice includes:
- Measure twice before cutting.
- Use the same measuring tool where possible.
- Read the measurement at eye level.
- Keep the tape straight and tight.
- Mark clearly.
- Allow for overlap, seams, folds, and joints.
- Consider insulation thickness before cladding measurement.
- Check pipe diameter and circumference correctly.
- Confirm dimensions against drawings or templates.
- Avoid guessing.
A small measurement error can become a large fitting problem during cladding installation.
Cutting and Forming Tools
Cutting and forming tools are used to shape insulation and sheet metal into the required form.
Common cutting and forming tools include:
| Tool / Equipment | Common Use |
|---|---|
| Tin snips | Cutting thin sheet metal |
| Guillotine shear | Straight cutting of sheet metal |
| Bench shear | Cutting sheet metal in the workshop |
| Nibbler | Cutting curves and irregular shapes |
| Utility knife | Cutting soft insulation materials |
| Insulation saw | Cutting rigid insulation sections |
| Hole punch | Making holes in sheet metal |
| Folding machine / brake | Bending sheet metal accurately |
| Hand seamer | Folding and flattening edges |
| Slip roller | Rolling sheet metal into curves or cylinders |
| Swaging / grooving machine | Creating grooves or stiffening edges |
| Stake and anvil | Forming and shaping metal manually |
| Mallet | Light forming without excessive damage |
Tinsmith and sheet metal workers use bending, folding, seaming, and forming tools to shape thin metal sheets for cladding and protective covers. Specialist tinsmith tool ranges include seaming pliers, folding tools, benders, seamers, and forming accessories used for sheet metal work.
Folding Machine or Brake
A folding machine, also called a brake, is used to bend sheet metal accurately along a straight line.
It is used for:
- Making edges
- Creating folds
- Forming cladding sections
- Making boxes and covers
- Preparing seams
- Creating stiffened edges
Safe use includes keeping fingers away from the clamping and bending area, setting the sheet correctly, using the correct bend allowance, and not forcing material beyond the machine’s capacity.
Slip Roller
A slip roller is used to roll sheet metal into curved shapes such as cylindrical cladding, pipe covers, elbows, and round sections.
Safe use includes:
- Keep fingers away from rollers.
- Do not wear loose clothing.
- Feed the sheet evenly.
- Adjust rollers gradually.
- Do not force thick metal beyond capacity.
- Support large sheets.
- Keep the machine clean and lubricated.
Slip rolling requires practice because over-rolling or uneven pressure can distort the sheet.
Grooving and Seaming Tools
Grooving and seaming tools help create joined edges, strengthened ends, and neat sheet metal joints.
They are used in:
- Cladding seams
- Ductwork
- Covers
- Elbows
- Reducers
- Sheet metal boxes
- Weatherproof joints
Good seams should be neat, tight, aligned, and free from sharp edges.
Soldering Tools
Soldering may be used in some light sheet metal work, depending on the material and project requirement.
Common soldering items include:
- Soldering iron
- Solder
- Flux
- Cleaning cloth
- Heat-resistant surface
- Wire brush
- PPE
Safe soldering requires ventilation, fire control, clean surfaces, and careful handling of hot tools. Flux and fumes should be controlled according to product safety instructions.
Maintenance of Tools and Equipment
Tool maintenance keeps tools safe, accurate, and reliable. Poorly maintained tools can slip, cut badly, damage materials, or cause injury.
Basic maintenance practices include:
- Clean tools after use.
- Dry tools before storage.
- Remove metal chips, dust, and adhesive residue.
- Sharpen cutting tools where appropriate.
- Lubricate moving parts lightly.
- Check handles, blades, jaws, cords, batteries, and guards.
- Store measuring tools where they will not bend or break.
- Keep power tools in dry storage.
- Replace damaged blades, discs, bits, or accessories.
- Remove defective tools from service.
Regular cleaning and inspection help tools last longer and perform safely. Tool maintenance also improves accuracy and control during work.
Tool Inspection Checklist
Before use, check the tool condition.
| Tool Area | What to Check |
|---|---|
| Handles | Cracks, looseness, poor grip, sharp damage |
| Cutting edges | Dull, cracked, chipped, or misaligned blades |
| Jaws | Worn teeth, poor alignment, stiffness |
| Measuring tools | Bent, unreadable, loose, or inaccurate markings |
| Power cables | Cuts, exposed wires, crushed insulation |
| Plugs | Broken body, loose pins, burn marks |
| Guards | Missing, loose, or damaged |
| Switches | Faulty, sticking, or loose |
| Batteries | Swelling, leakage, overheating, damage |
| Fastening tools | Jammed, loose, or worn parts |
| Rollers and brakes | Misalignment, stiffness, dirt, or damage |
If a tool is defective, do not use it.
Tool Storage
Good storage improves safety and prevents tool damage.
Good storage practices include:
- Store tools in a toolbox, cabinet, rack, or shadow board.
- Keep sharp tools covered where possible.
- Store power tools in dry conditions.
- Keep measuring tools protected.
- Do not leave tools on ladders, pipes, or elevated surfaces.
- Keep heavy tools low and stable.
- Keep adhesives, sealants, and chemicals separate from tools.
- Return tools after use.
- Keep unauthorised persons away from dangerous equipment.
A clean and organised tool area reduces time waste and prevents accidents.
Real-Life Scenario
A worker needs to cut aluminium cladding for a pipe section. The correct snips are not nearby, so he uses an old pair of pliers and bends the sheet until it breaks. The edge becomes rough, sharp, and uneven. The cladding does not fit properly, and the worker cuts his hand while trying to force it into place.
The correct approach is to stop, select the proper cutting tool, mark the sheet accurately, support the sheet, cut along the marked line, smooth sharp edges, and fit the cladding properly. The right tool improves safety, accuracy, and workmanship.
Common Tool Mistakes
Avoid these mistakes:
- Using the wrong tool for the job.
- Cutting sheet metal without gloves.
- Drilling without eye protection.
- Using dull snips or damaged blades.
- Removing guards from power tools.
- Forcing a folding machine or roller beyond capacity.
- Leaving tools scattered on the floor.
- Measuring once and cutting immediately.
- Using damaged power cables.
- Carrying sharp tools in pockets.
- Leaving metal offcuts inside tools or machines.
- Using rusty or poorly maintained tools.
- Allowing untrained persons to use machines.
What a Pipe Insulator or Tinsmith Should Never Do
A pipe insulator or tinsmith should never:
- Use damaged tools or equipment.
- Use power tools without guards.
- Cut or grind without eye protection.
- Place fingers near rollers, blades, or folding points.
- Use a measuring tool that is bent or unreadable.
- Leave sharp tools or offcuts in walkways.
- Force tools beyond their design.
- Modify tools without approval.
- Use wet electrical tools.
- Store tools carelessly where they can fall or injure others.
- Continue using a tool that sparks, overheats, jams, or makes unusual noise.
Quick Recap
Tools and equipment are used to measure, mark, cut, form, join, fasten, install, and maintain pipe insulation and cladding systems. Hand tools provide control and accuracy, while power tools improve speed and productivity. Measuring and marking tools help prevent waste and poor fitting. Cutting and forming tools shape insulation and sheet metal into the required forms. Safe tool use requires inspection, correct selection, PPE, proper handling, good storage, and regular maintenance. A professional worker respects tools because good tools support safe, accurate, and high-quality work.