
Sheet Metal/Tinsmith Fabrication
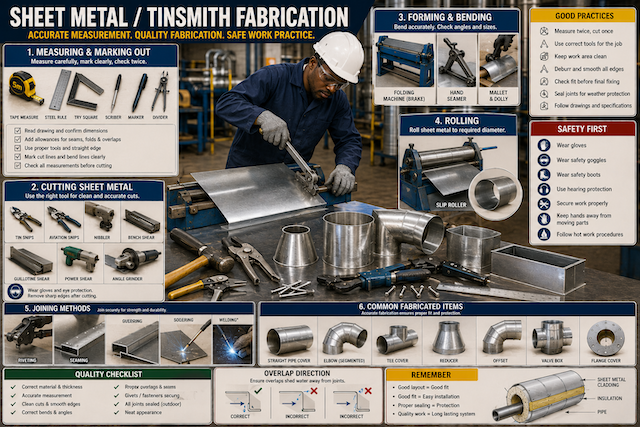
Introduction to Sheet Metal and Tinsmith Fabrication
Sheet metal and tinsmith fabrication is the process of measuring, marking, cutting, shaping, joining, and finishing thin metal sheets to produce useful parts. In pipe insulation work, these fabricated parts are commonly used as protective cladding over insulation.
A tinsmith may fabricate straight pipe covers, elbows, tees, reducers, offsets, valve boxes, flange covers, end caps, flashing, and protective jackets. Good fabrication requires accuracy, patience, safe tool handling, and understanding of how metal behaves when it is cut, bent, rolled, riveted, seamed, or soldered.
Sheet metal fabrication generally involves cutting, bending, shaping, and assembling metal sheets into useful components. Accurate cutting and bending are important because the finished parts must fit correctly and function as intended.
Measuring and Marking Out
Measuring and marking out is the first stage of fabrication. It involves transferring the required dimensions from a drawing, template, or actual pipe measurement onto the sheet metal before cutting.
Poor marking leads to poor cutting. Poor cutting leads to poor fitting. This is why a tinsmith must measure carefully before any material is cut.
Common marking tools include:
| Tool | Use |
|---|---|
| Tape measure | Measuring length, width, and circumference |
| Steel rule | Accurate short measurements |
| Try square | Marking right angles |
| Scriber | Scratching clear lines on metal |
| Marker pen | Marking temporary layout lines |
| Divider / compass | Marking circles, arcs, and repeated distances |
| Protractor | Marking angles |
| Chalk line | Marking long straight lines |
| Template | Repeating common shapes accurately |
Good Marking-Out Practice
Good marking-out practice includes:
- Place the sheet on a clean, flat surface.
- Confirm the correct material type and thickness.
- Check the drawing, pipe measurement, or template.
- Mark cut lines clearly.
- Mark bend lines differently from cut lines.
- Add allowance for overlap, seams, folds, and fixing.
- Mark the visible face carefully to avoid unnecessary scratches.
- Label parts when fabricating multiple pieces.
- Check all measurements before cutting.
The rule is simple: measure twice, mark clearly, check again, then cut.
Cutting Sheet Metal
Cutting is the process of separating sheet metal into the required size or shape. The cutting method depends on the material type, sheet thickness, shape required, available tools, and quality of finish expected.
Common cutting tools include:
| Cutting Tool | Common Use |
|---|---|
| Tin snips | Cutting thin sheet metal by hand |
| Aviation snips | Cutting curves, left cuts, right cuts, and straight cuts |
| Bench shear | Straight cutting of sheet metal |
| Guillotine shear | Long, straight, accurate sheet cutting |
| Nibbler | Cutting curves and irregular shapes |
| Power shear | Fast cutting of sheet metal |
| Hole punch | Creating holes in sheet metal |
| Angle grinder | Cutting or trimming metal where appropriate |
| Hacksaw | Cutting small metal sections or accessories |
Sheet metal tools such as snips and shears are commonly used for cutting thin metal sheets, while bench shears and other cutting equipment are used for heavier or straighter cuts.
Cutting Safety
Sheet metal has sharp edges, especially after cutting. Many injuries in metal work involve hand cuts and eye injuries from sharp metal pieces or flying particles. Proper gloves and eye protection are important controls.
Safe cutting practices include:
- Wear cut-resistant gloves.
- Wear safety goggles.
- Secure the sheet before cutting.
- Keep fingers away from the cutting line.
- Use the correct snips for the direction of cut.
- Do not force dull or damaged tools.
- Support large sheets to prevent sudden bending.
- Deburr sharp edges after cutting.
- Collect sharp offcuts immediately.
- Store cut pieces safely.
A clean cut improves safety, appearance, and fitting quality.
Folding and Bending
Folding and bending are used to form sheet metal into angles, edges, seams, covers, boxes, and cladding sections.
Bending changes the shape of the metal without cutting it. It is commonly done with a folding machine, brake, hand seamer, mallet, angle bar, or forming tool.
Common bending applications include:
- Straight cladding edges
- Overlaps
- Lock seams
- Box covers
- Valve covers
- End caps
- Flashing
- Strengthening edges
- Weatherproof lips
Good Bending Practice
Good bending requires correct measurement, correct bend line, suitable tool, and controlled pressure.
Good practice includes:
- Mark bend lines clearly.
- Confirm bend direction before bending.
- Allow for material thickness.
- Use the correct tool for the sheet thickness.
- Bend slowly and evenly.
- Avoid over-bending unless correction is planned.
- Keep fingers away from pinch points.
- Check the angle after bending.
- Avoid cracking coated or brittle material.
- Use a sample piece where necessary.
Bending is one of the major forming methods in sheet metal work and is used to create accurate angles and profiles from flat sheet.
Rolling
Rolling is used to form sheet metal into curved shapes. It is especially important for pipe cladding because pipe covers must fit around round insulation.
A slip roller or rolling machine is commonly used to roll sheet metal into cylindrical or curved sections.
Rolling is used for:
- Straight pipe cladding
- Cylindrical covers
- Large pipe jackets
- Curved sections
- Elbow segments
- Reducer sections
- Round equipment covers
Good Rolling Practice
Good rolling requires gradual adjustment and even feeding.
Good practice includes:
- Check the required finished diameter.
- Mark the sheet correctly.
- Feed the sheet straight into the roller.
- Adjust rollers gradually.
- Avoid forcing thick material beyond the machine capacity.
- Keep hands away from rollers.
- Support large sheets.
- Check the curve regularly.
- Make small corrections instead of forcing the metal.
- Avoid over-rolling.
A well-rolled cladding piece should sit neatly around the insulation without large gaps, flat spots, or excessive force.
Riveting
Riveting is a joining method used to permanently fasten two or more pieces of sheet metal together. It is common in tinsmith work because it is simple, strong, and useful for cladding, covers, elbows, tees, reducers, boxes, and fabricated accessories.
Common riveting tools and materials include:
| Item | Use |
|---|---|
| Hand rivet gun | Pulling pop rivets manually |
| Pneumatic rivet gun | Faster riveting for repeated work |
| Pop rivets | Common sheet metal fastening |
| Drill | Making rivet holes |
| Rivet washers | Supporting rivets where required |
| Centre punch | Marking hole positions |
| Deburring tool | Cleaning drilled holes |
Good Riveting Practice
Good riveting practice includes:
- Select the correct rivet size and material.
- Mark hole positions accurately.
- Drill the correct hole size.
- Keep sheets properly aligned.
- Insert the rivet fully.
- Pull the rivet squarely.
- Space rivets evenly.
- Avoid placing rivets too close to the edge.
- Remove sharp mandrel waste.
- Check that the joint is tight.
Riveting is one of the common sheet metal joining techniques, along with welding and other fastening methods.
Grooving and Seaming
Grooving and seaming are methods used to join or strengthen sheet metal edges. They help produce neat, strong, and professional sheet metal joints.
A seam is a folded or joined edge between two sheet metal pieces. A groove is a formed channel that can strengthen the metal, support joining, or improve fit.
Common seams include:
| Seam Type | Common Use |
|---|---|
| Lap seam | Simple overlap joint |
| Pittsburgh seam | Duct and sheet metal work |
| Grooved seam | Strong joined edge |
| Standing seam | Weather-resistant sheet metal joint |
| Locked seam | Secure mechanical joint |
| Hemmed edge | Safe folded edge to reduce sharpness |
Good Seaming Practice
Good seaming practice includes:
- Cut edges accurately.
- Keep fold allowances consistent.
- Align the sheets before closing the seam.
- Use the correct forming tool.
- Close seams evenly.
- Avoid crushing the insulation under cladding.
- Remove sharp edges.
- Seal seams where weatherproofing is required.
- Keep the seam direction suitable for water run-off.
Seaming is used to join sheet metal pieces and can be done with mechanical forming, riveting, soldering, welding, or other joining techniques depending on the work requirement.
Soldering and Basic Welding
Soldering and welding are joining methods used in some sheet metal and tinsmith work. They should only be performed by trained and authorised persons using safe procedures.
Soldering uses heat and filler metal to join light metal parts. It may be used for small tinsmith repairs, light sheet metal work, or special joints.
Welding uses higher heat to fuse metal parts together. It may be used for stronger fabrication work, but it creates higher risks and requires greater competence.
Hot Work Safety
Soldering, welding, cutting, brazing, and grinding are considered hot work because they can generate heat, sparks, flame, or hot surfaces. These activities present risks such as fire, burns, fumes, eye injury, and explosion if not properly controlled. OSHA covers welding, cutting, and brazing under specific safety standards, while HSE notes that welding activities can generate fumes that require risk assessment and control measures.
Safe hot work practices include:
- Use hot-work permits where required.
- Remove flammable materials from the area.
- Keep a suitable fire extinguisher nearby.
- Provide adequate ventilation.
- Wear eye and face protection.
- Wear heat-resistant gloves where required.
- Protect nearby insulation and cladding materials from sparks.
- Check for gas, vapour, oil, or combustible dust hazards.
- Keep a fire watch where required.
- Allow hot materials to cool before handling.
- Inspect the area after hot work.
Hot work should never be done near flammable adhesives, solvents, packaging, insulation materials, or oil without proper controls.
Fabrication of Elbows
An elbow cover is used to protect insulation around a pipe bend. Elbows may be fabricated in segments, often called gores.
The number of segments depends on pipe size, bend angle, appearance requirement, material thickness, and site standard.
Basic elbow fabrication involves:
- Measure the pipe and insulation diameter.
- Confirm the bend angle.
- Determine the number of segments.
- Mark out the segment pattern.
- Cut the sheet metal.
- Roll or form each segment.
- Fit the segments around the insulated bend.
- Overlap correctly.
- Rivet, screw, band, or seam as required.
- Seal joints where weatherproofing is required.
Good Elbow Fabrication Practice
A good elbow cover should:
- Follow the pipe bend neatly.
- Have consistent segment spacing.
- Avoid large gaps.
- Avoid sharp exposed edges.
- Allow proper overlap.
- Shed water correctly outdoors.
- Fit without crushing the insulation.
- Look neat and professional.
Poor elbow fabrication often causes gaps, wrinkles, water entry, and poor appearance.
Fabrication of Tees
A tee cover is used where one pipe branches from another. Tee fabrication requires accurate marking because the branch opening must fit properly around the joining pipe.
Basic tee fabrication involves:
- Measure the main pipe finished diameter.
- Measure the branch pipe finished diameter.
- Mark the main cladding section.
- Mark the branch cut-out.
- Cut the opening carefully.
- Form the branch section.
- Fit the parts around the insulation.
- Align the joint.
- Fasten and seal as required.
Good Tee Fabrication Practice
A good tee cover should:
- Fit tightly around the main and branch pipe.
- Have clean cut-outs.
- Avoid large openings around the branch.
- Maintain proper overlap.
- Allow water to shed away from joints outdoors.
- Avoid damaging the insulation.
- Allow future maintenance access where required.
Tee fittings are easy to spoil if the cut-out is guessed. Accurate measurement is essential.
Fabrication of Reducers
A reducer cover is used where a pipe changes from one size to another. Reducers may be concentric or eccentric.
A concentric reducer changes size evenly around the centreline. An eccentric reducer changes size with one side offset.
Basic reducer fabrication involves:
- Measure the large finished diameter.
- Measure the small finished diameter.
- Measure the reducer length.
- Identify whether it is concentric or eccentric.
- Mark the developed shape.
- Add seam and overlap allowance.
- Cut the metal.
- Roll or form the reducer shape.
- Fit and fasten carefully.
Good Reducer Fabrication Practice
A good reducer cover should:
- Match the pipe transition.
- Fit the insulation smoothly.
- Avoid wrinkles or gaps.
- Maintain correct overlap.
- Be sealed properly outdoors.
- Avoid forcing the sheet into shape.
Reducers require careful layout because one end is larger than the other.
Fabrication of Offsets
An offset cover is used where pipework changes position while continuing in the same general direction. Offsets may involve two bends and a short connecting section.
Basic offset fabrication involves:
- Measure the pipe finished diameter.
- Measure the offset distance.
- Confirm the bend angle.
- Measure the straight section between bends.
- Identify the number of cladding pieces needed.
- Mark out each part.
- Cut, roll, and fit the cladding.
- Align joints neatly.
- Fasten and seal.
Good Offset Fabrication Practice
A good offset cover should:
- Follow the pipe route accurately.
- Avoid twisted cladding.
- Maintain even overlap.
- Keep joints neat and accessible.
- Avoid gaps around bends.
- Protect insulation from water and damage.
Offsets should be measured from the actual pipe where possible because site conditions may differ from drawings.
Fabrication Quality
Fabrication quality affects durability, safety, appearance, and maintenance.
Quality fabrication should have:
- Accurate dimensions
- Clean cut lines
- Smooth edges
- Correct bends
- Even rolling
- Tight seams
- Proper rivet spacing
- Correct overlap direction
- Good sealing
- No exposed sharp edges
- No unnecessary dents
- No crushed insulation
- Neat final appearance
A professional tinsmith does not force poor pieces into place. If a fabricated part does not fit, the cause should be checked and corrected.
Real-Life Scenario
A tinsmith is asked to fabricate aluminium cladding for a 90-degree insulated elbow. He cuts one large piece and tries to force it around the bend without segmenting it. The metal wrinkles, gaps appear at the sides, and the cladding does not sit properly.
The correct approach is to measure the bend, decide the number of elbow segments, develop the pattern, cut each segment accurately, roll or form the pieces, overlap them correctly, fasten securely, and seal the joints where required.
Good elbow fabrication depends on measurement, layout, segment control, and careful fitting.
Common Fabrication Mistakes
Avoid these mistakes:
- Cutting before checking measurements.
- Forgetting seam or overlap allowance.
- Marking bend lines as cut lines.
- Using the wrong snips for curved cuts.
- Leaving sharp edges after cutting.
- Rolling sheet metal unevenly.
- Forcing sheet metal around bends.
- Using too few elbow segments.
- Riveting too close to the edge.
- Leaving gaps around tees and reducers.
- Sealing outdoor joints poorly.
- Crushing insulation under cladding.
- Using damaged or dented sheets.
- Ignoring the direction of water run-off.
What a Tinsmith Should Never Do
A tinsmith should never:
- Cut or form sheet metal without PPE.
- Use damaged cutting or forming tools.
- Put fingers near rollers, blades, or folding points.
- Leave sharp offcuts on the floor.
- Fabricate from guessed measurements.
- Ignore drawings or templates.
- Force badly fitting cladding into place.
- Leave seams open on outdoor systems.
- Perform hot work without authorisation and fire controls.
- Use soldering or welding equipment without training.
- Leave sharp edges exposed after installation.
- Cover poor workmanship without correcting it.
Quick Recap
Sheet metal and tinsmith fabrication involves measuring, marking, cutting, folding, bending, rolling, riveting, grooving, seaming, soldering, welding, and forming protective cladding parts. Accurate marking prevents waste, clean cutting improves fit, bending and rolling shape the metal, and riveting or seaming joins parts together. Elbows, tees, reducers, and offsets require careful measurement and layout. Safe fabrication requires correct tools, PPE, sharp-edge control, fire prevention, and good workmanship.