
Pipe Insulation Installation
Introduction to Pipe Insulation Installation
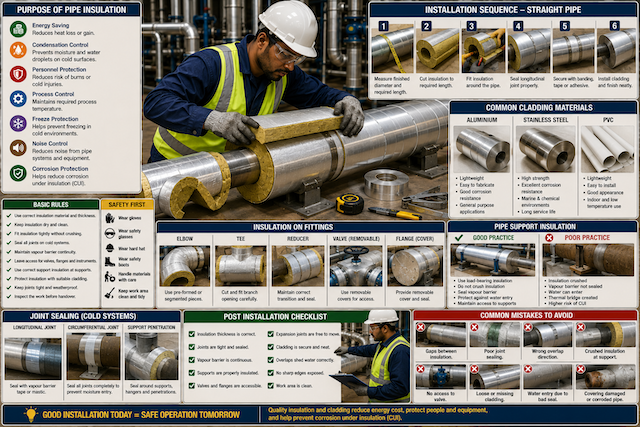
Pipe insulation installation is the practical process of fitting insulation materials around pipework, bends, tees, reducers, valves, flanges, expansion joints, supports, and hangers. A good installation should control heat transfer, prevent condensation, protect personnel, reduce energy loss, support process temperature, and protect the pipe system from avoidable damage.
Pipe insulation must be installed carefully because poor fitting can create gaps, water entry points, crushed insulation, condensation, heat loss, corrosion risk, and poor finishing. Installation guidance from the National Insulation Association notes that pipe hangers and supports can affect insulation performance and the ability to seal vapour retarders on cold systems.
Before Installation Begins
Before insulation is installed, the pipework and work area should be checked. Insulation should not be used to hide poor pipe condition, leaks, corrosion, dirt, or unfinished work.
Confirm the following before starting:
| Check | Why It Matters |
|---|---|
| Pipework is complete | Prevents insulation being removed for unfinished pipe work |
| Pressure testing is completed | Reduces the risk of covering leaking joints |
| Pipe surface is clean and dry | Helps prevent trapped moisture and corrosion |
| Insulation material is correct | Ensures it matches the service temperature and specification |
| Insulation is dry and undamaged | Wet or damaged insulation should not be installed |
| Pipe size is confirmed | Prevents wrong insulation size |
| Drawings are checked | Confirms correct line, thickness, and finish |
| Valves and flanges are identified | Helps plan removable covers and access |
| Supports are checked | Prevents crushed insulation and thermal bridging |
A pipe insulation installation manual states that piping and fittings should be pressure-tested before insulation is installed, and that pipe surfaces and insulation should be clean, dry, and in good mechanical condition.
Straight Pipe Insulation
Straight pipe insulation is usually the simplest part of pipe insulation work, but it still requires care. Poor joints, gaps, wrong thickness, or poor alignment can affect the whole system.
Straight pipe insulation may be supplied as:
- Pre-formed pipe sections
- Flexible foam tubes
- Insulation rolls
- Insulation blankets
- Rigid insulation blocks
- Multi-layer insulation sections
Installing Insulation on Straight Pipes
Basic steps include:
- Confirm pipe size and insulation thickness.
- Select the correct insulation section.
- Cut insulation to the required length.
- Fit the insulation tightly around the pipe.
- Close the longitudinal joint properly.
- Butt end joints tightly together.
- Stagger joints where required.
- Seal joints where the system requires vapour control.
- Secure the insulation using bands, tape, wire, adhesive, or approved fixing method.
- Prepare the surface for cladding where required.
Straight pipe insulation should fit firmly without large gaps. It should not be forced so tightly that the material becomes crushed or deformed.
Good Practice for Straight Pipes
Good straight pipe insulation should:
- Match the pipe size correctly.
- Maintain the specified thickness.
- Have tight joints.
- Avoid unnecessary gaps.
- Avoid crushed sections.
- Keep insulation dry.
- Maintain vapour barrier continuity on cold systems.
- Leave access to valves, drains, vents, and instruments.
- Provide a smooth base for cladding.
- Follow project drawings and specifications.
Insulation that is poorly fitted on straight sections will usually create problems when cladding is installed.
Elbows and Bends
Elbows and bends change the direction of pipework. They require careful insulation because the shape is curved and gaps can easily form.
Elbows may be insulated using:
- Pre-formed elbow insulation
- Mitred insulation sections
- Segmented insulation pieces
- Flexible insulation material
- Site-cut insulation blocks or blankets
Professional guidance for complex pipework notes that elbows, tees, valves, and flanges need careful cutting, fitting, sealing, and attention to access around bolts and maintenance points.
Installing Insulation on Elbows and Bends
Basic steps include:
- Confirm pipe diameter and insulation thickness.
- Check the bend angle.
- Select pre-formed elbow insulation or prepare segments.
- Cut pieces accurately to match the curve.
- Fit insulation tightly around the bend.
- Avoid open gaps at the throat and back of the bend.
- Seal joints where required.
- Secure insulation without crushing it.
- Prepare for segmented cladding or suitable outer protection.
Good Practice for Elbows
A good elbow insulation job should:
- Follow the curve of the pipe neatly.
- Have tight joints between segments.
- Maintain insulation thickness around the full bend.
- Avoid visible gaps.
- Avoid loose or uneven pieces.
- Maintain vapour barrier continuity on cold systems.
- Leave enough space for cladding overlap and sealing.
Elbows are common failure points when they are rushed. Gaps around elbows can cause heat loss, condensation, and poor cladding fit.
Tees
A tee is a pipe fitting where one pipe branches from another. Tee insulation requires careful measurement because the main pipe and branch pipe must meet neatly.
Tees may be insulated using:
- Pre-formed tee sections
- Site-cut insulation
- Flexible insulation
- Segmented pieces
- Specially fabricated covers
Installing Insulation on Tees
Basic steps include:
- Measure the main pipe and branch pipe.
- Confirm insulation thickness on both pipes.
- Fit the main pipe insulation first where practical.
- Mark the branch position accurately.
- Cut the branch opening neatly.
- Fit the branch insulation tightly.
- Seal all joints where required.
- Avoid gaps around the branch connection.
- Prepare for tee cladding or protective covering.
Good Practice for Tees
A good tee insulation installation should:
- Fit tightly around the main and branch pipe.
- Avoid large cut-outs.
- Maintain insulation thickness.
- Seal joints properly.
- Avoid compressing insulation at the branch.
- Allow cladding to fit neatly.
- Prevent water entry outdoors.
- Maintain vapour barrier continuity on cold systems.
Poorly insulated tees are often easy to identify because the cladding looks rough, the branch opening is too large, or the insulation has visible gaps.
Reducers
Reducers connect pipes of different sizes. The insulation must transition smoothly from the larger pipe to the smaller pipe.
Reducers may be concentric or eccentric. A concentric reducer changes size evenly around the centreline, while an eccentric reducer changes size with one side offset.
Installing Insulation on Reducers
Basic steps include:
- Measure the large pipe diameter.
- Measure the small pipe diameter.
- Measure reducer length.
- Confirm insulation thickness.
- Select or cut tapered insulation pieces.
- Fit the insulation smoothly over the reducer.
- Avoid gaps or uneven thickness.
- Seal joints where required.
- Prepare for reducer cladding.
Good Practice for Reducers
A good reducer insulation job should:
- Follow the reducer shape.
- Maintain specified thickness.
- Avoid wrinkles, gaps, or rough transitions.
- Seal properly on cold systems.
- Provide a smooth base for cladding.
- Align neatly with adjoining straight pipe insulation.
Reducers require patience because both ends have different sizes.
Valves and Flanges
Valves and flanges are important pipe components that often require inspection, operation, or maintenance. They should not be permanently covered in a way that prevents access.
HSE notes that water entering insulation can collect around discontinuities such as supports, elbows, horizontal pipe runs, nozzles, and other detail areas, which increases corrosion under insulation risk.
Insulating Valves
Valves may require removable insulation covers so they can be operated, inspected, or serviced.
When insulating valves:
- Confirm whether the valve should be insulated.
- Keep the handwheel, stem, actuator, or operating lever accessible.
- Use removable covers where required.
- Leave clearance for operation.
- Seal outdoor covers properly.
- Avoid trapping water around the valve body.
- Label removable covers where necessary.
- Reinstall covers properly after maintenance.
Valve insulation should not stop the valve from being operated.
Insulating Flanges
Flanges are bolted connections that may need future access. Many industrial systems use removable flange covers.
When insulating flanges:
- Confirm whether the flange should be insulated.
- Allow access to bolts where required.
- Use removable covers where specified.
- Avoid covering leaks or damaged gaskets.
- Seal the cover against weather where required.
- Avoid trapping water inside the cover.
- Refit covers correctly after inspection or maintenance.
Flanges and valves should never be covered carelessly. Poorly refitted covers can allow water into the insulation system.
Expansion Joints
Expansion joints allow pipework to move due to temperature changes, pressure changes, vibration, or system movement. They should be treated carefully during insulation.
Insulation around expansion joints must allow movement. If the insulation or cladding restricts movement, it can damage the joint, insulation, or pipe system.
Installing Insulation Around Expansion Joints
Basic rules include:
- Identify the expansion joint before installation.
- Check the drawing and specification.
- Do not restrict the movement of the joint.
- Use flexible or removable insulation where specified.
- Maintain required clearance.
- Avoid rigid cladding that blocks movement.
- Seal against weather without preventing expansion.
- Keep inspection access available.
- Report damaged expansion joints or abnormal movement.
Expansion joints should not be treated like ordinary straight pipe sections.
Pipe Supports and Hangers
Pipe supports and hangers carry the weight of the pipe and help control pipe movement. They are critical points in insulation work because insulation can be crushed, cut, bridged, or interrupted at supports.
The NIA notes that the selection and treatment of pipe hangers and supports can negatively affect the thermal performance of an insulation system and can affect the sealing of vapour retarders on cold systems.
Pipe Support Insulation
Pipe support areas may require stronger insulation materials or pre-insulated supports. Ordinary soft insulation may not carry the load and can become crushed.
Support insulation may include:
- Calcium silicate blocks
- Cellular glass blocks
- High-density PIR or PUR blocks
- Pre-insulated pipe supports
- Load-bearing insulation inserts
- Protective saddles
- Vapour barrier sealing around supports
- Cladding detail around support points
Good Practice for Pipe Supports
When insulating around pipe supports:
- Identify the support type.
- Do not crush insulation under pipe loads.
- Use load-bearing insulation where required.
- Maintain insulation thickness as much as practical.
- Seal vapour barriers on cold systems.
- Avoid water entry at supports.
- Keep support bolts and adjustment points accessible.
- Report corrosion, loose supports, or abnormal pipe movement.
- Ensure cladding does not interfere with support function.
Pipe supports are common weak points in insulation systems. They require special attention.
Finishing Techniques
Finishing is the final stage of insulation installation. It affects appearance, durability, safety, weather resistance, and maintenance access.
Good finishing includes:
- Tight insulation joints
- Smooth insulation surface
- Proper vapour barrier sealing
- Correct cladding alignment
- Neat overlap direction
- Secure bands or fasteners
- Smooth edges
- Clean sealant application
- No exposed sharp metal
- No loose pieces
- Proper valve and flange covers
- Good access for maintenance
The CINI manual includes detailed finishing guidance for pipes, supports, appendages, tanks, heat exchangers, and other industrial insulation applications, including hot, cold, cryogenic, and acoustic insulation.
Vapour Barrier Finishing
Cold and chilled systems often require a continuous vapour barrier. Any break in the vapour barrier can allow moisture to enter and cause condensation inside the insulation system.
Good vapour barrier finishing includes:
- Seal all longitudinal joints.
- Seal all circumferential joints.
- Seal around supports and hangers.
- Seal around valves and flanges.
- Seal around penetrations.
- Repair damaged vapour barrier immediately.
- Use compatible adhesive, tape, coating, or mastic.
- Avoid leaving open edges.
For low-temperature systems, manufacturer guidance may require vapour stop sealant at terminations, flanges, valves, supports, and other critical areas to prevent moisture migration within the insulation system.
Weatherproof Finishing
Outdoor insulation systems must be protected from rain, wash water, UV exposure, and mechanical damage.
Good weatherproof finishing includes:
- Correct cladding overlap direction.
- Sealed joints.
- Tight but non-crushing bands.
- Proper end caps.
- Sealed valve and flange covers.
- Correct treatment around supports.
- No upward-facing open joints.
- Immediate repair of damaged cladding.
- Smooth water-shedding finish.
Water should run off the cladding, not into it.
Inspection After Installation
After pipe insulation installation, the work should be inspected before handover.
Check:
| Area | What to Confirm |
|---|---|
| Straight pipes | Tight joints, correct thickness, smooth fit |
| Elbows and bends | No gaps, correct curve, proper sealing |
| Tees | Tight branch fit, no large cut-outs |
| Reducers | Smooth transition, no wrinkles or gaps |
| Valves | Operation and maintenance access preserved |
| Flanges | Access and removable covers provided where required |
| Expansion joints | Movement not restricted |
| Supports | Insulation not crushed, vapour barrier sealed |
| Cladding | Secure, neat, weatherproof, no sharp edges |
| Finish | Clean, aligned, and professional |
Defects should be corrected before the work is accepted.
Real-Life Scenario
A worker installs insulation on a chilled water line and fits straight sections neatly. However, around the pipe support, the vapour barrier is left open and the cladding has a gap. After some time, condensation forms at the support area and water begins to drip.
The problem is poor support treatment.
The correct approach is to use suitable support insulation, maintain vapour barrier continuity, seal the support area properly, and install cladding in a way that prevents moisture entry while still allowing the support to function.
Common Installation Mistakes
Avoid these mistakes:
- Installing insulation on dirty or wet pipe surfaces.
- Using wet or damaged insulation.
- Leaving gaps between insulation sections.
- Ignoring vapour barrier requirements on cold systems.
- Cutting elbow segments poorly.
- Leaving gaps around tees and reducers.
- Covering valves so they cannot be operated.
- Covering flanges without maintenance access where required.
- Treating expansion joints like rigid pipe sections.
- Crushing insulation at supports.
- Leaving support areas unsealed.
- Installing cladding with wrong overlap direction.
- Failing to replace removable covers properly.
- Ignoring rust stains, wet insulation, or damaged pipe coating.
What a Pipe Insulator Should Never Do
A pipe insulator should never:
- Cover leaking, wet, or corroded pipework without reporting it.
- Install insulation that is wet, damaged, or unsuitable.
- Leave gaps around bends, tees, reducers, valves, or supports.
- Break a vapour barrier and leave it unrepaired.
- Restrict movement at expansion joints.
- Crush insulation under pipe supports.
- Block access to valves, flanges, drains, vents, or instruments.
- Use cladding to hide poor insulation work.
- Leave outdoor insulation unsealed.
- Hand over work without inspection.
Quick Recap
Pipe insulation installation covers straight pipes, elbows, tees, reducers, valves, flanges, expansion joints, supports, and hangers. Straight sections require tight joints and correct thickness. Elbows and tees require accurate cutting and fitting. Reducers must transition smoothly. Valves and flanges often need removable covers for maintenance. Expansion joints must remain free to move. Pipe supports require special treatment to prevent crushed insulation, condensation, thermal bridging, and water entry. Good finishing requires proper sealing, vapour barrier continuity, weatherproofing, neat cladding, safe edges, and final inspection.