
Quality Assurance
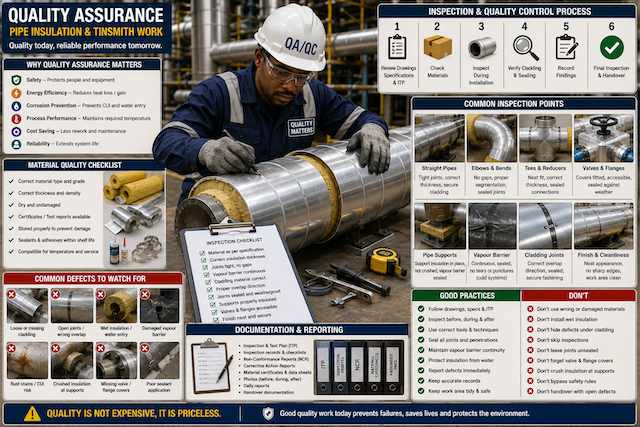
Introduction to Quality Assurance
Quality Assurance, often called QA, is the planned process of making sure pipe insulation and tinsmith work meets the required specification before, during, and after installation. It focuses on preventing defects, not just correcting them after the job is completed.
Quality Control, often called QC, is the checking and inspection process used to confirm that the work actually meets the required standard.
In simple terms:
| Term | Meaning |
|---|---|
| Quality Assurance | The system used to prevent poor work |
| Quality Control | The checks used to confirm work quality |
In pipe insulation and tinsmith work, QA/QC covers material inspection, measurement, fabrication, installation, cladding, sealing, weatherproofing, documentation, reporting, and final handover.
The CINI manual is widely used as a technical reference for industrial insulation and supports quality in design, execution, and inspection of insulation work.
Why Quality Assurance Matters
Quality assurance is important because insulation and cladding work affects safety, energy efficiency, process performance, corrosion prevention, and long-term maintenance.
Poor-quality work can cause:
- Heat loss
- Condensation
- Water entry
- Wet insulation
- Corrosion under insulation
- High surface temperature
- Poor process temperature control
- Loose or falling cladding
- Rework and material waste
- Failed inspection
- Client complaints
- Shortened insulation system life
A pipe insulation system may look acceptable from a distance but still fail if joints are open, vapour barriers are broken, cladding overlaps are wrong, or materials do not match the specification.
Quality Control Procedures
Quality control procedures are the step-by-step checks used to confirm that the work is correct. These procedures should follow the project specification, approved drawings, method statement, inspection and test plan, and manufacturer instructions.
A typical QC process includes:
- Review approved drawings and specifications.
- Inspect materials before installation.
- Confirm pipe condition before covering.
- Check insulation type and thickness.
- Inspect fitting around pipes, bends, tees, reducers, valves, and supports.
- Check vapour barriers and sealants.
- Inspect cladding material, overlap, fastening, and finish.
- Record defects and corrective actions.
- Reinspect corrected work.
- Prepare documentation for handover.
Inspection and Test Plans for thermal insulation usually check that materials, application, and installation meet project specifications, manufacturer data sheets, and approved quality procedures.
Inspection and Test Plan: ITP
An Inspection and Test Plan, or ITP, is a document that shows what must be inspected, when it should be inspected, who should inspect it, and what acceptance criteria should be used.
An ITP may include:
| Inspection Stage | What Is Checked |
|---|---|
| Material receiving | Correct material, quantity, condition, certificates |
| Surface readiness | Pipe clean, dry, tested, and ready for insulation |
| Insulation installation | Thickness, fit, joints, gaps, support details |
| Vapour barrier | Continuity, sealing, damage, terminations |
| Cladding installation | Material, overlap, fastening, weatherproofing |
| Fittings and covers | Valves, flanges, elbows, tees, reducers, supports |
| Final inspection | Finish, labels, records, defects closed |
An ITP helps prevent missed inspections and ensures that work is checked at the right time.
Material Inspection
Material inspection is the process of checking materials before they are used. This helps prevent wrong, damaged, wet, expired, or unsuitable materials from being installed.
Materials to inspect include:
- Insulation sections
- Insulation rolls or blankets
- Cladding sheets
- PVC cladding
- Stainless steel sheets
- Aluminium sheets
- Fasteners
- Bands and buckles
- Rivets and screws
- Sealants
- Adhesives
- Mastics
- Vapour barrier materials
- Pipe support insulation
- Removable covers
ASTM C1696 covers industrial thermal insulation systems and includes information on insulation material selection, system design, application methods, protective coverings, inspection, testing, and maintenance.
Material Inspection Checklist
Before installation, check:
| Item | What to Confirm |
|---|---|
| Material type | Matches approved specification |
| Thickness | Correct insulation thickness or sheet thickness |
| Quantity | Enough material for the work area |
| Condition | No damage, dents, cracks, tears, or contamination |
| Moisture | Insulation is dry |
| Storage | Material was stored correctly |
| Expiry date | Sealants, adhesives, and mastics are still valid |
| Certificates | Material certificates are available where required |
| Compatibility | Materials are suitable for temperature and environment |
| Identification | Labels, batch numbers, or markings are readable |
Damaged or incorrect material should not be installed without approval.
Common Material Defects
Common material defects include:
- Wet insulation
- Broken insulation sections
- Crushed insulation
- Dented cladding sheets
- Scratched stainless steel
- Corroded fasteners
- Expired sealant
- Wrong insulation thickness
- Wrong cladding material
- Missing vapour barrier
- Wrong adhesive for the insulation type
- Poorly stored materials
A worker should report material defects early. Installing poor material creates poor work.
Installation Inspection
Installation inspection checks whether the insulation and cladding have been installed correctly.
Inspection should happen during the work, not only at the end. Some defects become hidden after cladding is installed, so early inspection is important.
Installation inspection should check:
- Correct pipe line or equipment
- Correct insulation material
- Correct insulation thickness
- Tight insulation joints
- No visible gaps or voids
- No crushed insulation
- Correct treatment at bends, tees, reducers, valves, and flanges
- Correct pipe support insulation
- Continuous vapour barrier on cold systems
- Proper cladding overlap
- Secure bands, screws, rivets, or clips
- Good sealant application
- Weatherproof finishing
- No exposed sharp edges
Industrial insulation inspection templates commonly check whether insulation matches approved specifications, whether the vapour barrier and cladding are properly installed, and whether defects and corrective actions are documented.
Inspection of Straight Pipe Insulation
For straight pipe sections, check:
| Check | Standard Expectation |
|---|---|
| Fit | Insulation fits tightly around the pipe |
| Joints | End joints are closed without major gaps |
| Thickness | Specified thickness is maintained |
| Alignment | Sections are aligned neatly |
| Condition | No wet, crushed, or damaged insulation |
| Securing | Insulation is fixed as specified |
| Cladding | Smooth, secure, and correctly overlapped |
| Finish | Neat appearance with no sharp edges |
Straight pipe work may look simple, but poor jointing can create energy loss and water-entry points.
Inspection of Elbows, Tees and Reducers
Fittings require careful inspection because they are common weak points.
Check:
- Elbow segments are neat and properly overlapped.
- Tee branch openings fit closely.
- Reducers transition smoothly.
- No large gaps are visible.
- Vapour barrier is continuous where required.
- Cladding follows the shape correctly.
- Sealant is applied where required.
- Fasteners are secure.
- Weather-exposed joints shed water properly.
Poorly insulated fittings often lead to moisture entry, poor appearance, and early failure.
Inspection of Valves and Flanges
Valves and flanges often need removable covers for maintenance access.
Check:
- Covers are properly fitted.
- Covers can be removed where required.
- Valve operation is not blocked.
- Flange bolts remain accessible where specified.
- Covers are sealed against water entry.
- Fasteners or clips are secure.
- Covers are replaced after maintenance.
- No wet insulation is hidden inside covers.
Valve and flange covers must protect the insulation while still allowing future maintenance.
Inspection of Pipe Supports
Pipe support areas are critical because they carry load and often create insulation breaks.
Check:
- Correct support insulation is used.
- Insulation is not crushed.
- Vapour barrier is sealed on cold systems.
- Cladding does not interfere with the support.
- Water cannot collect around the support.
- Pipe movement is not restricted.
- Rust stains or water marks are reported.
- Support details match drawings or specification.
Poor support insulation can cause condensation, heat loss, water entry, and corrosion risk.
Industry Codes and Standards
Industry codes and standards provide guidance on material selection, installation requirements, inspection methods, safety expectations, and quality acceptance criteria.
Common references in industrial insulation work may include:
| Reference | Purpose |
|---|---|
| Project specification | Main instruction for the specific job |
| Approved drawings | Shows what should be installed and where |
| Manufacturer data sheets | Gives product limits and installation guidance |
| Method statement | Explains how work should be carried out |
| Inspection and Test Plan | Shows required inspection stages |
| CINI Manual | Industrial insulation reference for quality design, execution, and inspection |
| ASTM standards | Technical guidance for insulation materials and systems |
| Company procedures | Site-specific quality and safety rules |
The CINI handbook is updated regularly and is described as a reference manual for technical insulation in industry.
Why Standards Must Be Followed
Standards and specifications help ensure that insulation systems are:
- Safe
- Durable
- Energy efficient
- Suitable for the temperature
- Suitable for the environment
- Properly sealed
- Easy to inspect
- Properly documented
- Consistent across the project
A worker should not change materials, thickness, cladding type, overlap, or sealing method without approval.
Documentation and Reporting
Documentation is the written or digital record that proves what was checked, installed, corrected, and handed over.
Good documentation helps with:
- Quality control
- Client acceptance
- Maintenance planning
- Warranty support
- Future inspection
- Fault diagnosis
- Material traceability
- CUI monitoring
- Project closeout
A QA/QC checklist should document compliance verification, material specifications, job readiness, and installation quality.
Common QA/QC Documents
Common quality documents include:
| Document | Purpose |
|---|---|
| Material receiving report | Records delivered materials and condition |
| Material certificate | Confirms material properties or compliance |
| Inspection request | Requests inspection before work is covered |
| ITP checklist | Records inspection stages and acceptance |
| Non-conformance report | Records work that does not meet requirements |
| Corrective action report | Records how defects were fixed |
| Daily work report | Records work completed each day |
| Test and inspection record | Records inspection results |
| Photo report | Shows before, during, and after condition |
| Handover report | Confirms completed and accepted work |
Non-Conformance Report: NCR
A non-conformance happens when work or material does not meet the approved requirement.
Examples include:
- Wrong insulation thickness installed
- Wet insulation used
- Wrong cladding material installed
- Outdoor joints left unsealed
- Vapour barrier damaged
- Cladding overlap facing the wrong direction
- Valve cover missing
- Pipe support insulation crushed
- Work done without required inspection
An NCR should not be treated as punishment. It is a quality tool used to identify, correct, and prevent repeat defects.
Corrective Action
Corrective action is the step taken to fix a defect and prevent it from happening again.
A corrective action may include:
- Removing wrong material
- Replacing wet insulation
- Resealing failed joints
- Reinstalling cladding correctly
- Refitting valve covers
- Repairing vapour barriers
- Retraining workers
- Improving inspection timing
- Updating method statements
- Improving material storage
Corrective action should address the root cause, not only the visible defect.
Final Inspection and Handover
Final inspection is done when the work is complete and ready for acceptance.
Final inspection should confirm:
- Correct material was used.
- Insulation thickness is correct.
- Installation is complete.
- Joints are tight and sealed where required.
- Cladding is secure and neat.
- Weatherproofing is effective.
- Valves and flanges remain accessible.
- Pipe supports are properly treated.
- No sharp edges are exposed.
- Defects have been corrected.
- Records are complete.
- Work area is clean.
The work should not be handed over if major quality defects remain unresolved.
Real-Life Scenario
A team completes cladding on an outdoor chilled water line. During inspection, the QA/QC officer notices that some cladding joints are facing upward and sealant is missing around a pipe support. The work looks neat from a distance, but water can enter the insulation system.
The correct action is to raise the defect, remove or correct the affected cladding, seal the support area properly, reinstall the joints in the correct water-shedding direction, and reinspect before acceptance.
Quality work is not only about appearance. It must perform properly in service.
Common Quality Mistakes
Avoid these mistakes:
- Installing material before inspection.
- Using wrong insulation thickness.
- Covering wet insulation.
- Ignoring vapour barrier damage.
- Leaving gaps around fittings.
- Installing cladding with wrong overlap direction.
- Using damaged cladding sheets.
- Poor sealant application.
- Not treating pipe supports properly.
- Leaving valve covers loose.
- Failing to record defects.
- Hiding poor workmanship.
- Handing over work without final inspection.
- Ignoring project drawings and specifications.
What a Pipe Insulator or Tinsmith Should Never Do
A pipe insulator or tinsmith should never:
- Use materials that do not match the specification.
- Install wet or damaged insulation.
- Cover corrosion, leaks, or pipe damage without reporting.
- Ignore quality inspection requirements.
- Change insulation thickness without approval.
- Leave cold-system vapour barriers open.
- Leave outdoor joints unsealed.
- Hide defects under cladding.
- Sign off work that was not inspected.
- Remove inspection tags or records without permission.
- Treat documentation as unnecessary.
Quick Recap
Quality assurance ensures that pipe insulation and tinsmith work meets the required specification and performs safely in service. Quality control checks materials, installation, cladding, sealing, weatherproofing, fittings, supports, and finishing. Material inspection prevents wrong or damaged materials from being used. Installation inspection confirms that insulation and cladding are fitted properly. Industry codes, standards, drawings, and project specifications guide the work. Documentation and reporting provide proof of quality, record defects, support corrective action, and help future maintenance.