
Practical Welding Skills
Introduction to Practical Welding Skills
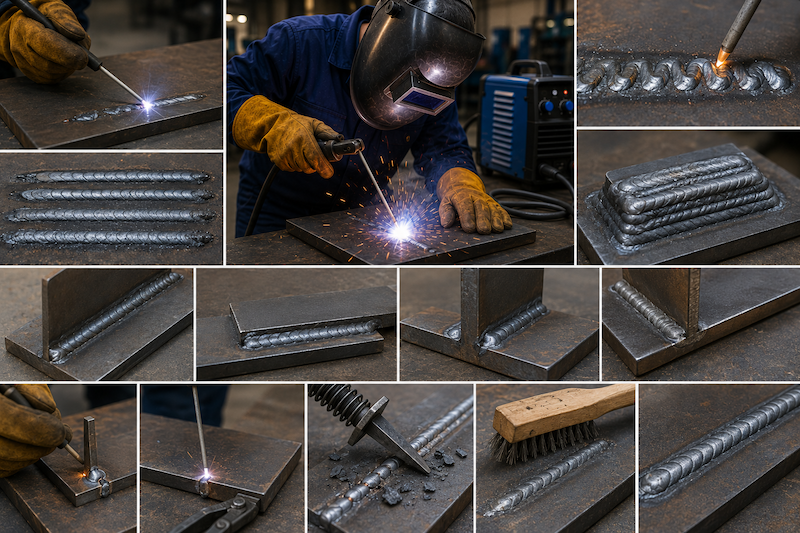
Practical welding skills are developed through repeated, guided practice. A trainee may understand safety, electrodes, machine setup, arc length, and travel speed, but real welding competence comes from applying those fundamentals on actual metal.
This module focuses on the key practical exercises every beginner arc welder must master: running straight beads, weaving, pad welding, tack welding, fillet welds, butt joints, lap joints, tee joints, corner joints, and multi-pass welding.
The goal is to help trainees develop hand control, arc control, weld pool control, joint preparation, bead consistency, and confidence in producing basic welds safely.
Why Practical Welding Skills Matter
Practical welding skills help trainees to:
- Improve hand steadiness.
- Control the arc more confidently.
- Produce consistent weld beads.
- Understand how heat affects metal.
- Join metal pieces properly.
- Prepare for real fabrication work.
- Reduce common weld defects.
- Improve speed and accuracy.
- Build workshop confidence.
- Develop professional welding habits.
Welding is a skill-based trade. The more correctly a trainee practises, the better the results become.
General Safety Before Practical Welding
Before any practical welding exercise, trainees must:
- Wear full PPE.
- Inspect welding machine, cables, electrode holder, and earth clamp.
- Keep the welding area clean and dry.
- Remove flammable materials.
- Ensure good ventilation.
- Select the correct electrode.
- Set the correct current.
- Attach the earth clamp to clean metal.
- Protect nearby people from arc rays.
- Confirm trainer approval before striking the arc.
No trainee should begin welding without permission and proper safety preparation.
Materials Needed for Practical Welding
Common materials and tools for this module include:
- Mild steel plates.
- Mild steel flat bars.
- Angle iron.
- Square pipes or hollow sections.
- E6013 electrodes for beginner practice.
- E7018 electrodes for advanced practice, where appropriate.
- Welding machine.
- Electrode holder.
- Earth clamp.
- Welding cables.
- Welding helmet.
- Welding gloves.
- Safety goggles.
- Chipping hammer.
- Wire brush.
- Angle grinder.
- Measuring tape.
- Try square.
- Soapstone or marker.
- Clamps.
- Welding table.
Trainees should start with mild steel because it is common, affordable, and suitable for beginner practice.
Practical Welding Workflow
Every practical welding activity should follow this workflow:
- Understand the task.
- Select the correct material.
- Measure and mark where necessary.
- Clean the metal surface.
- Set up the machine.
- Clamp or position the workpiece.
- Tack weld if needed.
- Perform the weld.
- Allow the weld to cool safely.
- Chip slag while wearing goggles.
- Brush the weld clean.
- Inspect the weld.
- Correct mistakes where required.
- Clean the work area.
A professional welder follows a process, not guesswork.
Running Straight Beads
Running straight beads is one of the first practical exercises in arc welding. A straight bead is a continuous line of weld deposited on a flat metal plate.
This exercise helps trainees practise:
- Arc striking.
- Arc length control.
- Electrode angle.
- Travel speed.
- Weld pool control.
- Bead consistency.
- Starting and stopping a weld.
- Slag removal.
- Visual inspection.
Straight bead practice is the foundation for welding joints.
How to Run a Straight Bead
Steps:
- Clean the surface of the mild steel plate.
- Mark straight guide lines using soapstone.
- Attach the earth clamp to clean metal.
- Select a suitable electrode, such as E6013.
- Set the welding current based on electrode size.
- Hold the electrode at the correct angle.
- Lower the helmet.
- Strike the arc at the start point.
- Allow the weld pool to form.
- Move steadily along the guide line.
- Maintain a short arc length.
- Keep travel speed consistent.
- Fill the crater at the end.
- Break the arc smoothly.
- Allow the weld to cool.
- Chip slag safely.
- Brush and inspect the bead.
The bead should be straight, even, smooth, and consistent.
Good Straight Bead Characteristics
A good straight bead should have:
- Uniform width.
- Uniform height.
- Smooth ripple pattern.
- Straight direction.
- Good fusion at the edges.
- Minimal spatter.
- No visible holes.
- No major undercut.
- No trapped slag.
- Clean surface after slag removal.
A neat bead shows good hand control, but it must also have proper fusion.
Common Straight Bead Mistakes
| Mistake | Possible Cause |
|---|---|
| Bead is too narrow | Moving too fast or current too low |
| Bead is too wide | Moving too slowly or current too high |
| Electrode keeps sticking | Current too low or arc too short |
| Excessive spatter | Arc too long or current too high |
| Bead is not straight | Poor hand position or lack of guide line |
| Uneven bead | Inconsistent travel speed |
| Holes in weld | Dirty metal, damp electrode, long arc |
| Slag difficult to remove | Low current, poor angle, poor technique |
Trainees should inspect every bead and understand what caused the result.
Weaving Techniques
Weaving is a controlled side-to-side movement of the electrode while moving along the weld direction. It is used to make a wider weld bead, fill wider joints, control the weld pool, and build up weld metal.
Weaving must be controlled. Excessive weaving can cause poor fusion, slag inclusion, overheating, distortion, and weak welds.
Beginners should first master straight beads before practising weaving.
Common Weaving Patterns
Common weaving patterns include:
| Weaving Pattern | Description |
|---|---|
| Side-to-side weave | Electrode moves gently left and right |
| Crescent weave | Electrode moves in small curved motions |
| Zigzag weave | Electrode moves from side to side in a controlled pattern |
| Circular weave | Small circular motion, used carefully |
| Triangle weave | Sometimes used in vertical welding under supervision |
The trainer should demonstrate the correct pattern for the weld position and joint type.
How to Practise Weaving
Steps:
- Clean the plate.
- Mark a guide line.
- Set correct current.
- Strike the arc.
- Form a weld pool.
- Move the electrode slightly from side to side.
- Pause briefly at each side to allow fusion.
- Keep the weave width controlled.
- Move forward steadily.
- Maintain short arc length.
- Stop smoothly and fill the crater.
- Chip, brush, and inspect.
The aim is not to make a very wide bead. The aim is to control the pool and produce a uniform weld.
Weaving Width
A beginner should avoid wide weaving. As a general rule, the weave should not be excessively wider than necessary for the joint.
Wide weaving may cause:
- Overheating.
- Slow travel.
- Slag trapped inside the weld.
- Poor fusion at the edges.
- Excessive bead width.
- Weak weld profile.
- Distortion.
The trainer should guide trainees on acceptable weave width.
Pad Welding
Pad welding is the practice of depositing multiple weld beads side by side and layer by layer on a metal plate. It helps trainees build control, consistency, and confidence.
Pad welding improves:
- Bead placement.
- Overlapping technique.
- Slag removal.
- Heat control.
- Multi-pass discipline.
- Surface build-up.
- Electrode manipulation.
- Weld pool control.
Pad welding is one of the best exercises for beginner welders.
How to Perform Pad Welding
Steps:
- Clean the base plate.
- Mark the welding area if required.
- Run the first straight bead.
- Allow the bead to cool slightly.
- Chip and brush off all slag.
- Run the second bead beside the first bead.
- Slightly overlap the toe of the previous bead.
- Continue until the plate surface is covered.
- Start a second layer if instructed.
- Alternate direction where required by the trainer.
- Remove slag between every pass.
- Inspect the finished pad.
Do not weld over slag. Each bead must be cleaned before the next bead is added.
Pad Welding Goals
A good pad welding exercise should show:
- Even bead spacing.
- Proper overlap between beads.
- Complete slag removal between passes.
- Consistent bead height.
- Consistent travel speed.
- Controlled heat input.
- No large gaps between beads.
- No excessive buildup in one area.
- Good overall surface appearance.
Pad welding trains the welder to be patient and consistent.
Common Pad Welding Mistakes
Avoid:
- Welding over slag.
- Poor bead overlap.
- Wide gaps between beads.
- Excessive heat buildup.
- Uneven bead height.
- Random bead direction.
- Poor cleaning between layers.
- Moving too fast.
- Long arc length.
- Using wrong current setting.
Pad welding requires discipline because the quality of each pass affects the next pass.
Tack Welding
Tack welding is the use of small temporary welds to hold metal pieces in position before final welding.
Tack welds are important in fabrication because they help maintain:
- Alignment.
- Joint gap.
- Squareness.
- Fit-up.
- Assembly shape.
- Position before final welding.
A poor tack weld can break, distort the job, or create defects in the final weld.
Purpose of Tack Welding
Tack welding helps to:
- Hold parts together before full welding.
- Prevent movement during welding.
- Maintain joint gap.
- Reduce distortion.
- Help assemble frames.
- Keep plates aligned.
- Allow checking before final weld.
- Save time during fabrication.
Tack welding is small, but it is very important.
How to Make a Tack Weld
Steps:
- Prepare and clean the joint.
- Align the parts correctly.
- Clamp the parts if necessary.
- Check squareness and dimensions.
- Set correct current.
- Strike the arc at the tack location.
- Deposit a short weld.
- Stop smoothly.
- Chip and inspect the tack if needed.
- Place additional tacks at suitable points.
- Recheck alignment before final welding.
Tack welds should be strong enough to hold the job but not so large that they interfere with the final weld.
Good Tack Weld Characteristics
A good tack weld should be:
- Properly fused.
- Correctly positioned.
- Strong enough to hold.
- Not too large.
- Not cracked.
- Clean before final welding.
- Not placed where it will disturb the final weld.
- Evenly spaced where required.
Tack welds should be treated as part of the job, not as careless temporary spots.
Tack Welding Mistakes
Avoid:
- Tack welds that are too small and weak.
- Tack welds that are too large.
- Tack welds on dirty metal.
- Tacking without checking alignment.
- Tacking without clamping where needed.
- Placing tacks in the wrong position.
- Welding over cracked tack welds.
- Failing to clean tacks before final welding.
- Depending on tacks to correct poor fit-up.
A tack weld should support good fabrication, not hide bad preparation.
Fillet Welds
A fillet weld is used to join two pieces of metal that meet at an angle, commonly 90 degrees. It is one of the most common weld types in fabrication.
Fillet welds are used in:
- Tee joints.
- Lap joints.
- Corner joints.
- Brackets.
- Frames.
- Supports.
- Stiffeners.
- Structural members.
A fillet weld has a triangular shape and must fuse properly into both pieces.
Parts of a Fillet Weld
Important parts include:
| Part | Meaning |
|---|---|
| Root | Deep point where the two plates meet |
| Toe | Edge where weld face meets base metal |
| Face | Visible surface of the weld |
| Leg length | Distance from root to toe on each plate |
| Throat | Shortest distance from root to weld face |
Trainees should understand that a fillet weld must fuse into both sides of the joint.
How to Make a Basic Fillet Weld
Steps:
- Clean both metal surfaces.
- Fit the pieces at the correct angle.
- Tack weld both ends.
- Check alignment.
- Position the electrode at about 45 degrees between the two plates.
- Use a slight travel angle.
- Strike the arc at the start point.
- Direct heat into the joint root.
- Move steadily along the joint.
- Keep the weld pool even on both sides.
- Fill the end crater.
- Chip, brush, and inspect.
The bead should not sit only on one plate. It must fuse into both plates.
Good Fillet Weld Characteristics
A good fillet weld should have:
- Even leg length.
- Smooth bead shape.
- Fusion into both plates.
- No undercut at the toes.
- No overlap.
- No trapped slag.
- No visible cracks.
- Correct size for the job.
- Clean appearance after slag removal.
Fillet welds are common in real work, so trainees must practise them carefully.
Common Fillet Weld Mistakes
| Mistake | Possible Cause |
|---|---|
| Weld mostly on one plate | Wrong work angle |
| Poor root fusion | Arc not directed into root, current too low |
| Undercut | Current too high, long arc, fast travel |
| Slag inclusion | Poor angle, poor cleaning, low current |
| Overlap | Travel too slow or current too low |
| Uneven leg length | Poor electrode positioning |
| Excessive spatter | Long arc or high current |
Correct electrode angle is very important in fillet welding.
Butt Joints
A butt joint is formed when two metal pieces are placed edge to edge and welded along the joint line.
Butt joints are used in:
- Plates.
- Pipes.
- Tanks.
- Frames.
- Sheet metal.
- Structural members.
- Repair work.
The joint may be square edge, V-groove, or other prepared shape depending on thickness.
Types of Butt Joint Preparation
| Preparation Type | Use |
|---|---|
| Square butt | Thin to medium metal, simple joints |
| Single V-groove | Thicker metal needing better penetration |
| Double V-groove | Thick metal welded from both sides |
| Root gap | Space between pieces to allow penetration |
| Root face | Small flat land left after beveling |
Beginners usually start with square butt joints on mild steel plates.
How to Weld a Basic Butt Joint
Steps:
- Cut two plates to size.
- Clean both edges.
- Align the plates edge to edge.
- Set the correct root gap if required.
- Clamp the plates.
- Tack weld both ends.
- Check alignment.
- Weld along the joint line.
- Maintain correct arc length.
- Keep the bead centered on the joint.
- Fill the end crater.
- Chip, brush, and inspect.
The weld must fuse into both edges.
Common Butt Joint Mistakes
Avoid:
- Poor alignment.
- No root gap where one is required.
- Excessive gap.
- Dirty edges.
- Weak tack welds.
- Bead not centered.
- Poor penetration.
- Burn-through.
- Slag inclusion.
- Distortion.
- Welding over tack defects.
A butt joint requires good fit-up before welding starts.
Lap Joints
A lap joint is made when one piece of metal overlaps another and the edge is welded.
Lap joints are common in:
- Sheet metal work.
- Brackets.
- Frames.
- Covers.
- Light fabrication.
- Reinforcement plates.
- Repair patches.
The weld is usually a fillet weld along the edge of the overlapping plate.
How to Weld a Lap Joint
Steps:
- Clean the surfaces where the plates overlap.
- Place one plate over the other.
- Align the overlap correctly.
- Clamp the plates.
- Tack weld the ends.
- Position the electrode to direct heat into both plates.
- Weld along the edge of the top plate.
- Maintain steady travel speed.
- Avoid burning through the top plate.
- Chip, brush, and inspect.
The weld should join both pieces properly, not simply sit on the top plate.
Common Lap Joint Mistakes
Avoid:
- Poor cleaning between overlapping surfaces.
- Poor fit-up.
- Welding only on the top plate.
- Insufficient fusion into the bottom plate.
- Excessive heat on thin top plate.
- Undercut at the top edge.
- Overlap defect.
- Distortion from too much heat.
Lap joints need good heat control, especially when metal thickness is light.
Tee Joints
A tee joint is formed when one metal piece is placed at approximately 90 degrees to another, forming a T shape. It is usually welded with fillet welds on one or both sides.
Tee joints are used in:
- Frames.
- Brackets.
- Stiffeners.
- Supports.
- Base plates.
- Structural fabrication.
- Machine stands.
- Gates and railings.
Tee joints are very common in fabrication work.
How to Weld a Tee Joint
Steps:
- Clean both pieces.
- Position one plate upright on the other at 90 degrees.
- Use a try square to check alignment.
- Clamp if necessary.
- Tack weld at both ends.
- Recheck squareness.
- Position electrode at about 45 degrees between both plates.
- Strike the arc.
- Direct the arc into the root of the joint.
- Move steadily.
- Keep both sides of the weld even.
- Chip, brush, and inspect.
Good tee joint welding depends on correct work angle and root fusion.
Common Tee Joint Mistakes
Avoid:
- Poor 90-degree alignment.
- Weak tack welds.
- Weld leaning to one side.
- Poor root penetration.
- Undercut on the vertical plate.
- Slag trapped at the root.
- Excessive weld buildup.
- Distortion due to poor sequence.
Tee joints help trainees understand fillet weld control.
Corner Joints
A corner joint is formed when two metal pieces meet at a corner, usually at 90 degrees.
Corner joints are used in:
- Boxes.
- Frames.
- Tanks.
- Covers.
- Cabinets.
- Square tubing.
- Metal furniture.
- Light fabrication.
Corner joints may be welded from the outside, inside, or both, depending on the job.
How to Weld a Corner Joint
Steps:
- Clean both edges.
- Align the pieces at the correct angle.
- Clamp the pieces.
- Tack weld both ends.
- Check squareness.
- Weld along the corner.
- Maintain correct arc length.
- Control travel speed.
- Avoid excessive heat.
- Chip, brush, and inspect.
Corner joints can distort easily, so good tacking and heat control are important.
Common Corner Joint Mistakes
Avoid:
- Poor alignment.
- Weak tacks.
- Excessive gap.
- Burn-through on thin material.
- Poor fusion at the corner.
- Excessive grinding after welding.
- Distortion.
- Welding too slowly.
- Long arc length.
Good corner joints require accurate fit-up before welding.
Multi-Pass Welding
Multi-pass welding means depositing two or more weld passes to fill a joint or build up weld metal. It is used when the joint is too large or too thick for one pass.
Multi-pass welding is common in:
- Thick plate welding.
- Structural welding.
- Groove welds.
- Large fillet welds.
- Repair buildup.
- Pad welding.
- Heavy fabrication.
Each pass must be properly cleaned before the next pass is added.
Types of Weld Passes
Common pass names include:
| Pass Type | Meaning |
|---|---|
| Root pass | First pass at the root of the joint |
| Hot pass | Pass after root pass, often used to refine and strengthen root area |
| Fill pass | Passes used to fill the joint |
| Cap pass | Final visible pass on top of the weld |
| Stringer bead | Straight narrow bead |
| Weave bead | Wider bead made with side-to-side motion |
In beginner training, trainees mostly practise stringer beads, simple weave beads, and layered pad welds.
Multi-Pass Welding Procedure
Steps:
- Prepare the joint correctly.
- Select suitable electrode.
- Set correct current.
- Deposit the first pass.
- Allow the weld to cool as required.
- Chip all slag completely.
- Brush the weld clean.
- Inspect for defects.
- Grind if instructed.
- Deposit the next pass.
- Repeat cleaning between passes.
- Complete the final pass.
- Clean and inspect the finished weld.
Never deposit a new pass over slag, cracks, or visible defects.
Importance of Slag Removal Between Passes
Slag left between passes can become trapped inside the weld. This defect is called slag inclusion.
Slag inclusion can weaken the weld and cause rejection during inspection.
To avoid slag inclusion:
- Chip thoroughly.
- Brush properly.
- Clean corners and edges.
- Remove loose slag completely.
- Grind trapped slag areas if required.
- Inspect before continuing.
Multi-pass welding requires patience and cleanliness.
Heat Control in Multi-Pass Welding
Too much heat during multi-pass welding can cause:
- Distortion.
- Burn-through.
- Wide weld bead.
- Weak appearance.
- Excessive spatter.
- Overheating of the workpiece.
- Difficulty controlling the weld pool.
Control heat by:
- Using correct current.
- Avoiding unnecessary weaving.
- Allowing cooling time where needed.
- Using proper sequence.
- Avoiding overwelding.
- Following trainer instruction.
Heat control becomes more important as the weld size increases.
Weld Cleaning and Inspection After Practice
After each practical weld:
- Allow the weld to cool safely.
- Wear goggles.
- Chip off slag.
- Brush the weld.
- Check bead shape.
- Check for cracks.
- Check for holes.
- Check for undercut.
- Check for slag inclusion.
- Check for excessive spatter.
- Ask trainer for feedback.
- Record improvement points where required.
Inspection helps trainees learn from each weld.
Basic Weld Quality Criteria
A trainee’s weld should be assessed for:
- Safety during work.
- Correct machine setup.
- Correct electrode use.
- Proper arc striking.
- Proper arc length.
- Correct electrode angle.
- Steady travel speed.
- Bead straightness.
- Bead uniformity.
- Slag removal.
- Fusion at joint edges.
- Absence of major visible defects.
- Clean work area after practice.
Practical skill is measured by both the weld result and the work behaviour.
Common Weld Defects During Practical Training
Common defects include:
| Defect | Possible Cause |
|---|---|
| Porosity | Dirty metal, damp electrode, long arc |
| Slag inclusion | Poor cleaning, wrong angle, low current |
| Undercut | High current, long arc, fast travel |
| Overlap | Low current or slow travel |
| Lack of fusion | Low heat, fast travel, wrong angle |
| Crater cracks | Poor stopping technique |
| Excessive spatter | High current or long arc |
| Burn-through | High current, thin metal, slow travel |
| Uneven bead | Poor hand control or travel speed |
Trainees should learn to connect defects with causes.
Body Position During Practical Welding
Good body position improves control.
Before welding:
- Stand or sit comfortably.
- Keep feet stable.
- Avoid stretching too far.
- Support your welding arm if possible.
- Keep cables from pulling your hand.
- Position your head to see the weld pool clearly.
- Plan the direction of travel.
- Practise the movement without striking the arc first.
A steady body helps produce a steady bead.
Practical Exercise 1: Straight Bead Practice
Task:
Run five straight beads on a mild steel plate.
Trainees should focus on:
- Correct current setting.
- Smooth arc striking.
- Short arc length.
- Correct travel angle.
- Steady travel speed.
- Straight bead line.
- Safe slag removal.
- Visual inspection.
Assessment:
- Beads should be straight and consistent.
- Spatter should be minimal.
- Slag should be properly removed.
- Starts and stops should be controlled.
Practical Exercise 2: Weaving Practice
Task:
Run three controlled weave beads on a mild steel plate.
Trainees should focus on:
- Small side-to-side movement.
- Consistent weave width.
- Slight pause at each side.
- Proper arc length.
- Slag control.
- Uniform bead appearance.
Assessment:
- Weave should not be too wide.
- Bead should be even.
- No slag should be trapped.
- Edges should show proper fusion.
Practical Exercise 3: Pad Welding
Task:
Build a weld pad by placing beads side by side.
Trainees should focus on:
- Cleaning between beads.
- Overlapping each bead correctly.
- Maintaining consistent bead height.
- Controlling heat.
- Filling gaps evenly.
- Creating a neat weld surface.
Assessment:
- Pad should show organised bead placement.
- No slag should remain between passes.
- Surface should be fairly uniform.
- Heat input should be controlled.
Practical Exercise 4: Tack Welding and Fit-Up
Task:
Align two plates and apply tack welds before final welding.
Trainees should focus on:
- Measuring and alignment.
- Clamping.
- Correct tack size.
- Correct tack placement.
- Rechecking alignment after tacking.
- Cleaning tacks before final weld.
Assessment:
- Parts should remain aligned.
- Tack welds should be sound.
- Tacks should not be too large.
- Final welding should not be affected by poor tacks.
Practical Exercise 5: Basic Joint Welding
Task:
Practise butt joint, lap joint, tee joint, and corner joint.
Trainees should focus on:
- Joint cleaning.
- Correct fit-up.
- Tack welding.
- Electrode angle.
- Root fusion.
- Bead control.
- Slag removal.
- Visual inspection.
Assessment:
- Weld should join both pieces properly.
- Joint should remain aligned.
- Bead should be consistent.
- No major visible defects should remain.
Practical Exercise 6: Multi-Pass Welding
Task:
Complete a simple multi-pass fillet weld or pad weld.
Trainees should focus on:
- First pass quality.
- Complete slag removal.
- Correct placement of each pass.
- Heat control.
- Final bead appearance.
- Inspection after each pass.
Assessment:
- No slag should be trapped between passes.
- Passes should be correctly placed.
- Weld size should be appropriate.
- Final weld should be clean and sound.
Real-Life Scenario
A trainee is asked to fabricate a small metal support bracket using a tee joint. The trainee first cleans the plates, checks the 90-degree angle with a try square, and applies tack welds at both ends. After checking the alignment, the trainee starts the fillet weld.
At first, the weld bead sits mostly on the bottom plate. The trainer explains that the electrode work angle is wrong and should be directed more evenly between the vertical and horizontal plates. The trainee adjusts the angle to about 45 degrees and directs the arc into the root of the joint.
The next weld shows better fusion on both plates. After cooling, the trainee chips the slag, brushes the weld, and inspects for undercut and slag inclusion.
The key lesson is that practical welding requires preparation, correct angle, steady movement, and inspection after welding.
Common Practical Welding Mistakes
Avoid these mistakes:
- Welding without cleaning the metal.
- Starting without proper PPE.
- Poor earth clamp connection.
- Wrong current setting.
- Arc too long.
- Moving too fast.
- Moving too slowly.
- Poor electrode angle.
- Weak tack welds.
- Welding over slag.
- Poor fit-up before welding.
- Excessive weaving.
- Not filling the crater.
- Touching hot metal with bare hands.
- Ignoring visible defects.
- Leaving the work area dirty.
What a Welding Trainee Should Never Do
A welding trainee should never:
- Weld without permission.
- Strike an arc without helmet and gloves.
- Use damaged cables or holder.
- Weld near flammable materials.
- Weld over slag without cleaning.
- Force badly fitted parts together with weld metal.
- Use tack welds to hide poor alignment.
- Grind without eye and face protection.
- Chip slag toward another person.
- Touch newly welded metal with bare hands.
- Continue welding when equipment behaves abnormally.
- Hide cracked, porous, or defective welds.
- Leave electrode stubs and hot metal on the floor.
Practical Skill Checklist
| Skill | Competent |
|---|---|
| Wears PPE correctly | |
| Sets up welding area safely | |
| Cleans metal before welding | |
| Runs straight beads | |
| Maintains short arc length | |
| Controls travel speed | |
| Uses correct electrode angle | |
| Performs basic weaving | |
| Performs pad welding | |
| Cleans slag between beads | |
| Applies tack welds correctly | |
| Welds a butt joint | |
| Welds a lap joint | |
| Welds a tee joint | |
| Welds a corner joint | |
| Performs simple fillet weld | |
| Performs simple multi-pass weld | |
| Chips and brushes weld safely | |
| Identifies visible defects | |
| Keeps work area clean |
Quick Recap
Practical welding skills are developed through repeated hands-on practice. Trainees must learn how to run straight beads, use controlled weaving, perform pad welding, apply tack welds, and weld common joints such as butt, lap, tee, and corner joints. Fillet welds are especially important because they are widely used in fabrication. Multi-pass welding teaches trainees the importance of cleaning between passes, controlling heat, and placing weld beads correctly. Good practical welding requires clean metal, correct current, proper electrode angle, short arc length, steady travel speed, complete slag removal, and careful inspection. A good welder does not only weld; a good welder prepares, welds, cleans, inspects, and improves.