
Welding Fundamentals
Introduction to Welding Fundamentals
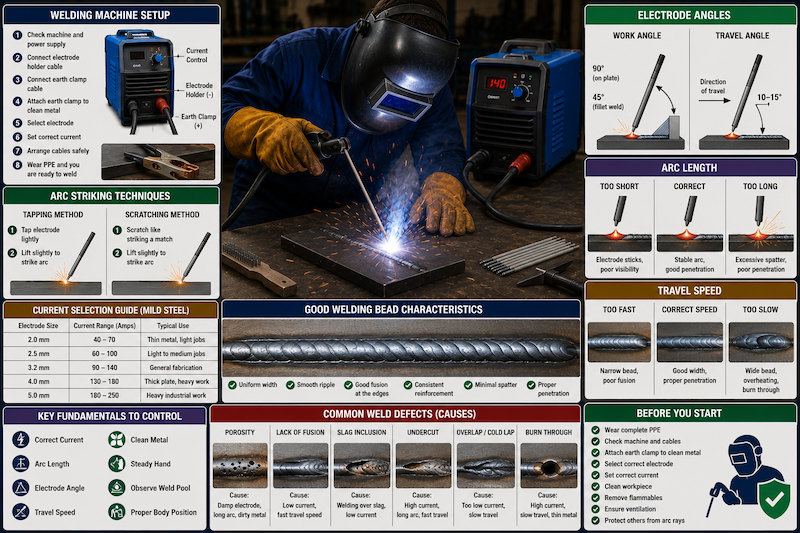
Welding fundamentals are the basic skills and controls every trainee must understand before producing quality welds. These fundamentals include correct machine setup, current selection, AC/DC current awareness, electrode angle, arc striking, arc length control, travel speed, and bead formation.
A welder may have good equipment and the correct electrode, but if the welding fundamentals are poor, the weld may still be weak, rough, uneven, or defective. Good welding depends on preparation, correct settings, steady hand movement, and continuous practice.
This module focuses on the practical foundation of manual arc welding, especially stick welding.
Why Welding Fundamentals Matter
Welding fundamentals help trainees to:
- Set up the welding machine safely.
- Choose suitable current settings.
- Strike the arc correctly.
- Prevent electrode sticking.
- Maintain a stable arc.
- Control heat input.
- Produce uniform weld beads.
- Reduce spatter.
- Improve penetration.
- Avoid common weld defects.
- Build confidence before welding joints.
- Develop steady hand control.
A trainee who masters the fundamentals will find practical welding easier in later modules.
Basic Welding Circuit Review
In arc welding, the welding machine supplies electric current through a complete circuit.
The circuit includes:
| Part | Function |
|---|---|
| Welding machine | Supplies welding current |
| Electrode holder | Holds the electrode and carries current |
| Electrode | Creates arc and supplies filler metal |
| Workpiece | Metal being welded |
| Earth clamp | Completes the return path |
| Welding cables | Carry current through the circuit |
For welding to work properly, the circuit must be complete, connections must be tight, and the earth clamp must be attached to clean metal.
Setting Up the Welding Machine
Before welding, the machine must be set up correctly. Poor setup can cause unstable arc, sticking electrode, poor penetration, overheating, electric shock, or equipment damage.
Basic setup steps:
- Wear complete welding PPE.
- Place the machine on a dry, stable surface.
- Check that the power supply is correct.
- Inspect the welding machine for damage.
- Check that ventilation openings are not blocked.
- Inspect welding cables.
- Connect the electrode holder cable correctly.
- Connect the earth clamp cable correctly.
- Attach the earth clamp to clean metal.
- Select the correct electrode.
- Set the correct welding current.
- Arrange cables safely.
- Ensure flammable materials are removed.
- Confirm ventilation is adequate.
- Start welding only when authorised.
Machine setup should never be rushed.
Pre-Welding Safety Check
Before striking the arc, check:
- Helmet is available and working.
- Gloves are dry and undamaged.
- Protective clothing is worn.
- Safety boots are worn.
- Work area is dry.
- Fire extinguisher is nearby.
- Flammable materials are removed.
- Cables are not damaged.
- Electrode holder is insulated.
- Earth clamp is secure.
- Workpiece is stable.
- Other people are protected from arc rays.
- Ventilation is adequate.
A professional welder checks safety before every weld.
Setting the Welding Current
Welding current is measured in amperes, commonly called amps. The current controls how much heat is produced at the arc.
If the current is too low:
- Electrode may stick.
- Arc may be unstable.
- Weld bead may sit on top of the metal.
- Penetration may be poor.
- Slag may be trapped.
- Weld may look narrow and rough.
If the current is too high:
- Electrode burns too fast.
- Excessive spatter occurs.
- Metal may burn through.
- Undercut may form.
- Weld bead may become flat and wide.
- Workpiece may distort.
The correct current depends on electrode size, electrode type, metal thickness, welding position, and joint type.
General Current Guide
The following is a general guide for mild steel electrodes:
| Electrode Size | Approximate Current Range |
|---|---|
| 2.0 mm | 40–70 amps |
| 2.5 mm | 60–100 amps |
| 3.2 mm | 90–140 amps |
| 4.0 mm | 130–180 amps |
| 5.0 mm | 180–250 amps |
These ranges are only starting points. The trainer, electrode packet, and practical result should guide the final setting.
How to Know Current Is Correct
Current may be correct when:
- The arc starts without excessive sticking.
- The arc sound is steady.
- The electrode melts evenly.
- The weld pool is controllable.
- Spatter is not excessive.
- The bead is smooth and consistent.
- Slag removes fairly easily.
- Penetration is adequate for the job.
- The weld does not burn through the plate.
A stable arc and controlled weld pool are signs of good current setting.
Adjusting Current During Practice
A trainee should learn to observe the weld and adjust safely.
| Observation | Possible Cause | Correction |
|---|---|---|
| Electrode sticks often | Current too low, arc too short, poor technique | Increase current slightly or improve arc control |
| Heavy spatter | Current too high, arc too long, wrong electrode angle | Reduce current or shorten arc |
| Bead too high and narrow | Low current or fast travel | Increase current slightly or slow down |
| Bead too wide and flat | High current or slow travel | Reduce current or increase travel speed |
| Burn-through | Current too high or metal too thin | Reduce current, use smaller electrode |
| Poor fusion | Low current, fast travel, dirty metal | Increase current, slow travel, clean metal |
Do not keep changing settings randomly. Observe, adjust, and test.
Current Types: AC and DC
Arc welding machines may supply AC, DC, or both.
| Current Type | Meaning |
|---|---|
| AC | Alternating current |
| DC | Direct current |
The current type affects arc stability, penetration, electrode behaviour, and suitable electrode selection.
Some electrodes are designed for AC, some for DC, and some for both. Always check the electrode packet or trainer’s instruction.
Alternating Current: AC
AC means the current changes direction many times per second.
General features of AC welding:
- Common on older transformer machines.
- Can be used with suitable electrodes.
- Useful for some general workshop applications.
- Arc may feel less smooth than DC with some electrodes.
- Helps reduce arc blow in some cases.
- Requires electrodes designed for AC use.
Trainees should not assume every electrode works well on AC.
Direct Current: DC
DC means the current flows in one direction. DC welding is common with inverter and rectifier machines.
General features of DC welding:
- Usually gives a smoother arc.
- Easier arc control for many trainees.
- Better choice for many electrodes.
- Allows polarity selection.
- Often used for structural and higher-quality welding.
- Can give better arc starting and weld control.
DC machines may allow the electrode to be connected positive or negative, depending on the required polarity.
Welding Polarity
Polarity applies to DC welding. It describes how the electrode and workpiece are connected.
| Polarity | Connection |
|---|---|
| DCEN | Electrode connected to negative terminal |
| DCEP | Electrode connected to positive terminal |
Polarity affects arc heat distribution, penetration, electrode melting rate, and bead shape.
Many electrodes specify the recommended polarity. For example, many E7018 electrodes are commonly used on DCEP, while other electrodes may work on AC or DC depending on the manufacturer.
Choosing AC/DC and Polarity
Before welding, check:
- What current type the machine provides.
- What the electrode packet recommends.
- What the trainer instructs.
- What the job specification requires.
- What polarity gives the best weld result.
Do not guess polarity on important work. Wrong polarity can cause unstable arc, poor penetration, excessive spatter, and poor bead appearance.
Electrode Angle
Electrode angle is the position of the electrode in relation to the workpiece and direction of travel. Correct electrode angle helps control the weld pool, penetration, bead shape, slag flow, and spatter.
There are two basic angles:
| Angle Type | Meaning |
|---|---|
| Work angle | Angle of the electrode across the joint |
| Travel angle | Angle of the electrode in the direction of movement |
A good welder controls both angles at the same time.
Work Angle
Work angle depends on the joint type.
General guide:
| Joint Type | Common Work Angle |
|---|---|
| Bead on plate | About 90 degrees to the plate surface |
| Fillet weld in tee joint | About 45 degrees between the two plates |
| Lap joint | Angle directed toward the joint root |
| Butt joint | Usually close to 90 degrees to the plate surface |
The correct work angle helps distribute heat evenly into the joint.
Travel Angle
Travel angle is the angle in the direction of travel. For stick welding, the electrode is often tilted slightly in the direction of movement or slightly back depending on technique and electrode type.
A common travel angle for basic flat welding is about 10 to 15 degrees from vertical in the direction of travel.
If the angle is too steep or too flat, the weld may suffer from:
- Poor slag control.
- Poor penetration.
- Excessive spatter.
- Uneven bead.
- Slag inclusion.
- Undercut.
Drag Technique and Push Technique
In stick welding, many electrodes are used with a drag or slight pull technique, where the electrode leans back slightly as the welder moves forward. This helps keep slag behind the weld pool.
In some welding processes, pushing is used, but in basic stick welding, trainees are often taught to drag or pull the electrode slightly.
General rule for beginners:
- Keep a steady travel angle.
- Keep slag behind the weld pool.
- Do not allow slag to run ahead of the molten metal.
- Follow trainer guidance for each electrode type.
Arc Striking Techniques
Arc striking is the process of starting the welding arc between the electrode and the workpiece.
There are two common methods:
| Method | Description |
|---|---|
| Tapping method | Tap the electrode lightly on the workpiece and lift slightly |
| Scratching method | Scratch the electrode like striking a match, then lift slightly |
Both methods require practice. The goal is to start the arc without the electrode sticking.
Tapping Method
Steps:
- Hold the electrode above the workpiece.
- Lower the helmet.
- Touch the electrode quickly to the workpiece.
- Lift it slightly to create the arc.
- Maintain a short, steady arc length.
- Start moving when the weld pool forms.
Common mistake: pressing the electrode too hard and making it stick.
Scratching Method
Steps:
- Hold the electrode at a slight angle.
- Lower the helmet.
- Scratch the electrode lightly across the metal surface.
- Lift slightly as the arc starts.
- Move to the starting point if needed.
- Maintain the correct arc length.
Common mistake: scratching too far away from the weld start point and leaving unwanted arc marks.
Preventing Electrode Sticking
Electrode sticking is common for beginners.
Causes may include:
- Current too low.
- Arc length too short.
- Poor striking technique.
- Damp electrode.
- Dirty workpiece.
- Poor earth connection.
- Incorrect electrode angle.
- Hesitation after arc starts.
To reduce sticking:
- Use correct current.
- Keep metal clean.
- Attach earth clamp properly.
- Strike firmly but lightly.
- Lift slightly after contact.
- Keep a short arc, not a buried electrode.
- Practise regularly.
If the electrode sticks, twist it loose quickly or release it from the holder if needed. Do not panic.
Arc Length Control
Arc length is the distance between the electrode tip and the workpiece. It is one of the most important welding controls.
For stick welding, a common guide is to keep the arc length approximately equal to the diameter of the electrode core wire.
For example:
- 2.5 mm electrode: short arc around 2.5 mm.
- 3.2 mm electrode: short arc around 3.2 mm.
The arc should not be too long or too short.
Effects of Long Arc Length
If the arc is too long:
- Arc becomes unstable.
- Spatter increases.
- Weld bead becomes rough.
- Porosity may occur.
- Penetration may reduce.
- Undercut may appear.
- Weld pool becomes harder to control.
- Arc sound becomes harsh.
A long arc is a common beginner mistake.
Effects of Short Arc Length
If the arc is too short:
- Electrode may stick.
- Arc may keep cutting out.
- Weld pool may be difficult to see.
- Slag may interfere with the arc.
- Bead may become irregular.
- Fusion may be poor if travel is also incorrect.
A short arc is good, but the electrode must not be buried into the weld pool.
Maintaining Arc Length as Electrode Burns
As the electrode burns, it becomes shorter. The welder must gradually move the hand closer to the workpiece to maintain the same arc length.
This is difficult for beginners because they must control three movements at the same time:
- Moving along the weld line.
- Feeding the electrode downward as it burns.
- Maintaining correct angle and speed.
This is why bead practice is important.
Travel Speed
Travel speed is how fast the electrode moves along the joint or plate.
Travel speed affects:
- Bead width.
- Bead height.
- Penetration.
- Heat input.
- Slag control.
- Fusion.
- Weld appearance.
A consistent travel speed helps produce a uniform bead.
Effects of Moving Too Fast
If travel speed is too fast:
- Bead becomes narrow.
- Weld may be small and weak.
- Penetration may be poor.
- Fusion may be incomplete.
- Slag may be trapped.
- Bead may look rope-like.
- Undercut may occur.
The weld may look like it is sitting on top of the metal instead of fusing into it.
Effects of Moving Too Slowly
If travel speed is too slow:
- Bead becomes too wide.
- Excessive heat enters the metal.
- Metal may burn through.
- Slag may flood the weld pool.
- Weld may become too high or uneven.
- Distortion may increase.
- Excessive buildup may occur.
The welder must move steadily and observe the weld pool.
Finding the Correct Travel Speed
Correct travel speed is achieved when:
- The bead is uniform.
- The weld pool is controlled.
- The edges of the weld blend into the base metal.
- Slag stays behind the weld pool.
- Bead width is suitable.
- Penetration is adequate.
- There is no excessive undercut or buildup.
The welder should watch the leading edge of the weld pool, not just the arc light.
Bead Formation
A weld bead is the deposited line of weld metal. Good bead formation shows that current, arc length, travel speed, electrode angle, and metal preparation are working together.
A good beginner weld bead should be:
- Straight.
- Uniform in width.
- Uniform in height.
- Well fused at the edges.
- Free from excessive spatter.
- Free from major holes.
- Clean after slag removal.
- Consistent from start to finish.
Bead formation improves with repetition.
Parts of a Weld Bead
A weld bead may include:
| Part | Meaning |
|---|---|
| Face | Visible top surface of the weld |
| Toe | Edge where weld meets base metal |
| Root | Deepest part of the weld joint |
| Reinforcement | Weld metal above the plate surface |
| Penetration | Depth of fusion into the base metal |
| Heat affected zone | Area beside weld affected by heat |
Trainees should learn to look at bead shape and identify whether technique needs correction.
Straight Bead Practice
Straight bead practice is the first major practical exercise for many trainees.
Steps:
- Clean a mild steel plate.
- Draw straight guide lines using soapstone.
- Set the machine current.
- Hold the electrode at correct angle.
- Strike the arc.
- Allow the weld pool to form.
- Move steadily along the guide line.
- Maintain arc length.
- Stop at the end of the line.
- Allow the weld to cool.
- Chip slag safely.
- Brush and inspect the bead.
Straight bead practice builds hand control.
Starting a Weld Bead
At the start of a weld:
- Strike the arc at or near the start point.
- Allow a small weld pool to form.
- Do not move too quickly immediately.
- Maintain correct arc length.
- Begin moving steadily once the pool is established.
A poor start may cause lack of fusion or a thin starting point.
Ending a Weld Bead
At the end of the weld:
- Do not lift the electrode suddenly.
- Pause briefly to fill the crater.
- Move slightly back if needed.
- Break the arc smoothly.
- Allow the weld to cool.
- Chip and inspect.
A crater left at the end of a bead can become a weak point and may crack in some applications.
Restarting a Weld Bead
Sometimes the electrode finishes before the weld is complete.
To restart:
- Chip slag from the end of the previous weld.
- Brush the area clean.
- Restart slightly before the end of the previous bead.
- Move into the crater and continue welding.
- Keep the bead uniform.
Do not restart over slag. Slag trapped inside the weld can cause defects.
Weld Pool Control
The weld pool is the molten metal created by the arc. The welder must control the size, shape, and movement of the weld pool.
To control the weld pool:
- Use correct current.
- Keep a short arc.
- Maintain correct electrode angle.
- Move at steady speed.
- Watch the edges of the pool.
- Keep slag behind the weld pool.
- Avoid sudden hand movement.
- Keep a stable body position.
A welder controls the pool, not just the electrode.
Body Position and Comfort
Good body position helps steady hand control.
Before striking the arc:
- Stand comfortably.
- Support your body if possible.
- Keep feet stable.
- Avoid overreaching.
- Position the work at a comfortable height where possible.
- Hold the electrode holder firmly.
- Rest your welding hand or support hand if safe.
- Plan your movement before starting.
- Make sure cables do not pull your hand.
Poor body position causes shaky beads and poor control.
Hand and Eye Coordination
Welding requires the eyes and hands to work together.
The welder must watch:
- Arc position.
- Weld pool.
- Slag movement.
- Joint line.
- Electrode angle.
- Travel direction.
- Bead width.
Beginners often focus only on the bright arc. With practice, they learn to watch the molten pool and the edges of the bead.
Cleaning Before Welding
Metal should be cleaned before welding. Dirt and contamination can cause defects.
Remove:
- Rust.
- Paint.
- Oil.
- Grease.
- Moisture.
- Thick scale.
- Dirt.
- Loose coating.
Tools used for cleaning include:
- Wire brush.
- Grinder.
- File.
- Scraper.
- Clean cloth.
Good cleaning improves arc stability and weld quality.
Slag Removal
In stick welding, slag forms over the weld bead. Slag protects the weld while it cools, but it must be removed before inspection or before another pass.
Slag removal steps:
- Allow weld to cool slightly.
- Wear goggles or face shield.
- Use chipping hammer.
- Chip away from the body.
- Keep others away.
- Brush with wire brush.
- Inspect the bead.
Never chip slag without eye protection.
Multi-Pass Awareness
Some welds require more than one pass. A pass is one layer or run of weld metal.
Before adding another pass:
- Remove slag completely.
- Brush the weld clean.
- Check for visible defects.
- Grind if required.
- Ensure the previous pass is sound.
- Maintain correct electrode angle and speed.
Welding over slag causes slag inclusion and weak welds.
Good Bead Appearance
A good beginner bead should show:
- Consistent width.
- Even ripple pattern.
- Smooth edges.
- No large holes.
- No excessive spatter.
- No undercut.
- No trapped slag.
- No sudden high and low sections.
- Good fusion at the sides.
A neat bead is not always a strong weld, but poor bead appearance is often a sign of poor control.
Common Bead Problems and Causes
| Bead Problem | Possible Cause |
|---|---|
| Bead too narrow | Travel speed too fast or current too low |
| Bead too wide | Travel too slow or current too high |
| Excessive spatter | Long arc, high current, wrong angle |
| Undercut | High current, long arc, fast travel, wrong angle |
| Porosity | Dirty metal, damp electrode, long arc |
| Slag inclusion | Poor slag removal, wrong angle, low current |
| Poor penetration | Low current, fast travel, poor preparation |
| Burn-through | High current, slow travel, thin metal |
| Irregular bead | Shaky hand, poor body position, inconsistent speed |
| Electrode sticking | Low current, short arc, poor striking technique |
The bead tells the welder what needs correction.
Welding Sound
A stable arc usually has a steady sound. Many welders describe a good arc sound as smooth and consistent.
A poor arc may sound:
- Harsh.
- Popping.
- Irregular.
- Explosive.
- Weak.
- Cutting in and out.
Sound alone is not enough to judge the weld, but it helps the welder recognise changes in arc stability.
Basic Weaving Awareness
Although this module focuses on fundamentals, trainees should understand that weaving means moving the electrode side to side while traveling forward.
Weaving may be used to:
- Make a wider bead.
- Fill a wider joint.
- Control weld pool shape.
- Build up weld metal.
- Join wider gaps.
Beginners should first master straight beads before advanced weaving. Too much weaving can cause poor fusion, overheating, slag inclusion, and wide weak beads.
Tack Welding Awareness
Tack welds are small temporary welds used to hold pieces in place before final welding.
Good tack welds should:
- Be placed correctly.
- Be strong enough to hold alignment.
- Not be too large.
- Be cleaned before welding over.
- Not create defects in the final weld.
Tack welding is covered more practically in later modules, but trainees should understand its purpose early.
Heat Control
Heat control means managing the amount of heat going into the metal.
Heat is affected by:
- Current setting.
- Electrode size.
- Travel speed.
- Arc length.
- Number of passes.
- Joint design.
- Metal thickness.
Too much heat can cause distortion, burn-through, wide bead, and weak appearance. Too little heat can cause poor fusion and poor penetration.
Distortion Awareness
Distortion is the bending or movement of metal caused by welding heat and cooling. When hot metal cools, it shrinks and can pull parts out of position.
Basic ways to reduce distortion include:
- Use correct current.
- Avoid excessive heat.
- Use proper tack welds.
- Use clamps and fixtures.
- Weld in a planned sequence.
- Avoid overwelding.
- Allow cooling where necessary.
Distortion control becomes more important in fabrication work.
Basic Weld Quality Awareness
A quality weld should be:
- Safe.
- Strong enough for the job.
- Properly fused.
- Correct size.
- Free from serious defects.
- Clean after slag removal.
- Neat where appearance matters.
- Made according to instruction or drawing.
Weld quality begins with correct fundamentals.
Common Beginner Mistakes
Avoid these mistakes:
- Welding without full PPE.
- Forgetting to clean the metal.
- Poor earth clamp connection.
- Setting current without checking electrode size.
- Starting with current too low.
- Holding a long arc.
- Moving too fast.
- Moving too slowly.
- Changing angle constantly.
- Watching only the bright arc instead of the weld pool.
- Chipping slag without goggles.
- Welding over slag during restart.
- Lifting the electrode suddenly at the end of the bead.
- Poor body position.
- Not inspecting the bead after welding.
What a Welding Trainee Should Never Do
A welding trainee should never:
- Strike an arc without a helmet.
- Weld without trainer permission.
- Use damaged cables or holders.
- Weld on dirty, oily, or wet metal without preparation.
- Touch live electrode with bare hands.
- Weld in wet gloves or wet clothing.
- Use random current settings without guidance.
- Chip slag toward another person.
- Restart a weld over slag.
- Touch hot metal with bare hands.
- Ignore excessive spatter, smoke, or unstable arc.
- Hide equipment faults or poor weld results.
Practical Exercise 1: Machine Setup
Trainees should practise setting up the welding machine under supervision.
Task steps:
- Wear PPE.
- Inspect cables and electrode holder.
- Place the machine safely.
- Connect electrode holder and earth clamp.
- Attach earth clamp to clean metal.
- Select electrode.
- Set current.
- Arrange cables safely.
- Confirm work area is safe.
Purpose: To build safe setup habits before welding.
Practical Exercise 2: Arc Striking
Trainees should practise both tapping and scratching methods.
Task steps:
- Clean a practice plate.
- Set correct current.
- Hold electrode correctly.
- Strike arc using tapping method.
- Break arc safely.
- Strike arc using scratching method.
- Practise until sticking reduces.
Purpose: To build confidence starting the arc.
Practical Exercise 3: Arc Length Control
Trainees should practise maintaining a short, steady arc.
Task steps:
- Strike the arc.
- Hold a short arc.
- Move slowly along the plate.
- Keep the electrode from touching the metal.
- Observe arc sound and bead appearance.
- Compare long arc and correct arc results.
Purpose: To understand how arc length affects weld quality.
Practical Exercise 4: Straight Beads
Trainees should run straight beads on mild steel plate.
Task steps:
- Mark straight lines on the plate.
- Strike arc at start point.
- Maintain electrode angle.
- Move along the line at steady speed.
- Fill crater at the end.
- Chip slag safely.
- Brush and inspect.
Purpose: To develop hand control, travel speed, and bead consistency.
Practical Exercise 5: Current Adjustment
Trainees should compare weld beads at different current settings.
Task steps:
- Run one bead at low current.
- Run one bead at correct current.
- Run one bead at high current.
- Chip and brush all beads.
- Compare bead shape, spatter, slag, and penetration appearance.
Purpose: To learn how current affects welding performance.
Practical Exercise 6: Bead Inspection
Trainees should inspect their weld beads visually.
Check:
- Bead straightness.
- Width consistency.
- Height consistency.
- Spatter level.
- Undercut.
- Porosity.
- Slag removal.
- Start and stop points.
Purpose: To help trainees connect technique with weld appearance.
Real-Life Scenario
A trainee is practising straight beads with a 3.2 mm E6013 electrode. At first, the electrode sticks repeatedly. The trainer checks the setup and sees that the current is too low and the trainee is holding the electrode too close to the plate. The current is adjusted slightly, and the trainee practises lifting the electrode just enough to maintain a short arc.
The next bead starts better, but it becomes narrow and uneven because the trainee moves too fast. The trainer asks the trainee to slow down and watch the weld pool instead of only watching the bright arc. After several more attempts, the bead becomes wider, smoother, and more consistent. The key lesson is that good welding comes from controlling current, arc length, electrode angle, and travel speed together.
Practical Skill Checklist
| Skill | Competent |
|---|---|
| Wears PPE correctly | |
| Sets up welding machine safely | |
| Connects cables correctly under supervision | |
| Attaches earth clamp to clean metal | |
| Selects suitable electrode size | |
| Sets approximate welding current | |
| Explains AC and DC basics | |
| Explains polarity basics | |
| Demonstrates tapping arc strike | |
| Demonstrates scratching arc strike | |
| Maintains short arc length | |
| Holds correct electrode angle | |
| Controls travel speed | |
| Runs a straight bead | |
| Fills crater at weld end | |
| Chips slag safely | |
| Brushes and inspects weld bead | |
| Identifies basic bead defects |
Quick Recap
Welding fundamentals are the foundation of good arc welding. The trainee must set up the machine correctly, inspect cables, connect the electrode holder and earth clamp, select the right electrode, and set suitable current. AC and DC current affect arc behaviour and electrode choice, while polarity affects weld performance in DC welding. Electrode angle, arc striking, arc length, travel speed, and bead formation must be controlled together. A good weld bead should be straight, smooth, consistent, and properly fused. Beginners should practise arc striking, short arc control, straight beads, current adjustment, slag removal, and visual bead inspection. The more correctly trainees practise these fundamentals, the better their welding skills will become.