
Weld Defects and Inspection
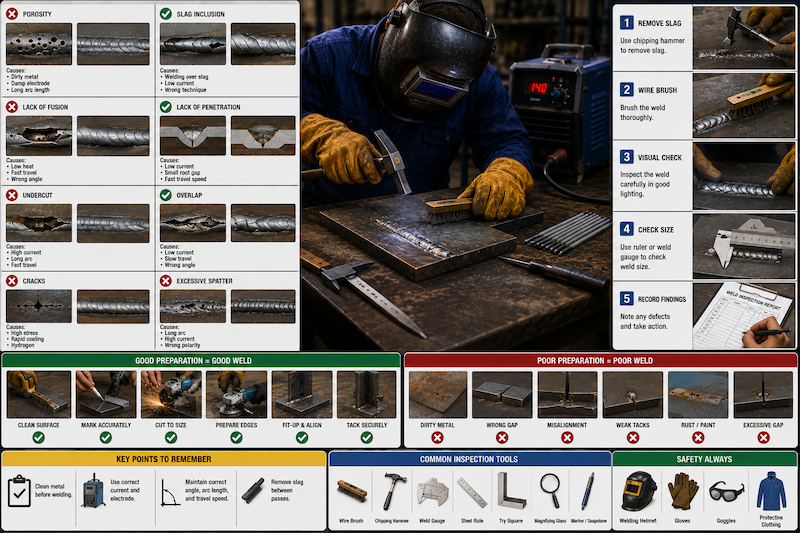
Introduction to Weld Defects and Inspection
Weld defects are faults, imperfections, or irregularities that reduce the quality, strength, appearance, or safety of a weld. Some defects are visible on the surface, while others may be hidden inside the weld.
Inspection is the process of checking a weld to confirm whether it is acceptable for its intended use. In basic welding training, trainees mainly practise visual inspection, which means checking the weld with the eyes, basic tools, and simple measuring aids.
A good welder does not only produce welds. A good welder also checks welds, identifies defects, understands their causes, and corrects poor technique. Welding inspection helps improve safety, quality, confidence, and professionalism.
Why Weld Inspection Is Important
Weld inspection is important because poor welds can fail during use. A failed weld may cause injury, equipment damage, structural collapse, leakage, customer complaints, or costly rework.
Inspection helps to:
- Identify poor welding technique.
- Detect visible weld defects.
- Confirm if the weld has acceptable appearance.
- Improve weld quality.
- Reduce rework.
- Prevent unsafe fabrication.
- Build trainee discipline.
- Improve confidence in finished work.
- Support quality control in workshops and industries.
- Help welders learn from mistakes.
A weld should not be judged only by how shiny or smooth it looks. It must be properly fused, correctly sized, clean, and free from serious defects.
What Is a Weld Defect?
A weld defect is a problem in the weld that may make it unacceptable. Defects can affect the strength, durability, safety, or appearance of the welded joint.
Common weld defects include:
- Porosity.
- Slag inclusion.
- Lack of fusion.
- Lack of penetration.
- Undercut.
- Overlap.
- Cracks.
- Excessive spatter.
- Burn-through.
- Distortion.
- Crater defects.
- Poor bead profile.
- Arc strikes.
- Incomplete weld size.
- Excessive reinforcement.
Some defects are caused by poor preparation, while others are caused by wrong settings, poor electrode handling, incorrect technique, contamination, or poor cleaning between passes.
Types of Weld Defects
Weld defects can be grouped into two main categories.
| Defect Type | Meaning |
|---|---|
| External defects | Visible on the weld surface |
| Internal defects | Hidden inside the weld metal or joint |
In basic training, trainees focus mainly on visible defects. Advanced inspection methods are used to detect internal defects in industrial work.
External Weld Defects
External defects can often be seen after slag removal and cleaning.
Examples include:
- Undercut.
- Overlap.
- Cracks.
- Excessive spatter.
- Burn-through.
- Surface porosity.
- Poor bead shape.
- Excessive reinforcement.
- Uneven bead.
- Arc strikes.
- Incomplete weld length.
- Poor start and stop points.
External defects are important because they often show poor technique or poor preparation.
Internal Weld Defects
Internal defects are hidden inside the weld and cannot always be seen by visual inspection.
Examples include:
- Internal porosity.
- Slag inclusion inside the weld.
- Lack of root fusion.
- Lack of penetration.
- Internal cracks.
- Incomplete fusion between weld passes.
Industrial inspection methods such as radiographic testing, ultrasonic testing, magnetic particle testing, and dye penetrant testing may be used for more detailed inspection. However, this module focuses on basic visual inspection for trainees.
Common Causes of Weld Defects
Many weld defects come from repeated causes.
Common causes include:
- Dirty base metal.
- Rust, paint, oil, grease, or moisture.
- Damp electrodes.
- Wrong electrode type.
- Wrong electrode size.
- Wrong current setting.
- Wrong polarity.
- Long arc length.
- Poor electrode angle.
- Wrong travel speed.
- Poor fit-up.
- Poor edge preparation.
- Poor tack welding.
- Welding over slag.
- Poor cleaning between passes.
- Poor body position.
- Rushing the job.
- Lack of practice.
A welder must learn to connect the defect with the cause.
Defect 1: Porosity
Porosity is the presence of small holes or gas pockets in the weld metal. It may appear as tiny round holes on the surface or may be hidden inside the weld.
Porosity is one of the most common beginner welding defects.
Causes of Porosity
Common causes include:
- Dirty metal.
- Oil or grease on the workpiece.
- Paint or rust in the weld area.
- Moisture on the metal.
- Damp electrodes.
- Long arc length.
- Poor shielding from flux.
- Wind disturbing the arc area.
- Wrong electrode type.
- Welding over contaminated material.
Porosity happens when gas becomes trapped in the weld as it cools.
Prevention of Porosity
To prevent porosity:
- Clean the metal before welding.
- Remove oil, paint, rust, and moisture.
- Use dry electrodes.
- Store electrodes properly.
- Keep a short arc length.
- Use correct current.
- Avoid welding in strong wind.
- Use the correct electrode.
- Do not weld over dirty tack welds.
- Clean between passes.
Good preparation is the best way to prevent porosity.
How to Correct Porosity
If porosity is found:
- Stop and inspect the weld.
- Identify the likely cause.
- Grind out the porous area where required.
- Clean the metal properly.
- Replace damp electrodes.
- Adjust arc length or current.
- Re-weld using correct technique.
- Inspect again after cleaning.
Do not hide porosity by welding over it without removing the defective area.
Defect 2: Slag Inclusion
Slag inclusion happens when slag becomes trapped inside the weld metal. Slag is the non-metallic material formed from the electrode flux during welding.
Slag should protect the weld while cooling, but it must be removed after each pass. If slag remains in the joint or between passes, it can become trapped.
Causes of Slag Inclusion
Common causes include:
- Welding over slag.
- Poor slag removal between passes.
- Low welding current.
- Wrong electrode angle.
- Poor travel speed.
- Slag running ahead of the weld pool.
- Poor joint preparation.
- Narrow groove angle.
- Poor weaving technique.
- Poor bead placement in multi-pass welding.
Slag inclusion weakens the weld and may cause failure.
Prevention of Slag Inclusion
To prevent slag inclusion:
- Chip and brush every pass properly.
- Do not weld over slag.
- Use correct current.
- Keep proper electrode angle.
- Keep slag behind the weld pool.
- Avoid excessive weaving.
- Prepare the joint properly.
- Use suitable groove angle where required.
- Inspect before adding the next pass.
- Grind difficult areas where slag is trapped.
Cleanliness between passes is very important.
How to Correct Slag Inclusion
If slag inclusion is visible or suspected:
- Stop welding.
- Chip and brush the weld thoroughly.
- Grind out the defective area if needed.
- Clean the groove or surface.
- Re-weld with correct technique.
- Inspect again.
Never continue multi-pass welding over trapped slag.
Defect 3: Lack of Fusion
Lack of fusion occurs when the weld metal does not properly fuse with the base metal or with the previous weld pass. The weld may look like it is sitting on the surface instead of becoming part of the metal.
Lack of fusion is serious because the joint may be weak even if the weld bead looks present.
Causes of Lack of Fusion
Common causes include:
- Low welding current.
- Travel speed too fast.
- Wrong electrode angle.
- Dirty metal.
- Poor joint preparation.
- Arc not directed into the joint root.
- Weld pool too cold.
- Large electrode used incorrectly.
- Welding over slag or scale.
- Poor sidewall fusion in groove welds.
Lack of fusion often happens when the welder moves too fast or does not direct heat into the correct area.
Prevention of Lack of Fusion
To prevent lack of fusion:
- Use correct current.
- Clean the joint properly.
- Direct the arc into the joint root.
- Maintain correct electrode angle.
- Keep a short arc.
- Use steady travel speed.
- Prepare edges properly.
- Pause at sidewalls during weaving where needed.
- Clean between passes.
- Use correct electrode size.
The weld must melt into the base metal, not only lie on top of it.
How to Correct Lack of Fusion
If lack of fusion is found:
- Grind out the defective weld.
- Clean the area properly.
- Adjust current if needed.
- Improve electrode angle.
- Re-weld with better heat control.
- Inspect the corrected weld.
Lack of fusion should not be ignored.
Defect 4: Lack of Penetration
Lack of penetration occurs when the weld does not reach deep enough into the joint, especially at the root. The joint may not be fully joined through its thickness.
This defect is common in butt joints, groove welds, pipe welds, and poorly prepared joints.
Causes of Lack of Penetration
Common causes include:
- Current too low.
- Travel speed too fast.
- Root gap too small.
- Root face too large.
- Electrode too large or too small for the joint.
- Poor edge preparation.
- Arc not directed at the root.
- Wrong electrode angle.
- Poor fit-up.
- Incorrect welding technique.
Lack of penetration can seriously reduce joint strength.
Prevention of Lack of Penetration
To prevent lack of penetration:
- Prepare the joint correctly.
- Set correct root gap.
- Use suitable current.
- Direct the arc into the root.
- Use correct electrode size.
- Control travel speed.
- Use proper groove angle for thick plates.
- Clean the root area.
- Follow the correct welding procedure.
- Practise root-pass technique.
Good penetration requires both preparation and technique.
How to Correct Lack of Penetration
Correction may require:
- Grinding or gouging out the defective area.
- Re-preparing the root.
- Adjusting current and technique.
- Re-welding properly.
- Inspecting again.
For serious work, correction should follow supervisor or inspector instruction.
Defect 5: Undercut
Undercut is a groove melted into the base metal along the edge of the weld that is not filled with weld metal. It usually appears along the toe of the weld.
Undercut reduces the thickness of the base metal and may create a weak point.
Causes of Undercut
Common causes include:
- Current too high.
- Arc length too long.
- Travel speed too fast.
- Wrong electrode angle.
- Excessive weaving.
- Poor control at weld toes.
- Holding too long in the centre and not filling the edges.
- Incorrect technique in vertical or overhead positions.
Undercut is common when trainees use too much heat or move too fast.
Prevention of Undercut
To prevent undercut:
- Use correct current.
- Keep a short arc.
- Control travel speed.
- Use correct electrode angle.
- Pause slightly at the sides when weaving.
- Avoid excessive heat.
- Avoid wide uncontrolled weaving.
- Watch the weld toes carefully.
- Use suitable electrode size.
A weld should blend smoothly into the base metal without cutting into it.
How to Correct Undercut
If undercut is minor, it may be corrected by depositing a proper weld bead to fill the groove, depending on job requirements.
For serious undercut:
- Grind and clean the affected area.
- Re-weld carefully with correct current and angle.
- Ensure the weld toe is properly filled.
- Inspect again.
Do not leave deep undercut on load-bearing welds.
Defect 6: Overlap
Overlap occurs when weld metal rolls over the surface of the base metal without properly fusing into it. It may look like the weld is flowing over the plate edge.
Overlap creates poor fusion and can trap slag or dirt.
Causes of Overlap
Common causes include:
- Current too low.
- Travel speed too slow.
- Electrode angle too flat.
- Weld pool too large.
- Poor manipulation.
- Metal surface not clean.
- Excessive weld metal deposited.
- Poor heat control.
Overlap often means the weld metal is deposited without enough heat to fuse properly into the base metal.
Prevention of Overlap
To prevent overlap:
- Use correct current.
- Maintain proper travel speed.
- Keep the correct electrode angle.
- Avoid excessive weaving.
- Keep the weld pool controlled.
- Watch the bead edges.
- Do not deposit too much weld metal at once.
- Clean the metal properly.
The weld edge should blend smoothly into the base metal.
How to Correct Overlap
Correction usually requires:
- Grinding out the overlapped weld area.
- Cleaning the surface.
- Re-welding with proper heat and angle.
- Inspecting for fusion.
Do not simply weld over overlap without removing the defective area.
Defect 7: Cracks
Cracks are breaks or separations in the weld metal, base metal, or heat-affected zone. Cracks are among the most serious weld defects.
Cracks may appear:
- Along the weld.
- Across the weld.
- At the crater.
- Beside the weld.
- Inside the weld.
- After cooling.
Cracks should never be ignored.
Causes of Cracks
Common causes include:
- Poor electrode selection.
- High restraint in the joint.
- Rapid cooling.
- High carbon or hardenable steel.
- Hydrogen from damp electrodes.
- Poor preheating where required.
- Poor crater filling.
- Excessive stress.
- Contaminated weld metal.
- Incorrect welding procedure.
- Welding over cracked material.
Cracking is more likely in thick, restrained, high-strength, or contaminated materials.
Prevention of Cracks
To prevent cracks:
- Use correct electrode.
- Keep low hydrogen electrodes dry.
- Clean the joint properly.
- Use proper preheat where required.
- Avoid rapid cooling where not allowed.
- Fill craters properly.
- Avoid excessive restraint.
- Use proper welding sequence.
- Do not weld over existing cracks without repair preparation.
- Follow the welding procedure.
Cracks are serious and should be corrected properly.
How to Correct Cracks
If a crack is found:
- Stop welding.
- Mark the cracked area.
- Report to the trainer or supervisor.
- Grind out the crack completely.
- Clean the area.
- Identify and correct the cause.
- Re-weld using the correct procedure.
- Inspect carefully.
Welding over a crack without removing it is poor practice.
Defect 8: Excessive Spatter
Spatter is small droplets of molten metal thrown from the weld arc. Some spatter may occur in welding, but excessive spatter shows poor control and can affect appearance, safety, and cleaning time.
Causes of Excessive Spatter
Common causes include:
- Arc length too long.
- Current too high.
- Wrong polarity.
- Damp electrode.
- Dirty metal.
- Wrong electrode type.
- Poor electrode angle.
- Unstable arc.
- Poor earth connection.
Excessive spatter can also result from poor machine settings or poor technique.
Prevention of Excessive Spatter
To reduce spatter:
- Keep a short arc.
- Use correct current.
- Use correct polarity.
- Clean the workpiece.
- Use dry electrodes.
- Attach earth clamp properly.
- Keep electrode angle steady.
- Avoid excessive movement.
- Use suitable electrode type.
Good arc control reduces spatter.
Correcting Excessive Spatter
Correction includes:
- Adjusting current.
- Shortening arc length.
- Checking polarity.
- Replacing damp electrodes.
- Cleaning metal.
- Improving earth connection.
- Cleaning spatter after welding with proper tools.
Excessive spatter should not be ignored because it may indicate poor weld conditions.
Defect 9: Burn-Through
Burn-through occurs when the weld burns a hole through the metal. It is common when welding thin metal or when heat input is too high.
Causes of Burn-Through
Common causes include:
- Current too high.
- Travel speed too slow.
- Metal too thin for electrode size.
- Root gap too wide.
- Holding arc too long in one place.
- Poor heat control.
- Wrong electrode size.
- Excessive weaving.
- Poor fit-up.
Burn-through means the heat is not controlled properly for the material thickness.
Prevention of Burn-Through
To prevent burn-through:
- Use lower current on thin metal.
- Use smaller electrode.
- Move at correct speed.
- Control root gap.
- Avoid holding the arc in one place.
- Use stitch or intermittent welding where appropriate.
- Allow cooling if needed.
- Use proper backing where required.
Thin metal requires careful heat control.
Correcting Burn-Through
Correction may involve:
- Grinding the damaged area.
- Filling the hole carefully with controlled welds.
- Using a backing plate where appropriate.
- Adjusting current and technique.
- Re-inspecting after repair.
For serious work, damaged sections may need replacement.
Defect 10: Distortion
Distortion is unwanted bending, twisting, shrinking, or movement of metal caused by welding heat and cooling.
Distortion can affect the shape, dimension, and fit of the finished job.
Causes of Distortion
Common causes include:
- Excessive heat input.
- Too much weld metal.
- Poor tack welding.
- Poor clamping.
- Wrong welding sequence.
- Uneven heating.
- Thin material.
- Long continuous welds.
- Poor fit-up.
- Welding too slowly.
Welding heat causes metal to expand and shrink, which can pull the work out of shape.
Prevention of Distortion
To reduce distortion:
- Use correct current.
- Avoid excessive weld size.
- Use proper tack welds.
- Clamp parts securely.
- Use balanced welding sequence.
- Weld in shorter sections where appropriate.
- Allow cooling where needed.
- Avoid overwelding.
- Prepare fit-up correctly.
- Check alignment during welding.
Good preparation helps control distortion.
Correcting Distortion
Minor distortion may be corrected by:
- Mechanical straightening.
- Controlled heating, if trained and authorised.
- Reworking the assembly.
- Cutting and re-welding where necessary.
Prevention is better than correction because distortion can be difficult to repair.
Defect 11: Poor Bead Profile
Poor bead profile means the weld shape is not acceptable. The bead may be too high, too flat, too wide, too narrow, uneven, or poorly blended into the base metal.
Causes of Poor Bead Profile
Common causes include:
- Wrong current.
- Wrong travel speed.
- Wrong electrode angle.
- Arc length too long.
- Poor hand control.
- Poor joint preparation.
- Electrode too large or too small.
- Excessive weaving.
- Poor body position.
- Inconsistent movement.
Poor bead profile is common during early training.
Prevention of Poor Bead Profile
To improve bead profile:
- Set correct current.
- Maintain short arc length.
- Use correct electrode angle.
- Move at steady speed.
- Watch the weld pool.
- Keep body position stable.
- Use guide lines during practice.
- Clean metal properly.
- Practise straight beads repeatedly.
Consistency improves with practice.
Defect 12: Crater Defects
A crater is the depression left at the end of a weld bead. If the crater is not filled properly, it can become a weak point and may crack.
Causes of Crater Defects
Common causes include:
- Ending the weld suddenly.
- Pulling the electrode away too quickly.
- Not pausing at the end.
- Poor heat control.
- Poor stopping technique.
- High restraint in the joint.
Prevention of Crater Defects
To prevent crater defects:
- Do not stop suddenly.
- Pause briefly at the end.
- Move slightly back into the weld pool before breaking the arc.
- Fill the crater properly.
- Use good stopping technique.
- Inspect the weld end after cleaning.
A good weld should have a controlled start and finish.
Defect 13: Arc Strikes
An arc strike is a mark made when the electrode accidentally strikes an arc outside the weld area. Arc strikes can create hard spots, cracks, or poor appearance, especially on important jobs.
Causes of Arc Strikes
Common causes include:
- Careless arc starting.
- Poor electrode control.
- Striking the arc away from the joint.
- Holding the electrode too close while positioning.
- Poor visibility.
- Rushing.
Prevention of Arc Strikes
To prevent arc strikes:
- Strike the arc only at the weld start point.
- Use proper starting technique.
- Keep the electrode away from the work until ready.
- Lower the helmet before striking.
- Practise control.
- Do not drag the live electrode across the workpiece.
Arc strikes should be avoided, especially on structural or pressure-related work.
Basic Weld Quality Standards
A basic weld should meet the required quality for its purpose. Not all welds have the same acceptance standard. A training weld, gate weld, structural weld, pipe weld, and pressure vessel weld may have different requirements.
However, basic weld quality should include:
- Correct weld location.
- Correct weld size.
- Proper fusion.
- Adequate penetration for the joint.
- Clean surface.
- Acceptable bead shape.
- No visible cracks.
- No excessive porosity.
- No severe undercut.
- No trapped slag.
- No excessive spatter.
- No serious distortion.
- Good start and stop points.
The weld must be suitable for the job it is expected to perform.
Visual Inspection
Visual inspection is the most basic and common method of checking welds. It is done by looking carefully at the weld before, during, and after welding.
Visual inspection can identify many surface defects and preparation problems.
Visual inspection should be done:
- Before welding.
- During welding.
- After welding.
A good welder inspects at every stage, not only at the end.
Inspection Before Welding
Before welding, check:
- Correct material selected.
- Material thickness is correct.
- Joint type is correct.
- Edges are prepared.
- Surfaces are clean.
- Root gap is correct.
- Alignment is correct.
- Tack welds are sound.
- Clamps are secure.
- Earth clamp is properly attached.
- Electrode is correct and dry.
- Current setting is suitable.
- Work area is safe.
Many defects can be prevented before welding starts.
Inspection During Welding
During welding, observe:
- Arc stability.
- Weld pool control.
- Slag behaviour.
- Travel speed.
- Electrode angle.
- Arc length.
- Bead placement.
- Excessive spatter.
- Overheating.
- Distortion.
- Tack weld movement.
- Slag removal between passes.
If something goes wrong during welding, stop and correct it early.
Inspection After Welding
After welding:
- Allow the weld to cool safely.
- Wear goggles.
- Chip off slag.
- Brush the weld clean.
- Check weld length.
- Check bead shape.
- Check bead width and height.
- Check for cracks.
- Check for porosity.
- Check for undercut.
- Check for overlap.
- Check for slag inclusion.
- Check start and stop points.
- Check distortion and alignment.
- Ask for trainer feedback.
A weld cannot be inspected properly if slag and dirt remain on it.
Tools for Basic Visual Inspection
Basic inspection tools include:
- Eyes and proper lighting.
- Wire brush.
- Chipping hammer.
- Magnifying glass, where available.
- Steel rule.
- Tape measure.
- Welding gauge.
- Fillet weld gauge.
- Try square.
- Straight edge.
- Marker or chalk.
- Inspection checklist.
Good lighting is important. Poor lighting can hide defects.
Weld Size Inspection
Weld size should match the job requirement. A weld that is too small may be weak, while a weld that is too large may waste time, electrode, and heat.
For fillet welds, size may be checked by:
- Leg length.
- Throat size.
- Bead profile.
For groove welds, inspection may include:
- Bead width.
- Reinforcement.
- Penetration evidence where visible.
- Root condition if accessible.
Trainees should learn basic weld size awareness, even if advanced gauges are not available.
Fillet Weld Inspection
When inspecting a fillet weld, check:
- Is the weld in the correct location?
- Is the bead continuous?
- Are both legs fairly equal?
- Is the root properly fused?
- Is there undercut at the toes?
- Is there overlap?
- Is there visible slag inclusion?
- Are there cracks?
- Is the weld too small or too large?
- Is the start and stop controlled?
A good fillet weld should blend smoothly into both plates.
Butt Weld Inspection
When inspecting a butt weld, check:
- Is the weld centered on the joint?
- Is the bead continuous?
- Is the bead width consistent?
- Is the reinforcement acceptable?
- Is there undercut along the edges?
- Are there cracks?
- Is there visible porosity?
- Is there burn-through?
- Is alignment maintained?
- Is distortion controlled?
A butt weld should join both edges properly.
Inspection of Multi-Pass Welds
For multi-pass welds, inspect after each pass.
Check:
- Complete slag removal.
- No visible cracks.
- No trapped slag.
- Proper bead placement.
- Smooth tie-in between passes.
- Proper fusion at edges.
- No excessive buildup.
- No undercut before adding next pass.
Do not wait until the final pass to discover a defect that started in the first pass.
Acceptable vs Unacceptable Welds
A weld may be acceptable or unacceptable depending on the job requirement. In training, the trainer may accept minor imperfections while the trainee is learning, but serious defects should be corrected.
Generally unacceptable defects include:
- Cracks.
- Severe porosity.
- Deep undercut.
- Severe lack of fusion.
- Severe lack of penetration.
- Slag inclusion.
- Burn-through in critical areas.
- Major distortion.
- Weak tack welds in finished work.
- Welds that do not join both pieces.
The higher the risk of the job, the stricter the acceptance standard.
Basic Weld Inspection Checklist
| Inspection Point | Acceptable / Not Acceptable |
|---|---|
| Weld area cleaned before inspection | |
| Weld is in correct location | |
| Weld length is correct | |
| Bead width is consistent | |
| Bead height is consistent | |
| Weld is properly fused at edges | |
| No visible cracks | |
| No serious porosity | |
| No severe undercut | |
| No overlap | |
| No visible slag inclusion | |
| No burn-through | |
| Spatter is controlled | |
| Start and stop points are acceptable | |
| Workpiece alignment is maintained | |
| Distortion is controlled |
Causes and Prevention Summary
| Defect | Common Cause | Prevention |
|---|---|---|
| Porosity | Dirty metal, damp electrode, long arc | Clean metal, dry electrode, short arc |
| Slag inclusion | Welding over slag, low current, bad angle | Clean between passes, correct current and angle |
| Lack of fusion | Low heat, fast travel, wrong angle | Correct current, slower travel, direct arc properly |
| Lack of penetration | Poor joint prep, low current, small root gap | Correct gap, current, and root technique |
| Undercut | High current, long arc, fast travel | Reduce current, short arc, control speed |
| Overlap | Low current, slow travel, poor angle | Increase heat slightly, improve speed and angle |
| Cracks | Poor electrode, rapid cooling, damp electrode | Correct electrode, dry storage, proper procedure |
| Spatter | Long arc, high current, wrong polarity | Short arc, correct current and polarity |
| Burn-through | High current, slow travel, wide gap | Reduce current, smaller electrode, faster control |
| Distortion | Excessive heat, poor tacking | Clamp, tack, sequence, control heat |
Corrective Action
Corrective action means what should be done when a defect is found.
Corrective action may include:
- Cleaning the weld.
- Grinding out the defect.
- Re-welding the affected area.
- Adjusting current.
- Changing electrode.
- Drying or replacing electrodes.
- Improving joint preparation.
- Reworking the fit-up.
- Changing travel speed.
- Correcting electrode angle.
- Improving slag removal.
- Asking for trainer or supervisor guidance.
Do not simply cover defects with more weld metal.
Weld Repair Basics
Basic weld repair may involve:
- Identify the defect.
- Mark the affected area.
- Grind or remove the defective weld.
- Clean the repair area.
- Recheck fit-up.
- Adjust welding settings.
- Re-weld carefully.
- Clean and inspect again.
Repair welding should be controlled. Poor repair can make the weld worse.
Importance of Documentation
In professional workshops, weld inspection may be recorded. Basic documentation helps track quality and learning progress.
Records may include:
- Trainee name.
- Date.
- Exercise type.
- Electrode used.
- Current setting.
- Joint type.
- Welding position.
- Defects observed.
- Correction made.
- Trainer comments.
- Final assessment.
Documentation helps trainees see improvement over time.
Common Inspection Mistakes
Avoid these mistakes:
- Inspecting before removing slag.
- Ignoring small cracks.
- Judging only by appearance.
- Failing to check fit-up before welding.
- Not checking tack welds.
- Welding over visible defects.
- Not checking the start and stop points.
- Ignoring undercut.
- Ignoring distortion.
- Not cleaning between passes.
- Blaming the machine before checking technique.
- Not asking for feedback.
- Hiding poor welds.
Inspection is part of learning, not punishment.
What a Welding Trainee Should Never Do
A welding trainee should never:
- Hide defective welds.
- Weld over slag.
- Weld over cracks.
- Ignore porosity.
- Leave deep undercut uncorrected.
- Grind defects without permission on assessment pieces.
- Claim a weld is good without cleaning and inspecting it.
- Use poor lighting for inspection.
- Touch hot welds with bare hands.
- Chip slag without goggles.
- Ignore trainer feedback.
- Submit unfinished or unclean work for inspection.
- Blame tools before checking preparation and technique.
Practical Exercise 1: Defect Identification
Task:
The trainer provides sample welds with visible defects.
Trainees should identify:
- Porosity.
- Undercut.
- Overlap.
- Slag inclusion.
- Poor bead profile.
- Burn-through.
- Excessive spatter.
- Cracks, if present.
Assessment:
- Trainee should correctly name the defect.
- Trainee should explain likely causes.
- Trainee should suggest prevention methods.
Practical Exercise 2: Inspect Your Own Weld
Task:
Trainees produce a straight bead or fillet weld and inspect it after cleaning.
Trainees should check:
- Bead shape.
- Bead consistency.
- Arc start and stop.
- Spatter.
- Undercut.
- Porosity.
- Fusion at the edges.
- Slag removal.
Assessment:
- Trainee should honestly identify strengths and weaknesses.
- Trainee should explain what to improve in the next weld.
Practical Exercise 3: Current Effect on Defects
Task:
Run three beads using low, correct, and high current settings.
Trainees should observe:
- Electrode sticking.
- Bead shape.
- Spatter.
- Penetration appearance.
- Undercut.
- Burn-through risk.
- Slag removal.
Assessment:
- Trainee should explain how current affects weld quality.
Practical Exercise 4: Cleaning Between Passes
Task:
Produce a small multi-pass weld and inspect between each pass.
Trainees should practise:
- Chipping slag.
- Wire brushing.
- Checking for defects.
- Grinding if instructed.
- Depositing the next pass only after cleaning.
Assessment:
- No pass should be placed over visible slag.
- Trainee should understand why cleaning between passes matters.
Practical Exercise 5: Weld Repair Practice
Task:
The trainer creates or identifies a defective weld area for repair practice.
Trainees should practise:
- Identifying the defect.
- Marking the area.
- Grinding out the defect.
- Cleaning the repair area.
- Re-welding properly.
- Inspecting the repaired weld.
Assessment:
- Defective area should be properly removed.
- Repair weld should be cleaner and more acceptable than the original.
Practical Exercise 6: Basic Visual Inspection Report
Task:
Trainees complete a simple inspection form for a weld sample.
The form should include:
- Joint type.
- Electrode used.
- Position.
- Current setting.
- Defects found.
- Likely causes.
- Corrective action.
- Trainer comment.
Assessment:
- Report should be clear, honest, and factual.
- Trainee should use correct welding terms.
Real-Life Scenario
A trainee completes a tee joint fillet weld and feels proud because the bead looks large. After cooling, he chips and brushes the weld. The trainer inspects it and points out undercut along the vertical plate and overlap on the lower plate.
The trainee learns that a large weld is not always a good weld. The current was too high at the upper edge, and the travel speed and angle were not controlled properly. The trainer asks him to grind the defective area, reset the current, hold a better 45-degree work angle, and watch the weld pool more carefully.
After correction, the weld is smaller, smoother, and better fused into both plates.
The key lesson is that weld quality is not based on size alone. A good weld must have proper fusion, correct shape, controlled heat, and no serious defects.
Practical Skill Checklist
| Skill | Competent |
|---|---|
| Explains what a weld defect is | |
| Identifies porosity | |
| Identifies slag inclusion | |
| Identifies lack of fusion | |
| Identifies lack of penetration | |
| Identifies undercut | |
| Identifies overlap | |
| Identifies cracks | |
| Identifies excessive spatter | |
| Identifies burn-through | |
| Explains common causes of defects | |
| Explains prevention methods | |
| Cleans weld before inspection | |
| Performs basic visual inspection | |
| Uses inspection checklist | |
| Inspects fillet welds | |
| Inspects butt welds | |
| Checks multi-pass welds between passes | |
| Suggests corrective action | |
| Completes basic inspection report |
Quick Recap
Weld defects are faults that reduce weld quality, strength, appearance, or safety. Common defects include porosity, slag inclusion, lack of fusion, lack of penetration, undercut, overlap, cracks, excessive spatter, burn-through, distortion, poor bead profile, crater defects, and arc strikes. Many defects are caused by dirty metal, damp electrodes, wrong current, long arc length, poor electrode angle, wrong travel speed, poor fit-up, and poor cleaning between passes. Basic visual inspection should be done before, during, and after welding. A weld should be cleaned before inspection, checked for visible defects, and corrected where necessary. A good welder does not hide defects. A good welder identifies problems, understands the cause, corrects the weld, and improves technique.