
Practical First Aid Skills
Practical First Aid Skills
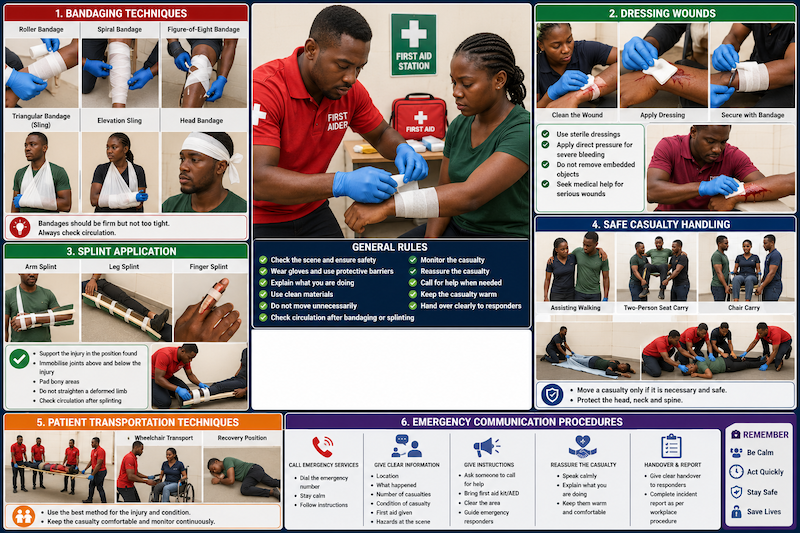
Practical first aid skills are the hands-on actions a first aider uses to protect a casualty, control injuries, prevent the condition from getting worse, and prepare the casualty for medical help. These skills include dressing wounds, applying bandages, supporting injured limbs, applying splints, handling casualties safely, assisting with movement, and communicating clearly during emergencies.
A first aider must understand that practical skills should be done safely, gently, and only when needed. The aim is not to perform advanced medical treatment, but to give immediate care until professional help arrives or the casualty can be taken for medical attention.
Good practical first aid is calm, clean, careful, and well-communicated.
Why Practical Skills Matter
Practical skills help a first aider to:
- Control bleeding.
- Protect wounds from contamination.
- Reduce pain and movement.
- Support fractures, sprains, and strains.
- Prevent further injury.
- Move a casualty only when necessary.
- Communicate effectively with emergency services.
- Reassure the casualty.
- Prepare for safe handover to medical responders.
- Reduce panic at the scene.
A first aider who only understands theory may freeze during an emergency. Practical training builds confidence and competence.
General Rules Before Giving Practical Care
Before touching or moving a casualty:
- Check that the scene is safe.
- Wear gloves or use a barrier if available.
- Introduce yourself and explain what you want to do.
- Ask for consent if the casualty is conscious.
- Check for life-threatening problems first.
- Call for help if the injury is serious.
- Avoid unnecessary movement.
- Use clean materials where possible.
- Monitor the casualty’s breathing and response.
- Give clear information to medical responders.
The Red Cross uses the “Check, Call, Care” approach: check the scene and the person, call emergency help when needed, and then give appropriate care.
Infection Prevention During Practical First Aid
When dealing with wounds, blood, or body fluids, protect yourself and the casualty.
Use:
- Disposable gloves.
- Clean dressings.
- Face shield or eye protection if splashing is possible.
- Handwashing or hand sanitiser.
- Safe disposal of contaminated materials.
- Clean bandages and cloths.
Avoid touching open wounds with bare hands. If gloves are not available, use a clean plastic bag, clean cloth, or other barrier where possible.
Bandaging Techniques
A bandage is used to hold dressings in place, apply pressure, support an injured part, reduce swelling, or restrict movement. Bandaging must be firm enough to do its job but not so tight that it blocks blood circulation.
Common types of bandages include:
| Bandage Type | Common Use |
|---|---|
| Roller bandage | Holding dressings, supporting joints, securing splints |
| Triangular bandage | Arm sling, elevation sling, broad-fold support |
| Elastic / crepe bandage | Supporting sprains and soft tissue injuries |
| Adhesive bandage | Small cuts and minor wounds |
| Pressure bandage | Helping control bleeding |
| Tubular bandage | Supporting fingers, toes, or joints |
A bandage should always be checked after application to ensure it is not too tight.
Basic Rules for Bandaging
When applying a bandage:
- Explain what you are doing.
- Support the injured part.
- Start below the injury and work upward where appropriate.
- Keep the bandage smooth and even.
- Avoid covering fingers or toes completely if circulation needs to be checked.
- Do not bandage too tightly.
- Secure the bandage safely.
- Check circulation after bandaging.
- Recheck regularly for swelling, numbness, or colour change.
A good bandage should stay in place, support the injury, and allow circulation.
Checking Circulation After Bandaging
After applying any bandage or splint, check the area beyond the bandage.
Check for:
- Colour: Are fingers or toes pale, blue, or normal?
- Warmth: Are they warm or cold?
- Sensation: Is there numbness, tingling, or loss of feeling?
- Movement: Can the casualty move fingers or toes?
- Swelling: Is swelling increasing below the bandage?
- Pain: Is pain worsening after bandaging?
If the bandage causes numbness, coldness, blue colour, swelling, or increased pain, loosen it and seek medical help.
Roller Bandage Technique
A roller bandage is commonly used for limbs, joints, and dressings.
Basic steps:
- Support the injured part.
- Place a dressing over the wound if there is one.
- Hold the loose end of the bandage in place.
- Wrap the bandage around the limb to anchor it.
- Continue wrapping with each layer partly overlapping the previous one.
- Keep the bandage smooth.
- Secure the end with tape, clip, or knot.
- Check circulation below the bandage.
Do not tie a knot directly over a wound or injury.
Spiral Bandage
A spiral bandage is used on areas of even size, such as the forearm or lower leg.
Steps:
- Anchor the bandage with one or two turns.
- Wrap upward in a spiral pattern.
- Overlap each turn by about half the bandage width.
- Keep tension even.
- Secure the end.
- Check circulation.
This is useful for holding a dressing on a limb.
Figure-of-Eight Bandage
A figure-of-eight bandage is useful around joints such as the ankle, knee, elbow, or wrist.
Steps:
- Anchor the bandage below the joint.
- Wrap diagonally across the joint.
- Pass around the limb above the joint.
- Return diagonally across the joint in the opposite direction.
- Repeat to form a figure-eight pattern.
- Secure the bandage.
- Check circulation.
This technique helps support a joint while allowing some shape and flexibility.
Triangular Bandage
A triangular bandage is very useful in first aid. It can be used as a sling, broad bandage, padding, head covering, or support.
Common uses include:
- Arm sling.
- Elevation sling.
- Supporting shoulder injuries.
- Holding dressings.
- Padding around an embedded object.
- Supporting a fractured collarbone.
- Improvised bandage.
A triangular bandage can be folded into a broad-fold or narrow-fold bandage depending on the need.
Arm Sling
An arm sling supports an injured arm, wrist, forearm, elbow, or collarbone.
Basic steps:
- Ask the casualty to support the injured arm across the chest.
- Place the triangular bandage between the arm and chest.
- Take one end around the neck on the uninjured side.
- Bring the other end up over the injured side.
- Tie the ends at the side of the neck, not directly on the spine.
- Adjust so the hand is slightly higher than the elbow.
- Secure the point near the elbow.
- Check circulation in the fingers.
A sling should support the limb comfortably without pulling on the neck.
Elevation Sling
An elevation sling may be used to help control bleeding or swelling in the hand or forearm, if there is no suspected fracture that would make the position painful.
Basic steps:
- Help the casualty place the injured hand across the chest, with fingers near the opposite shoulder.
- Place the triangular bandage over the forearm and hand.
- Tie the ends at the side of the neck.
- Keep the hand elevated.
- Check circulation.
Do not force the arm into this position if it causes pain.
Dressing Wounds
A dressing is placed directly over a wound to protect it, absorb blood, and reduce contamination. A bandage is then used to hold the dressing in place.
Common dressing materials include:
- Sterile gauze pad.
- Sterile wound dressing.
- Non-stick dressing.
- Clean cloth if sterile dressing is not available.
- Trauma dressing.
- Eye pad.
- Burn dressing, where available.
For heavy bleeding, direct pressure over the dressing is the priority. The American Red Cross advises placing a dressing over the wound and applying steady, firm direct pressure for life-threatening external bleeding.
Dressing a Minor Wound
For a minor wound:
- Wash your hands or use sanitiser.
- Wear gloves if available.
- Rinse the wound gently with clean water.
- Remove loose dirt if easy to do.
- Apply gentle pressure if bleeding.
- Cover with a sterile dressing or plaster.
- Secure the dressing.
- Advise the casualty to keep the wound clean.
- Watch for signs of infection.
Seek medical help if the wound is deep, dirty, caused by a bite, contains embedded material, or will not stop bleeding.
Dressing a Heavily Bleeding Wound
For heavy bleeding:
- Put on gloves if available.
- Expose the wound if possible.
- Place a sterile dressing or clean cloth on the wound.
- Apply firm direct pressure.
- Keep pressure on the wound.
- Secure with a bandage when bleeding is controlled.
- If blood soaks through, add another dressing on top.
- Do not remove the first dressing.
- Call emergency services.
- Treat for shock.
The British Red Cross advises putting pressure on a heavily bleeding wound and calling emergency help when bleeding is severe.
Dressing a Wound With an Embedded Object
An embedded object may be glass, metal, wood, plastic, or any object stuck in the wound.
Do not remove it.
Steps:
- Call emergency help if the wound is serious.
- Put on gloves.
- Apply pressure around the object, not directly on it.
- Place bulky dressings on both sides of the object.
- Bandage around the dressings to stabilise the object.
- Keep the casualty still.
- Treat for shock.
- Monitor until help arrives.
Removing an embedded object may cause severe bleeding or further injury.
Signs That a Wound Needs Medical Care
Seek medical care if:
- Bleeding is heavy or does not stop.
- The wound is deep or wide.
- There is an embedded object.
- The wound is from a bite.
- The wound is dirty or contaminated.
- There is loss of feeling or movement.
- The wound is on the face, eye, hand, joint, or genitals.
- There are signs of infection.
- The casualty may need tetanus protection.
- The wound was caused by a serious accident.
When unsure, seek medical advice.
Splint Application
A splint is used to support and reduce movement of an injured bone or joint. Splints can help reduce pain, prevent further damage, and make transportation safer.
Splints may be:
- Commercial splints.
- Padded boards.
- Folded cardboard.
- Rolled newspapers.
- Sticks or firm materials.
- Pillows.
- The casualty’s own body, such as tying an injured leg to the uninjured leg.
A first aider should not try to straighten a deformed limb. St John Ambulance advises supporting a suspected fracture and getting medical help where needed.
When to Use a Splint
Use a splint when:
- A fracture is suspected.
- A joint is badly injured.
- The casualty must be moved.
- Movement causes pain.
- Support is needed while waiting for help.
- Medical help is delayed.
Do not apply a splint if it causes severe pain, worsens the injury, or requires forceful movement.
Basic Splinting Rules
When applying a splint:
- Explain what you are doing.
- Support the injury in the position found.
- Do not straighten a deformed limb.
- Immobilise the joints above and below the injury where possible.
- Pad the splint to avoid pressure points.
- Tie above and below the injury, not directly over it.
- Check circulation before and after splinting.
- Keep the casualty still.
- Seek medical help.
If in doubt, support the injury and wait for trained medical responders.
Splinting an Arm Injury
For an arm injury:
- Support the injured arm.
- Place padding around the injury if needed.
- Apply a splint along the forearm or upper arm if trained.
- Tie the splint above and below the injury.
- Use a sling to support the arm.
- Check circulation in the fingers.
- Seek medical help.
If a splint is not available, support the arm with a sling and keep the casualty still.
Splinting a Leg Injury
For a leg injury:
- Keep the casualty still.
- Support the leg in the position found.
- Use padding between the legs if tying both legs together.
- Tie the injured leg to the uninjured leg if trained and movement is necessary.
- Secure above and below the injury.
- Do not tie directly over the injury.
- Check circulation in the toes.
- Call emergency services for serious injuries.
Avoid moving a casualty with suspected leg, hip, pelvic, or spinal injury unless there is immediate danger.
Using Soft Padding
Padding helps protect the injured area and prevent pressure from the splint.
Padding may include:
- Folded cloth.
- Towel.
- Clothing.
- Blanket.
- Bandage roll.
- Foam pad.
- Pillow.
A hard splint without padding may cause pressure injury or increase pain.
Safe Casualty Handling
Safe casualty handling means moving, supporting, or assisting a casualty without causing further harm to them or injury to yourself.
A casualty should not be moved unless:
- The scene is dangerous.
- The casualty needs airway care.
- The casualty must be moved for CPR.
- The casualty must be transported and medical help is not immediately available.
- Movement is required to prevent further harm.
If the casualty is safe where they are, keep them still and wait for help.
Before Moving a Casualty
Before moving a casualty, ask:
- Is the scene safe?
- Is movement necessary?
- Could there be a spinal injury?
- Is the casualty breathing?
- Is there severe bleeding?
- Can the casualty move themselves?
- Are enough helpers available?
- Is the route clear?
- Where are we moving the casualty to?
- What is the safest method?
Moving a casualty without planning can worsen injuries.
Manual Handling Safety for First Aiders
First aiders can injure themselves while lifting or moving casualties.
Protect yourself:
- Do not lift beyond your ability.
- Ask for help.
- Keep your back straight.
- Bend your knees.
- Keep the casualty close to your body.
- Avoid twisting.
- Move slowly and communicate.
- Use a stretcher or chair where available.
- Stop if pain or danger occurs.
Your safety matters. A rescuer who becomes injured cannot help the casualty.
Suspected Spinal Injury and Movement
Suspect spinal injury after:
- Road traffic accidents.
- Falls from height.
- Diving accidents.
- Head injury.
- Neck or back pain.
- Numbness or weakness.
- Serious impact.
- Unconsciousness after trauma.
If spinal injury is suspected, avoid moving the casualty unless necessary for safety or airway. St John Ambulance advises keeping a suspected spinal injury casualty still and supporting the head and neck, while calling emergency help.
Emergency Move
An emergency move is used only when the casualty is in immediate danger and staying there is more dangerous than moving.
Examples:
- Fire.
- Explosion risk.
- Traffic danger.
- Building collapse risk.
- Flooding.
- Toxic gas.
- Electrical danger after isolation is not possible.
- Violence or unsafe crowd.
Use the fastest safe method available, protect the head and neck as much as possible, and move the casualty to a safe place.
Assisting a Walking Casualty
Use this when the casualty can walk with help and has no serious injury.
Steps:
- Stand on the injured or weaker side.
- Place their arm around your shoulder.
- Hold their wrist or hand.
- Support their waist or back.
- Walk slowly.
- Watch for dizziness or weakness.
- Sit them down if they become unsteady.
Do not use this method for suspected spinal, leg fracture, severe shock, or unconscious casualty.
Two-Person Seat Carry
A two-person seat carry may be used for a conscious casualty who cannot walk but can sit upright and has no suspected spinal injury.
Basic idea:
- Two helpers form a seat using their arms.
- The casualty sits on the linked arms.
- The casualty holds around the helpers’ shoulders if able.
- Helpers lift together and move slowly.
This should only be practised under supervision during training.
Chair Carry
A chair carry can be used for a conscious casualty who can sit upright, especially on flat ground or stairs when done by trained helpers.
Steps:
- Use a strong chair.
- Sit the casualty securely.
- One helper holds the back of the chair.
- Another helper holds the front legs or sides.
- Communicate before lifting.
- Move slowly and carefully.
Do not use a weak plastic chair or unstable chair.
Blanket Drag
A blanket drag may be used in an emergency when a casualty must be moved away from danger and lifting is not safe.
Steps:
- Place a blanket or strong cloth beside the casualty.
- Roll the casualty gently onto the blanket if possible.
- Keep the head and neck supported as much as possible.
- Drag in a straight line to safety.
- Avoid twisting the body.
- Stop once out of danger.
This is an emergency method, not a routine transport method.
Log Roll
A log roll is used when a casualty must be turned while keeping the head, neck, and spine aligned as much as possible. It requires several helpers and should be done carefully.
It may be needed to:
- Check the back.
- Place onto a spinal board where trained.
- Turn an unconscious casualty with suspected spinal injury when airway must be managed.
If you are not trained and the casualty is breathing, keep them still and wait for emergency responders unless the airway or scene safety requires movement.
Patient Transportation Techniques
Patient transportation means moving a casualty from one place to another. First aiders should only transport a casualty if it is safe, necessary, and appropriate.
Transport may involve:
- Assisting walking.
- Carrying with helpers.
- Using a chair.
- Using a stretcher.
- Using a vehicle.
- Waiting for an ambulance.
For serious injuries, ambulance transport is safest because medical responders can monitor and treat the casualty.
When Not to Transport by Private Vehicle
Avoid private transport when the casualty has:
- Unconsciousness or reduced responsiveness.
- Breathing difficulty.
- Severe bleeding.
- Suspected spinal injury.
- Major fracture.
- Chest injury.
- Serious head injury.
- Stroke symptoms.
- Heart attack symptoms.
- Severe burns.
- Shock.
- Seizure that does not recover normally.
- Severe allergic reaction.
- Any condition likely to worsen quickly.
Call emergency services instead.
Safe Stretcher Use
If a stretcher is available and helpers are trained:
- Check the stretcher is safe.
- Explain to the casualty.
- Use enough helpers.
- Lift together on command.
- Keep the casualty secure.
- Keep the casualty level where possible.
- Monitor breathing and response.
- Move slowly.
- Avoid sudden turns.
- Do not leave the casualty unattended.
Improper stretcher use can cause falls and further injury.
Positioning During Transport
Different conditions may require different positions.
| Condition | Possible Position |
|---|---|
| Breathing difficulty | Sitting or semi-sitting if conscious |
| Shock without major injury | Lying flat, kept warm |
| Unconscious but breathing | Recovery position, if no spinal concern |
| Suspected spinal injury | Keep still; avoid movement unless necessary |
| Arm injury | Sling and seated if comfortable |
| Leg injury | Supported and kept still |
| Fainting recovery | Lying down until fully recovered |
| Chest injury | Comfortable semi-sitting position |
Do not force a casualty into a position that worsens pain or breathing.
Recovery Position
The recovery position is used for an unconscious casualty who is breathing normally and has no immediate need for CPR. It helps keep the airway open and allows fluids to drain from the mouth.
St John Ambulance advises calling emergency help and monitoring the casualty’s level of response while they are in the recovery position.
If spinal injury is suspected, avoid unnecessary movement, but airway takes priority. If the airway cannot be maintained, the casualty may need to be carefully placed in the recovery position with help.
Emergency Communication Procedures
Good communication can save time and prevent confusion. During an emergency, a first aider should speak clearly, give direct instructions, and share accurate information.
Emergency communication includes:
- Calling emergency services.
- Giving instructions to bystanders.
- Reassuring the casualty.
- Reporting to supervisors or workplace emergency team.
- Recording incident details.
- Handing over to medical responders.
Do not assume someone else has called for help unless you confirm it.
How to Call Emergency Services
When calling emergency services:
- Stay calm.
- State the emergency.
- Give the exact location.
- Give the number of casualties.
- Describe what happened.
- Explain the casualty’s condition.
- Say what first aid is being given.
- Mention dangers at the scene.
- Follow the call handler’s instructions.
- Do not hang up until told to do so.
British Red Cross emergency calling guidance advises calling emergency services and answering the call handler’s questions as accurately as possible.
Information to Give During an Emergency Call
Be ready to provide:
- Your name and phone number.
- Exact location and landmarks.
- What happened.
- Number of casualties.
- Age and sex of casualty if known.
- Conscious or unconscious.
- Breathing status.
- Severe bleeding or major injury.
- First aid already given.
- Hazards such as fire, traffic, electricity, chemicals, or violence.
- Best access route for responders.
Send someone to meet emergency responders if possible.
Giving Instructions to Bystanders
During emergencies, bystanders may want to help but may not know what to do.
Give clear, direct instructions:
- “You in the blue shirt, call emergency services now.”
- “Please bring the first aid kit.”
- “Move people back and give us space.”
- “Guide the ambulance to this location.”
- “Bring gloves if available.”
- “Help me support this injured arm.”
- “Write down the time.”
Pointing to a specific person is better than shouting generally.
Reassuring the Casualty
A calm first aider helps reduce fear.
Use simple words:
- “My name is ____. I am trained in first aid.”
- “I am going to help you.”
- “Try to stay still.”
- “Help is on the way.”
- “Keep breathing slowly.”
- “Tell me if the pain changes.”
- “You are not alone.”
Do not make false promises such as “You will be fine.” Instead, reassure them that help is being arranged.
Handover to Medical Responders
When responders arrive, give a clear handover.
Use this structure:
| Information | Example |
|---|---|
| What happened | “He fell from a ladder.” |
| Time | “It happened about 10 minutes ago.” |
| Condition | “He is conscious and breathing.” |
| Injuries | “Pain and swelling in the left ankle.” |
| First aid given | “We supported the leg and applied a cold pack.” |
| Changes | “He became dizzy after standing.” |
| Medical history | “He says he has diabetes.” |
| Allergies / medication | “No known allergies, according to him.” |
A good handover helps responders continue care quickly and safely.
Incident Reporting
In workplace first aid, incidents should be reported according to the organisation’s procedure.
A report may include:
- Date and time.
- Location.
- Name of casualty.
- What happened.
- Injury or illness.
- First aid given.
- Who gave first aid.
- Whether emergency services were called.
- Witnesses.
- Equipment used.
- Handover details.
- Recommendations to prevent recurrence.
Documentation should be factual, clear, and confidential.
Practical Skills to Demonstrate
Learners should practise:
- Applying a sterile dressing.
- Applying direct pressure to a wound.
- Securing a dressing with a roller bandage.
- Applying a triangular bandage sling.
- Applying an elevation sling.
- Applying a figure-of-eight bandage.
- Supporting a suspected fracture.
- Applying a simple splint.
- Checking circulation after bandaging.
- Assisting a walking casualty.
- Demonstrating safe casualty movement principles.
- Making a simulated emergency call.
- Giving clear handover to responders.
- Completing a simple incident report.
Practice should be done under supervision using training materials and simulated casualties.
Practical Skill Checklist
| Skill | Competent |
|---|---|
| Checks scene safety | |
| Uses gloves or barrier protection | |
| Applies dressing correctly | |
| Applies direct pressure correctly | |
| Secures dressing without cutting circulation | |
| Applies roller bandage correctly | |
| Applies triangular bandage sling correctly | |
| Checks circulation after bandaging | |
| Supports suspected fracture safely | |
| Applies splint without forcing movement | |
| Handles casualty gently | |
| Avoids unnecessary movement | |
| Gives clear emergency instructions | |
| Makes accurate emergency call | |
| Gives clear handover | |
| Completes basic incident report |
Common Practical Skills Mistakes
Avoid these mistakes:
- Touching blood without protection.
- Applying bandages too tightly.
- Forgetting to check circulation.
- Tying knots over wounds or injuries.
- Removing dressings soaked with blood instead of adding more.
- Removing embedded objects.
- Trying to straighten a suspected fracture.
- Moving a casualty unnecessarily.
- Lifting beyond your ability.
- Not supporting the head and neck when needed.
- Giving vague instructions to bystanders.
- Forgetting to call emergency services.
- Giving incomplete handover.
- Failing to document workplace incidents.
What a First Aider Should Never Do
A first aider should never:
- Put themselves in danger.
- Move a seriously injured casualty unless necessary.
- Force an injured limb into a straight position.
- Apply a bandage so tightly that circulation is blocked.
- Remove an embedded object from a wound.
- Use dirty materials if clean materials are available.
- Lift a casualty alone when help is needed.
- Transport a seriously injured casualty in a private vehicle when emergency care is required.
- Leave a casualty unattended after serious injury.
- Give unclear or false information to emergency responders.
- Hide incident details in workplace reporting.
Real-Life Scenario
A worker cuts his forearm deeply on a sharp metal edge. Blood is flowing heavily from the wound. A first aider checks that the area is safe, puts on gloves, and asks a bystander to call emergency services. The first aider places a sterile dressing over the wound and applies firm direct pressure. When the bleeding reduces, the dressing is secured with a roller bandage.
The first aider checks the fingers for warmth, colour, movement, and sensation to ensure the bandage is not too tight. The casualty is helped to sit down and is reassured. Another person guides emergency responders to the location.
When help arrives, the first aider explains what happened, when it happened, how long bleeding continued, what first aid was given, and whether the casualty’s condition changed.
The key lesson is simple: protect yourself, control bleeding, secure the dressing, check circulation, call for help, and hand over clearly.
Quick Recap
Practical first aid skills help a first aider protect wounds, control bleeding, support injuries, move casualties safely, and communicate during emergencies. Bandages are used to hold dressings, apply pressure, and support injured parts. Dressings protect wounds and help control bleeding. Splints reduce movement and pain when fractures or serious joint injuries are suspected. Casualties should not be moved unless necessary for safety, airway, CPR, or transport. If movement is required, it should be planned, gentle, and safe. Emergency communication must be clear, direct, and accurate. A good first aider uses PPE, avoids unnecessary movement, checks circulation after bandaging, gives clear instructions, and provides a proper handover to medical responders.