
Welding Equipment and Tools
Welding Equipment and Tools
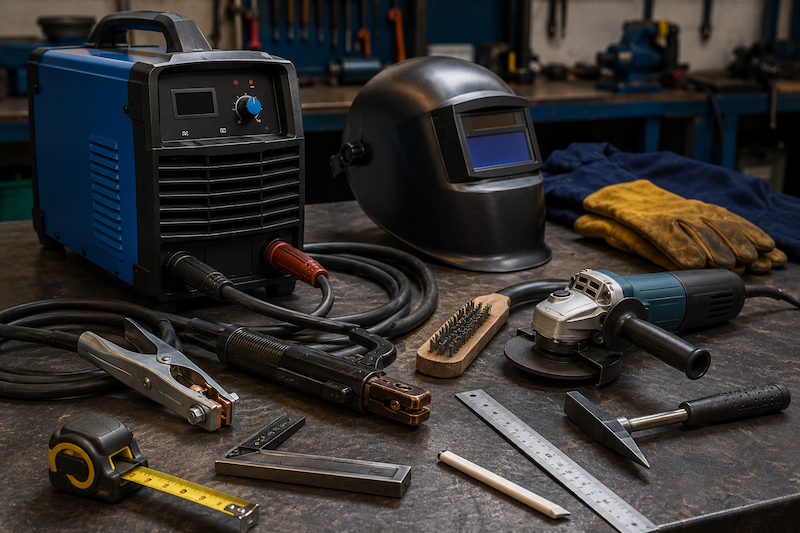
Welding equipment and tools are the basic items a welder uses to prepare metal, set up the welding circuit, strike an arc, produce a weld, clean the weld, measure workpieces, and finish the job properly.
A good welder must know the names, functions, correct handling, and safety checks of each tool. Poor equipment setup can cause electric shock, poor arc performance, weak welds, burns, fire, and damage to the welding machine.
This module covers arc welding machine components, welding cables, electrode holders, earth clamps, accessories, chipping hammer, wire brush, angle grinder, and measuring tools.
Why Equipment Knowledge Is Important
Knowing welding equipment helps trainees to:
- Set up the welding machine correctly.
- Identify machine controls and settings.
- Connect welding cables safely.
- Select the right accessories for the job.
- Recognise damaged tools before use.
- Prevent electric shock and fire hazards.
- Improve weld quality.
- Work faster and more professionally.
- Maintain tools properly.
- Report faults before accidents happen.
A welder who does not understand the equipment may struggle to produce consistent welds.
Basic Arc Welding Setup
A basic manual arc welding setup includes:
| Item | Function |
|---|---|
| Welding machine | Supplies welding current |
| Electrode holder | Holds the electrode and carries current |
| Welding electrode | Melts to form weld metal and shielding slag |
| Earth clamp | Connects the workpiece to the welding circuit |
| Welding cables | Carry current between the machine, holder, and workpiece |
| Workpiece | Metal being welded |
| PPE | Protects the welder from heat, arc rays, sparks, and electric shock |
| Cleaning tools | Remove slag, rust, paint, and dirt |
| Measuring tools | Help achieve accurate size, alignment, and layout |
These items must work together correctly for safe and effective welding.
Arc Welding Machine
The arc welding machine is the main power source. It converts electrical supply into welding current suitable for creating and maintaining an arc.
The welding machine controls the amount of current delivered to the electrode. The current setting affects arc heat, penetration, bead size, spatter, and electrode performance.
Common welding machine types include:
- Transformer welding machine.
- Rectifier welding machine.
- Inverter welding machine.
- Engine-driven welding generator.
For training and workshop use, inverter welding machines are common because they are portable, energy-efficient, and easier to control.
Main Parts of an Arc Welding Machine
Common parts include:
| Part | Function |
|---|---|
| Power switch | Turns the machine on and off |
| Current control knob | Adjusts welding amperage |
| Display panel | Shows current setting or machine status |
| Positive terminal | Connection point for one welding cable |
| Negative terminal | Connection point for the other welding cable |
| Cooling fan | Helps prevent overheating |
| Ventilation openings | Allow air flow through the machine |
| Input power cable | Connects the machine to electrical supply |
| Warning lights | Indicate overheating, fault, or power condition |
| Carrying handle | Helps move portable machines safely |
Trainees should not open the machine casing unless they are trained and authorised.
Welding Machine Ratings
Every welding machine has a rating plate or label. This gives important information about safe machine use.
Common rating information includes:
- Input voltage.
- Output current range.
- Duty cycle.
- Phase requirement.
- Frequency.
- Protection class.
- Machine model.
- Manufacturer details.
- Recommended cable size or protection rating.
Understanding the rating plate helps prevent misuse.
Duty Cycle
Duty cycle tells how long a welding machine can operate within a 10-minute period without overheating.
For example:
- A 60% duty cycle at 200 amps means the machine can weld for 6 minutes and should rest for 4 minutes at that current.
- A 100% duty cycle means the machine can weld continuously at the stated current.
If a machine overheats, it may shut down or become damaged. Do not block the fan or ventilation openings.
AC and DC Welding Machines
Some welding machines provide AC, some provide DC, and some can provide both.
| Current Type | Meaning | General Use |
|---|---|---|
| AC | Alternating current | Some general welding applications |
| DC | Direct current | Smooth arc, common for many electrodes |
| DCEN | Direct current electrode negative | Electrode connected to negative terminal |
| DCEP | Direct current electrode positive | Electrode connected to positive terminal |
Electrode manufacturers often specify whether an electrode should be used with AC, DCEN, or DCEP. Using the wrong current type or polarity can affect arc stability and weld quality.
Welding Machine Safety Checks
Before using a welding machine, check:
- Machine is dry and clean.
- Power cable is not damaged.
- Terminals are not loose or burnt.
- Fan and ventilation openings are clear.
- Machine is placed on a stable surface.
- Current control is working.
- Cables are connected tightly.
- No unusual smell, smoke, or noise.
- Machine is not exposed to water.
- Correct power supply is available.
Do not use a machine that sparks, smokes, shocks, overheats unusually, or has damaged cables.
Welding Cables
Welding cables carry high current from the machine to the electrode holder and from the workpiece back to the machine through the earth clamp.
There are usually two main welding cables:
| Cable | Function |
|---|---|
| Electrode cable | Connects welding machine to electrode holder |
| Return / earth cable | Connects welding machine to earth clamp and workpiece |
Welding cables must be flexible, well-insulated, and suitable for the current being used.
Welding Cable Safety
Poor cable condition can cause electric shock, overheating, unstable arc, or fire.
Cable safety rules:
- Inspect cables before use.
- Do not use cables with exposed copper.
- Do not use burnt, cracked, or badly taped cables.
- Keep cables away from water.
- Keep cables away from hot metal and sparks.
- Do not pull the welding machine by the cables.
- Do not wrap live cables around your body.
- Route cables away from walkways where possible.
- Avoid sharp bends and sharp metal edges.
- Report damaged cables immediately.
Good cable condition is both a safety and quality requirement.
Cable Size and Current Capacity
Welding cables must be large enough to carry the welding current safely. If a cable is too small for the current, it may overheat and cause voltage drop.
A poor cable can cause:
- Weak arc.
- Unstable welding.
- Excessive heat in the cable.
- Poor penetration.
- Equipment damage.
- Increased fire risk.
The trainer or qualified technician should select the correct cable size for the machine and welding current.
Cable Connections
Cable connections must be tight and clean.
Poor connections can cause:
- Sparking.
- Heating.
- Voltage loss.
- Arc instability.
- Damage to terminals.
- Burn marks.
- Poor weld quality.
Before welding, ensure all cable plugs and terminal connections are secure. Loose connections should be corrected before work begins.
Electrode Holder
The electrode holder, sometimes called the stinger, holds the welding electrode and transfers current from the cable to the electrode.
A good electrode holder should:
- Grip the electrode firmly.
- Be well insulated.
- Allow different electrode angles.
- Be comfortable to hold.
- Have strong jaws.
- Be rated for the welding current.
- Not overheat during normal use.
The electrode holder is one of the most handled tools in manual arc welding.
Electrode Holder Safety
Safety rules include:
- Do not use a holder with cracked insulation.
- Do not touch the metal jaws while welding.
- Do not place the electrode holder under your arm.
- Do not leave the holder on the workbench with a live electrode attached.
- Remove electrode stubs safely.
- Do not dip the holder in water to cool it.
- Keep the holder dry.
- Switch off the machine before changing major connections.
- Do not use an overheated holder.
A damaged electrode holder can expose the welder to electric shock and burns.
Holding the Electrode
The electrode should be clamped firmly in the holder. Many holders allow the electrode to be held at different angles.
Common electrode holding angles include:
- Straight out.
- 45 degrees.
- 90 degrees.
- Angled for tight spaces.
The selected angle should allow the welder to maintain good control, visibility, and correct welding position.
Earth Clamp
The earth clamp, also called the work clamp or return clamp, completes the welding circuit by connecting the workpiece back to the welding machine.
A good earth clamp is important for:
- Stable arc.
- Good current flow.
- Reduced overheating.
- Better weld quality.
- Electrical safety.
The earth clamp must be attached to clean metal close to the welding area where possible.
Earth Clamp Connection
For a good earth connection:
- Choose clean, bare metal.
- Remove rust, paint, oil, or scale where the clamp will grip.
- Attach the clamp firmly.
- Keep the clamp away from the weld path.
- Avoid clamping on loose materials.
- Check that the clamp does not become hot during welding.
- Reposition the clamp if arc becomes unstable.
Poor earthing is a common cause of difficult arc striking and poor weld quality.
Earth Clamp Problems
Common problems include:
- Weak spring grip.
- Rusty contact surface.
- Burnt clamp jaws.
- Loose cable connection.
- Broken insulation.
- Clamp attached to painted metal.
- Clamp too far from welding area.
- Clamp attached to unstable workpiece.
A poor earth clamp connection can make a good welder produce a bad weld.
Welding Accessories
Welding accessories are additional items that support safe and efficient welding.
Common accessories include:
- Electrode oven or storage container.
- Welding table.
- Welding screen.
- Clamps.
- Magnetic square.
- Welding pliers.
- Tongs.
- C-clamp or G-clamp.
- Bench vice.
- Soapstone or marker.
- Files.
- Steel ruler.
- Try square.
- Tape measure.
- Slag tray.
- Welding curtains.
- Extension leads where properly rated.
Accessories help improve setup, accuracy, safety, and productivity.
Welding Table
A welding table provides a stable surface for welding and fabrication.
A good welding table should be:
- Strong.
- Stable.
- Heat-resistant.
- Properly earthed where required.
- Clean.
- Free from oil and flammable materials.
- Suitable for clamping workpieces.
- At a comfortable working height.
Do not weld on unstable surfaces.
Welding Screen and Curtains
Welding screens protect other people from arc rays, sparks, and spatter.
Use welding screens when:
- Welding in shared workshops.
- Other trainees are nearby.
- Visitors or workers may pass close to the welding area.
- Welding outside a designated booth.
Welding screens help prevent arc eye in people who are not directly welding.
Clamps and Holding Tools
Clamps hold workpieces in position before and during welding.
Common clamps include:
- G-clamp.
- C-clamp.
- Locking pliers.
- Magnetic square.
- Bench vice.
- Bar clamp.
Clamps help with fit-up, alignment, tack welding, and preventing movement due to heat distortion.
Chipping Hammer
A chipping hammer is used to remove slag from a completed weld, especially in shielded metal arc welding. Slag is the protective layer formed by the melted flux coating of the electrode.
The chipping hammer usually has:
- A pointed end for breaking slag.
- A chisel end for scraping slag.
- A handle for grip.
Slag removal is important before inspection, grinding, or depositing another weld pass.
Chipping Hammer Safety
When using a chipping hammer:
- Wear safety goggles or a face shield.
- Wait for the weld to cool enough.
- Chip away from your body.
- Do not chip toward other people.
- Hold the hammer firmly.
- Keep bystanders away.
- Remove slag carefully.
- Do not use a damaged hammer.
- Check that the hammer head is secure.
Flying slag can cause eye injury. Eye protection is compulsory.
Wire Brush
A wire brush is used to clean metal surfaces and welds.
It removes:
- Slag particles.
- Rust.
- Dirt.
- Scale.
- Loose paint.
- Light spatter.
- Dust.
Wire brushing helps prepare the surface before welding and clean the weld after chipping.
Types of Wire Brushes
Common wire brushes include:
| Type | Use |
|---|---|
| Hand wire brush | Manual cleaning of welds and surfaces |
| Cup brush | Used with grinder for larger surfaces |
| Wheel brush | Used with grinder or bench tool |
| Stainless steel brush | Used for stainless steel to avoid contamination |
Do not use the same brush for different metals when contamination is a concern, especially stainless steel or aluminium work.
Wire Brush Safety
Safety rules:
- Wear goggles.
- Wear gloves.
- Brush away from your body.
- Do not use a brush with loose wires.
- Keep fingers away from sharp wires.
- Use the correct brush for the metal.
- Do not apply excessive pressure with power brushes.
- Allow grinder-mounted brushes to stop fully before setting down.
Small wires can break off and injure the eyes or skin.
Angle Grinder
An angle grinder is a power tool used for cutting, grinding, cleaning, beveling, and finishing metal.
It can be used to:
- Cut metal.
- Remove sharp edges.
- Grind welds.
- Clean surfaces.
- Prepare bevels.
- Remove rust or paint.
- Remove excess weld metal.
The angle grinder is very useful, but it is also one of the most dangerous tools in the welding workshop if misused.
Main Parts of an Angle Grinder
Common parts include:
| Part | Function |
|---|---|
| Body | Houses motor and controls |
| Power switch | Turns grinder on and off |
| Handle | Helps control the tool |
| Guard | Protects user from sparks and disc fragments |
| Spindle | Holds the disc |
| Lock nut | Secures the disc |
| Grinding disc | Removes material |
| Cutting disc | Cuts metal |
| Cable or battery | Supplies power |
| Ventilation slots | Cool the motor |
Never remove the grinder guard for convenience.
Types of Grinder Discs
Common discs include:
| Disc Type | Use |
|---|---|
| Cutting disc | Cutting metal |
| Grinding disc | Grinding welds and edges |
| Flap disc | Smoother grinding and finishing |
| Wire cup brush | Cleaning rust, paint, and slag |
| Diamond disc | Cutting masonry or special materials, not general steel unless specified |
Use each disc only for its intended purpose. A cutting disc should not be used for side grinding because it can break.
Angle Grinder Safety
Before using an angle grinder:
- Wear goggles or face shield.
- Wear gloves.
- Wear hearing protection where needed.
- Check the disc is correct for the job.
- Check the disc is not cracked or damaged.
- Ensure the guard is fitted.
- Ensure the handle is fitted.
- Keep sparks away from people and flammable materials.
- Hold the grinder firmly with both hands.
- Stand in a stable position.
- Let the disc reach full speed before contact.
- Do not force the grinder.
- Allow the disc to stop before putting it down.
Do not use a grinder without training and supervision.
Common Angle Grinder Mistakes
Avoid these mistakes:
- Removing the guard.
- Using a cracked disc.
- Using the wrong disc.
- Side-grinding with a cutting disc.
- Grinding toward people.
- Wearing loose clothing.
- Using one hand when two hands are needed.
- Dropping the grinder while the disc is rotating.
- Putting the grinder down before it stops.
- Using the grinder near flammable materials.
- Using excessive pressure.
- Cutting without supporting the workpiece.
Many grinder accidents are caused by rushing or poor control.
Measuring Tools
Measuring tools help welders mark, cut, fit, and assemble metal accurately. Accurate measurement is important because welding cannot correct poor layout.
Common measuring tools include:
- Tape measure.
- Steel rule.
- Try square.
- Combination square.
- Vernier caliper.
- Spirit level.
- Divider.
- Scriber.
- Soapstone or chalk.
- Marker.
- Protractor.
- Measuring gauge.
- Welding gauge.
Good measurement leads to better fit-up and better final work.
Tape Measure
A tape measure is used for measuring length, width, height, and spacing.
Good practice:
- Hook the tape properly.
- Keep the tape straight.
- Read the measurement at eye level.
- Do not bend the tape sharply.
- Return the tape slowly.
- Check units before marking.
- Measure twice before cutting.
A small measuring error can make the final job inaccurate.
Steel Rule
A steel rule is used for short, accurate measurements and straight marking.
Use it for:
- Small metal pieces.
- Checking dimensions.
- Marking straight lines.
- Confirming spacing.
- Measuring weld bead width where suitable.
Keep the steel rule clean and avoid using it as a scraper or lever.
Try Square
A try square checks whether two surfaces are at 90 degrees.
It is used for:
- Marking right angles.
- Checking frame corners.
- Checking cut edges.
- Aligning plates.
- Setting up tee joints and corner joints.
A frame that is not square may look poor and may not fit its purpose.
Spirit Level
A spirit level checks whether a surface is level or vertical.
It is useful for:
- Frames.
- Stands.
- Gates.
- Railings.
- Structural alignment.
- Installation work.
Do not use a damaged or bent level for accurate work.
Scriber, Chalk and Soapstone
A scriber, chalk, marker, or soapstone is used to mark lines on metal.
| Tool | Use |
|---|---|
| Scriber | Fine permanent line on metal |
| Soapstone | Visible marks that resist heat better |
| Chalk | Temporary marking |
| Marker | General workshop marking |
Marking should be clear, accurate, and easy to follow during cutting or fitting.
Clamps, Squares and Alignment Tools
Before welding, metal pieces must be held in the correct position. Heat can cause movement and distortion, so proper clamping is important.
Useful alignment tools include:
- Magnetic square.
- Try square.
- G-clamp.
- Bench vice.
- Straight edge.
- Spirit level.
- Tack welds.
Good fit-up reduces gaps, distortion, and poor weld appearance.
Welding Tools for Cleaning and Finishing
After welding, the weld may need cleaning and finishing.
Tools include:
- Chipping hammer.
- Wire brush.
- Angle grinder.
- File.
- Scraper.
- Flap disc.
- Grinding disc.
Cleaning is important for inspection and for multi-pass welding. Slag must be removed before another weld pass is deposited.
Tool Inspection Before Use
Before using any welding tool, inspect it.
Check:
- Is the tool clean?
- Is it damaged?
- Is it the correct tool for the job?
- Are handles secure?
- Are electrical cables safe?
- Are grinder discs correct and undamaged?
- Are clamps working?
- Are measuring tools readable?
- Is PPE available for the tool being used?
Do not use damaged tools. Report them.
Proper Tool Handling
Good tool handling prevents accidents and tool damage.
Rules:
- Use tools only for their correct purpose.
- Do not throw tools.
- Do not leave tools on the floor.
- Do not leave sharp tools where people can step on them.
- Carry tools safely.
- Do not use measuring tools as hammers.
- Do not use grinders without guards.
- Keep tools dry.
- Clean tools after use.
- Return tools to storage.
A professional welder respects tools.
Tool Storage
After work:
- Switch off welding machine.
- Coil cables neatly.
- Store electrode holder safely.
- Store earth clamp properly.
- Return chipping hammer and wire brush.
- Store grinder in a dry safe place.
- Remove and store discs properly where required.
- Keep measuring tools clean.
- Store electrodes in a dry place.
- Clear the workbench.
- Dispose of electrode stubs and metal waste correctly.
Good storage extends tool life and keeps the workshop safe.
Basic Equipment Setup Procedure
A safe setup procedure should include:
- Wear PPE.
- Check the welding area.
- Remove flammable materials.
- Place machine in a dry, stable position.
- Inspect machine, cables, holder, and clamp.
- Connect cables correctly.
- Attach earth clamp to clean metal.
- Select correct electrode.
- Set current with trainer guidance.
- Arrange cables safely.
- Position the workpiece securely.
- Confirm ventilation is adequate.
- Start welding only when authorised.
This procedure should become a habit.
Troubleshooting Basic Equipment Problems
| Problem | Possible Cause | Basic Action |
|---|---|---|
| Electrode keeps sticking | Low current, poor technique, damp electrode | Check current, technique, electrode condition |
| Arc is unstable | Poor earth, loose cable, dirty metal | Clean metal, tighten connections |
| Cable gets hot | Loose connection, undersized cable, excessive current | Stop and report |
| Holder gets too hot | Poor holder, high current, loose contact | Stop and inspect |
| Machine shuts down | Overheating, duty cycle exceeded, blocked fan | Allow cooling, check ventilation |
| Excessive spatter | Wrong current, long arc, wrong electrode | Adjust setting and technique |
| No arc | Poor connection, machine off, broken cable | Check setup safely |
| Electric tingling | Wet gloves, damaged cable, poor insulation | Stop immediately and report |
Trainees should not repair electrical faults unless trained and authorised.
Equipment Care and Maintenance Awareness
Basic care includes:
- Keep machine dry and clean.
- Do not block ventilation.
- Do not overload the machine.
- Coil cables properly.
- Keep holders and clamps clean.
- Replace damaged insulation.
- Store tools properly.
- Keep grinder discs dry and protected.
- Keep measuring tools accurate.
- Store electrodes correctly.
- Report faults early.
Maintenance prevents breakdown and accidents.
Common Equipment and Tool Mistakes
Avoid these mistakes:
- Using damaged cables.
- Connecting the earth clamp to painted or rusty metal.
- Leaving the electrode holder live on the table.
- Pulling the machine by the cable.
- Blocking machine ventilation.
- Using the wrong grinder disc.
- Removing grinder guard.
- Chipping slag without goggles.
- Measuring carelessly.
- Cutting before confirming measurement.
- Leaving tools on the floor.
- Using oily or wet tools.
- Failing to report faults.
What a Welding Trainee Should Never Do
A welding trainee should never:
- Use equipment without permission.
- Open a welding machine casing.
- Use exposed or damaged cables.
- Hold the bare metal part of the electrode holder while welding.
- Use a broken earth clamp.
- Weld with poor earth connection.
- Use a grinder without a guard.
- Use cracked cutting or grinding discs.
- Chip slag without eye protection.
- Touch hot metal with bare hands.
- Use measuring tools as hammers.
- Leave tools where others can trip.
- Hide damaged equipment.
Real-Life Scenario
A trainee prepares to practise straight welding beads. He connects the welding cables and tries to strike an arc, but the electrode keeps sticking and the arc is unstable. Instead of increasing the current immediately, the trainer asks him to check the earth clamp.
The trainee discovers that the earth clamp is attached to a painted section of the metal table. He removes the clamp, cleans a bare metal area, and attaches it firmly. The arc becomes more stable.
After welding, the trainee chips the slag while wearing goggles, brushes the weld clean, switches off the machine, coils the cables, and returns the tools.
The key lesson is that good welding depends on good equipment setup. A simple poor earth connection can make welding difficult and unsafe.
Practical Training Activities for This Module
Trainees should practise:
- Identifying parts of a welding machine.
- Identifying electrode holder and earth clamp.
- Inspecting welding cables for damage.
- Connecting welding cables under supervision.
- Attaching the earth clamp to clean metal.
- Setting up a safe welding station.
- Identifying chipping hammer and wire brush.
- Demonstrating safe slag removal.
- Identifying angle grinder parts.
- Selecting correct grinder disc for a task.
- Measuring and marking a metal plate.
- Using a try square for 90-degree alignment.
- Cleaning and storing tools after use.
Practical Skill Checklist
| Skill | Competent |
|---|---|
| Identifies welding machine components | |
| Explains function of welding machine | |
| Identifies electrode holder | |
| Identifies earth clamp | |
| Inspects cables for damage | |
| Connects cables correctly under supervision | |
| Attaches earth clamp to clean metal | |
| Explains duty cycle basics | |
| Uses chipping hammer safely | |
| Uses wire brush correctly | |
| Identifies angle grinder parts | |
| Explains grinder safety rules | |
| Uses measuring tape correctly | |
| Uses try square correctly | |
| Stores tools properly after work | |
| Reports damaged equipment |
Quick Recap
Welding equipment and tools are essential for safe and quality welding. The welding machine supplies current, the electrode holder carries current to the electrode, the earth clamp completes the circuit, and welding cables carry current between the components. Accessories such as clamps, welding screens, tables, chipping hammers, wire brushes, grinders, and measuring tools support preparation, welding, cleaning, inspection, and finishing. Trainees must inspect tools before use, avoid damaged equipment, connect cables properly, attach the earth clamp to clean metal, use grinders safely, measure accurately, and store tools correctly after work. A professional welder understands that good welding begins with good equipment setup and safe tool handling.